A
D
B
E
F
C
4
3
1
2 2
5
5
5
5
7
1x
1
4x
2
1x
3
1x
4
4x
5
4x
6
4x
7
1x
8
9
1x
10
1x
11
1x
12
4x
Thank you for choosing an A.T.U product.
Please read these instructions carefully before using the product for the fi rst time and keep them
safely in the event of issues later on. It is important that the user proceed in accordance with
the operating instructions. All persons who work with this product need to be provided with the
operating instructions! All the facts mentioned previously apply in a resale!
We assume no liability for accidents or damage caused by non-observance of these instructions
and the safety information. Any structural modifi cation to the product excludes liability against the
manufacturer!
This product is intended for private use only!
Intended use
The tyre rack is designed for storing car rims with / without tyres. The maximum tyre width of
225 mm must not be exceeded. Any other use is not permitted. The loading capacity per support
plate is 25 kg. The total load must not exceed 100 kg. Make sure that the specifi ed nominal load/
tyre width is not exceeded because damage may occur and safety can no longer be guaranteed.
By using the tyre rack, the tyre load and possible damage to bearings, such as indentations, can be
reduced. The user is liable for damages resulting from improper use.
Safety Instructions
Do not tilt the tyre rack - risk of accident! Load the tyre rack from the bottom upwards!
Use the tyre rack only on fi rm, level ground! Soft or uneven ground can cause instability or slipping
of the load. Consequential damages can not be excluded - risk of accident!
Caution! This product is not a toy. It is essential to keep the protective cover away from children -
danger of suffocation!
Inspect the rim and tyre holders regularly for damages. Pay specifi c attention to the bolted con-
nections and whether they are tightly secured.
Attention: The tyre rack must not be used in the case of missing, loose or broken parts!
It is absolutely essential that the original condition of the tyre rack must be kept. No changes are
to be carried out to the product.
General operating instructions / assembly instructions
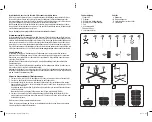
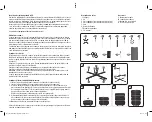
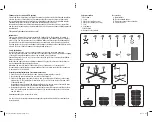
1. Push the four feet (5) into the base frame (1) and lock them with the screws (2).
2. Insert the pipe piece 4 (without the cap) into the base frame (1).
3. Push the locking pin (6) into the bottom bore hole of the pipe piece (4) and put on the round
plastic plate (7). The locking pin (6) must latch into the recess on the reverse (“bottom side”)
of the plastic plate (7).
Now push the complete wheel (rim with mounted tyre) onto the top centre of the plastic plate.
Repeat this procedure for the second wheel (rim with mounted tyre).
4. Now push the pipe piece 3 (with cover cap) into the opening of the pipe piece (4). When this is
done, you can then push the third and fourth wheel, as described under point 3, onto the rim
and tyre holders.
Dismounting takes place in the reverse order.
Use the enclosed coloured tyre markers and apply the tyre identifi cation before removing them
from the vehicle.
Parts description
1. Base frame
2. Screw
3. Pipe piece (with cover cap)
4. Pipe piece (without cover cap)
5. Foot
6. Locking pin
7. Plastic plate
8. Hexagon socket wrench
Accessories
9. Wheel marker
10. Tyre tread depth gauge
11. Air pressure gauge (non-calibrated)
12. Protective cover
85-17-29 004 MANUAL Felgenbaum_REP.indd 6
03.07.17 15:05

