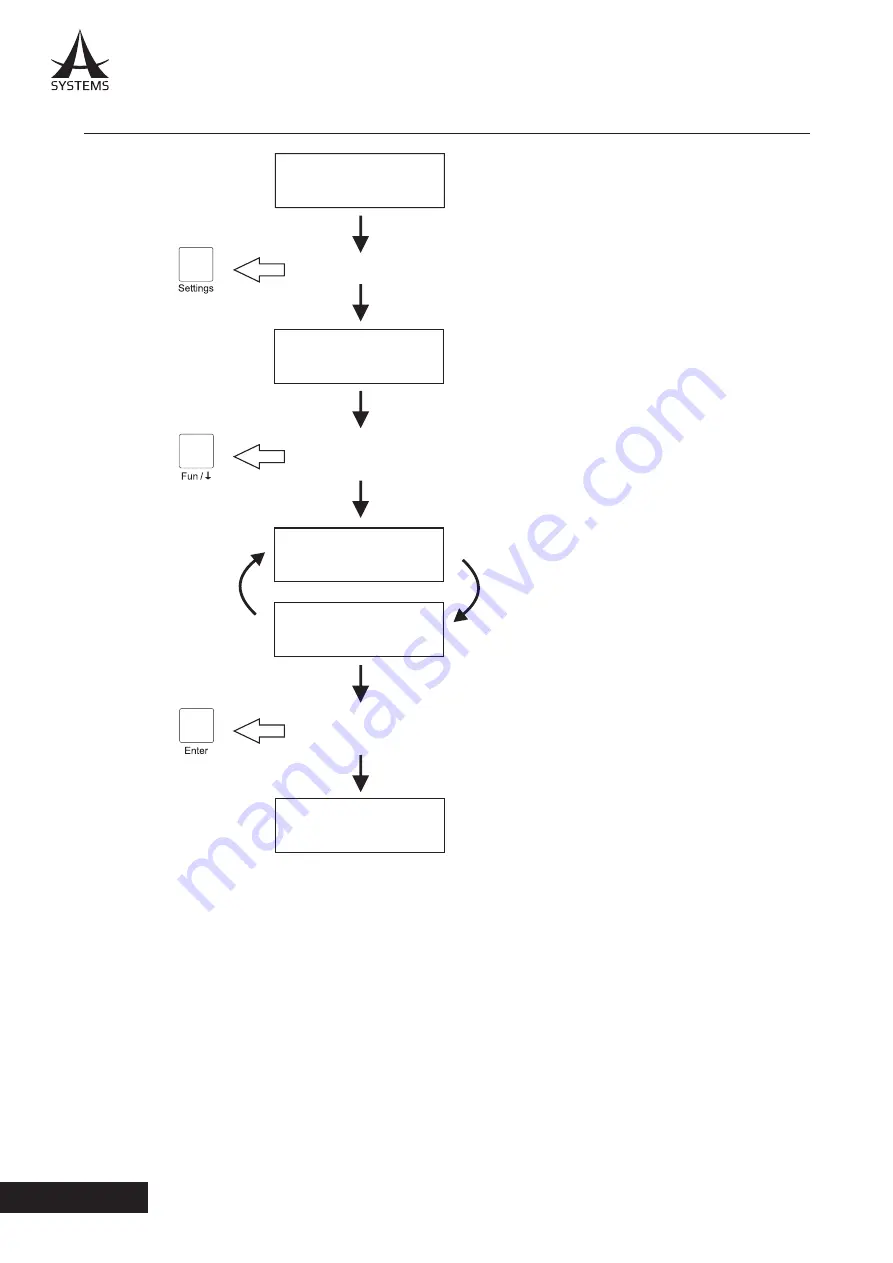
A SYSTEMS MS400HD User Manual Download Page 14

12

MS400HD

English

MUTE/UNMUTE BUZZER

Step 1: 

Press button ‘Settings’ 2 times

2XWSXW$%&'

,QSXW

Initial LCD status

%((3

21

You will see left indication

on LCD display

Step 2: 

Consecutively pressing button 

‘Fun ’, will cycle through ON/OFF options

/

ʆ

Step 3: 

Once the desired option is selected,

press ‘Enter’ button 

2XWSXW$%&'

,QSXW

Turn off buzzer

%((3

2))

Turn on buzzer

%((3

21

- 8 -

Summary of Contents for MS400HD

Page 1: ...User s Manual Matrix Switcher MS400HD...

Page 2: ...Diagram 5 System Setup 5 Operating Precautions 6 Front Rear Panel View 7 IR Remote 8 Selecting Sources and Outputs by Keypad 8 Save Preset Routing Status 10 Load Preset Routing Status 10 Change LED Ti...

Page 3: ...n the apparatus has been damaged in any way such as power supply cord or plug is damaged liquid has been spilled or objects have fallen into the apparatus has been exposed to rain or moisture does not...

Page 4: ...s and cables that often trouble the technicians MS400HD is also the best companion device that works well with Asystems extensive line of video switchers and PTZ cameras to provide the most streamline...

Page 5: ...eamlined workflow Front Panel Configuration Front panel LED source indicator Front panel LED display On board push buttons IR Remote sensor CHECK THE INCLUDED ITEMS Upon unboxing the product please ca...

Page 6: ...16 around the front vents to avoid obstructing ventilation In particular ensure sufficient space between ventilation and wiring when using mounted in a panel or table Do not install the unit in a mann...

Page 7: ...D Video Player HD DVD Player MS400HD Blu ray Video Player RJ45 LAN RJ45 COM RJ45 WLAN CAT to HDMI Converter Digital Mixer MS400HD HDMI Matrix Switcher HDMI HDMI HDMI Display 1 Display 2 Display 3 Sour...

Page 8: ...ity and dust will cause damage to the parts inside the unit Maintenance Wipe the product using a dry cloth to remove stubborn dirt dip a cloth into a diluted solution of kitchen detergent neutral wrin...

Page 9: ...ns double as up and down buttons 5 Output Status LEDs Indicates active displays 6 Input Status LEDs Indicates active input sources 7 IR Receiver Point the remote at this receiver when operating 8 Powe...

Page 10: ...all switch Press ALL then press in input block to select input source which you want to be displayed on all output Preset routing for scenes Press Save then press 1 2 3 4 in scene block save current r...

Page 11: ...or example 3 2XWSXW QSXW Finally the routing states of all outputs are changed to input 3 2XWSXW QSXW Initial routing status 1 to all switch Step 1 Press button Fun 2 times 0LUURU FRQQHFW You will see...

Page 12: ...ication on LCD display Step 2 Select numbers for example 1 then the preset routing 1 will be loaded and apply to current routing Step 1 Press button Scene 0 2 times 2XWSXW QSXW Initial LCD status 6DYH...

Page 13: ...er seconds of inactivity Below is how to change the settings WLPHRXW 1 9 5 You will see left indication on LCD display WLPHRXW 1 9 5 WLPHRXW 6 WLPHRXW 6 Step 2 Consecutively pressing button Fun will c...

Page 14: ...s 2XWSXW QSXW Initial LCD status 3 21 You will see left indication on LCD display Step 2 Consecutively pressing button Fun will cycle through ON OFF options Step 3 Once the desired option is selected...

Page 15: ...232 control Ethernet control 10 IR Remote Control Electro optical characteristics 25 Carrier frequency 38kHz 11 HDMI Connector Type A 19 pin female 12 RJ 45 Connector WE SS 8P8C with 2 LED indicators...

Page 16: ...www asystems sys com...

Reviews: