background image


Getting Started                                                                                                                                         

1.1 Understanding Hardware Features 
NOTE: Depending upon the specific model purchased, the color of your device 
exactly match the device shown in this manual. 
 
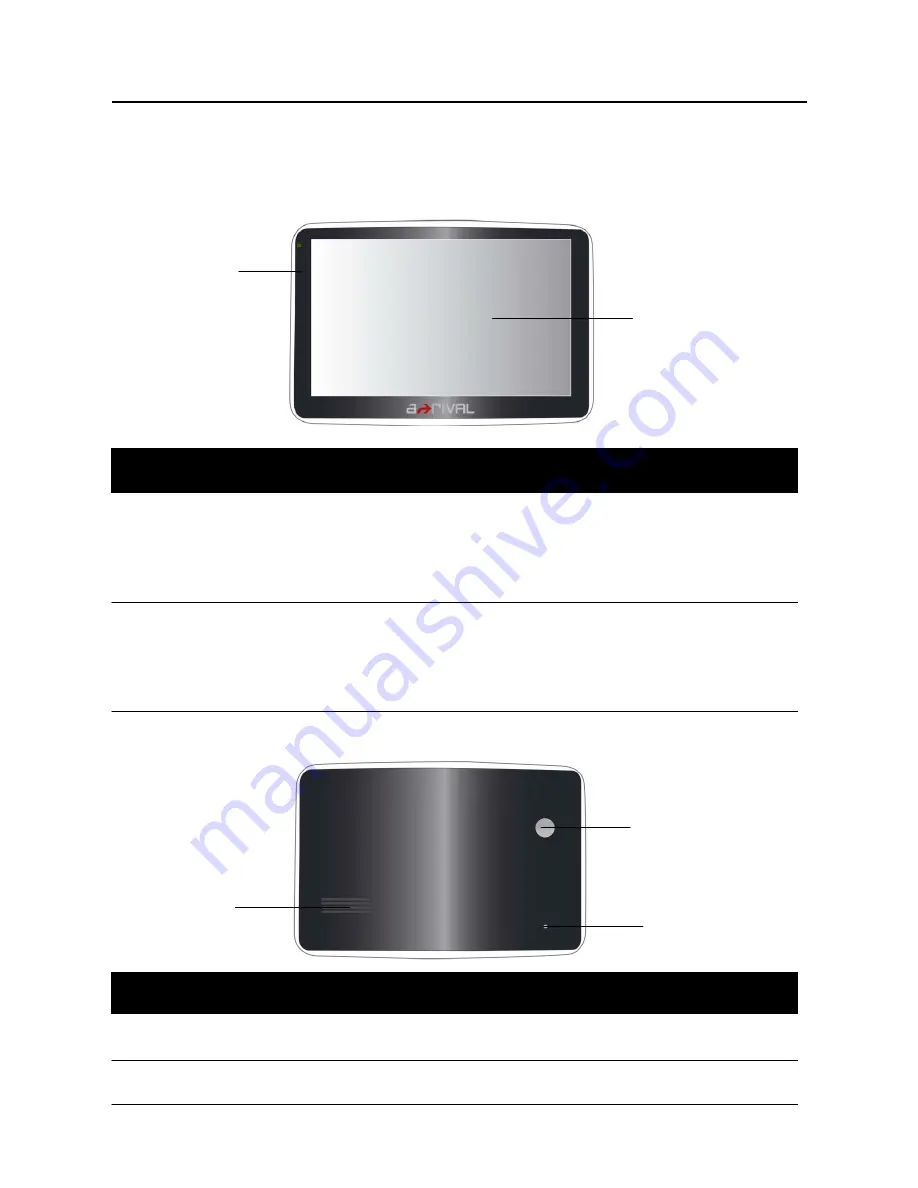
Front Components 


1            Touch  Screen              Displays  the  output  of  your  device.  Tap  the 

Screen  with  your  fingertip  to  select  menu 
commands or enter information. 


2          Charge Indicator        Glows bright amber to indicate that the battery is 

charging, and turns green when the battery is 
fully charged. 

 
Back Components 


1              Speaker                                Sends out music, sounds and voice. 
 
2              backlight window     

Ref        Component                                                Description   


Ref        Component                                                Description   


Summary of Contents for NAV-PNF 50 TMC

Page 1: ...tionsystem A good choice We hope you ll enjoy using your new an a rival Navigationsystem Just in case that you are facing any problems with your Device please call our support service hotline 0049 0 511 123 83 505 or send us an e mail to support a rival de For Updates and technical information please visit our website ww w a rival de ...

Page 2: ...ted States government which is solely responsible for the performance of GPS Any change to the GPS system can affect the accuracy of all GPS equipments GPS satellite signals cannot pass through solid materials except glass When you are inside a tunnel or building GPS positioning is not available A minimum of 4 GPS satellite signals is needed to determine current GPS position Signal reception can b...

Page 3: ...N cable 9 2 Operating Basics 10 2 1 Performing the Initial Start Up 10 2 2 Turning On and Off sleeping mode 10 2 3 Operating the Device 11 2 4 Main Menu 11 2 5 Inserting a microSD Card 12 3 Device Settings 13 3 1 Using Device Settings 13 3 2 Volume 13 3 3 Date time 14 3 3 1 Time zone 14 3 4 Backlight 14 3 5 Language 15 3 6 Calibrator 15 3 7 About 16 3 8 NAVI Path 17 3 9 Reset Setting 17 4 1 GPS Re...

Page 4: ...bleshooting 21 Screen freezes 22 GPS Problems 23 9 3 Maintaining Your Device 24 10 Regulatory Information 25 10 1 Regulations Statements 25 Canada 25 11 Safety 27 11 1 Safety Precautions 27 About the Battery 28 12 Main Elements 29 ...

Page 5: ...ouch Screen Displays the output of your device Tap the Screen with your fingertip to select menu commands or enter information 2 Charge Indicator Glows bright amber to indicate that the battery is charging and turns green when the battery is fully charged Back Components 1 Speaker Sends out music sounds and voice 2 backlight window Ref Component Description Ref Component Description 1 2 1 2 3 ...

Page 6: ...ch 2 3 pen Side Components 1 microSD Slot Accepts a microSD Secure Digital card for accessing data such as Music 2 Mini USB Connector Connects to the USB cable 3 Build in TMC connector Connects to TMC Antenna 4 AV IN connector Connects to AV IN cable Ref Component Description Ref Component Description 1 1 2 3 4 2 3 ...

Page 7: ... turn on your device after connecting the AC adapter to charge a power depleted battery If you need to turn on the device again wait for at least one minute Depending on your region of purchase the connector converter may not look exactly the same as the picture shown Your device can also be charged when it is connected to a desktop computer via the USB cable CAUTION For optimal performance of the...

Page 8: ... not to pinch the antenna cable Cars with an anti jam window design may automatically leave adequate space as needed The car holder consists of a bracket and a stand Use the car holder to fix your device in a vehicle Make sure that the GPS antenna has a clear view of the sky See the document supplied with the car holder for the installation instruction For initial positioning remain at the same sp...

Page 9: ...the car charger to the power connector of your device 2 Connect the other end to the cigarette lighter in the car to power and charge your device The indicator on the car charger lights in green to indicate that power is being supplied to your device 1 6 Using the AV IN cable see the picture connect one end of the AV IN cable to the AV IN connector of your device the other end of the AV IN cable c...

Page 10: ...creen appears 4 The Main Menu appears as shown below You can now use your device 5 Fully charge the battery before using your device for the first time 2 2 Turning On and Off sleeping mode 1 Use the ON OFF button to turn on and off your device 2 If want to turn off the device press the ON OFF button for several seconds Your device will appearing the menu of turning off press button the device is t...

Page 11: ...u can perform the following actions Tap Touch the screen once with your fingertip to open item or options Drag Hold your fingertip on the screen and drag up down left right or across the screen e g dragging the map Tap and hold Tap and hold your fingertip until an action is complete or a result or menu is shown 2 4 Main Menu The first time you initialize your device the Main Menu appears The Main ...

Page 12: ...th the connector pointing to the slot and its label facing the front of the device To remove a card first make sure that no application is accessing the card then slightly push the top edge of the card to release it and pull it out of the slot NOTE Make sure that no foreign objects enter the slot Keep a microSD card in a well protected box to avoid dust and humidity when you are not using it Ref B...

Page 13: ...volume date and time Once you change the settings your new settings will remain until you change them again 3 2 Volume 1 Tap button on the Device Settings menu The volume function menu appears as shown below 2 Tap the knob and to adjust the volume To decrease the volume tap the knob To increase the volume tap the knob 3 Tap the button to accomplish modification 4 Tap the button to quit modificatio...

Page 14: ... can accomplish easily to adjustment of hour minute and second 4 Tap the button to save the changes and go back to the previous menu 3 3 1 Time zone To set the time in your Time zone correctly tap the Time zone button on the bottom Your Time zone is pre set for Germany GMT 1 see picture below Confirm your setting by pressing the OK button You are returned to the prior menu now Winter Summer time s...

Page 15: ...ll become light if the environment beam is very dark the display screen of the device will become dark When the device is opening if you don t operate it for a while the device will become dark to enter into a saving electricity state 3 5 Language 1 Tap button on the Device Settings menu The Language Function menu appears as shown below 2 Tap the knob and to select language 3 After accomplishing t...

Page 16: ...et moves the Next position of left down 3 The target moves to five position Left up left down right up right down Center in order forming a period If nicetily tap and hold the target each time after a period the target is Disappear the device completes the calibration process and tap screen to back the Device Settings menu 3 7 About 1 Tap button on the Device Settings menu The About Function menu ...

Page 17: ... you want to run the map directly once re start the PND tap the button 5 After accomplishing tap the knob to back 3 9 Reset Setting 1 Tap button on the About Function menu to enter into Reset menu 2 Tap the button to restore to factory default setting or tap the button to quit modification 4 1 GPS Receiver NOTE This page is for information only You can view the number of satellite ...

Page 18: ...eceiver Function menu appears as shown below This page gives your current position in degrees longitude and latitude your current speed and the status of your position i e Fixed 3D or Fixed Invalid etc The compass circle shows the satellites that the unit is receiving and the bar chart below shows the strength of the signal from each of these satellites ...

Page 19: ...Viewing a document file 1 Tap the Documents button on the APPS function menu to enter the file lists menu All the document files will show on the lists menu 2 Tap one of the document files the system opens document menu and shows the selecting document 5 2 Documents Playback Control Exit Back the file lists menu Previous Next Play the previous or next file 6 UNITS CONVERT 6 1 Tap the UNITS CONVERT...

Page 20: ...7 CALCULATOR 7 1 Tap the CALCULATOR button on the APPS function menu to enter its menu 1 Tap the knob to input digital to complete calculator 2 Tap the button to quit 8 GAME 8 1 Tap three right button on the APPS function menu to enter their game menu ...

Page 21: ...clip into the reset button on the bottom of your device This is called a soft reset The Main Menu should appear after a soft reset If your device still does not respond after a soft reset you can use the following steps to perform a hard reset 1 Disconnect all cables including the AC adapter from your device 2 Press the ON OFF button to the OFF position 3 Wait for l minute and then press the butto...

Page 22: ...reen is hard to read Make sure that the backlight of the display is on Move to a location with more light Inaccurate response to taps Recalibrate the touch screen See section 3 4 for instructions Connection Problems Cable Connection Problems Make sure that your device and your computer are both turned on before trying to establish a connection Make sure that the cable is securely plugged into the ...

Page 23: ... signals available consider the following Make sure that the GPS antenna has a clear view of the sky Note that the GPS reception can be affected by Bad weather Dense overhead obstacles e g trees and tall buildings Other wireless device in the car Reflective car window tint ...

Page 24: ...before use Take care not to sit on the device We advise not to carry the device in one s back pocket for that reason The screen surface can easily be scratched Avoid touching it with sharp objects Non adhesive generic screen protectors designed specifically for use on portable devices with LCD panels may be used to help protect the screen from minor scratches Never clean your device with it powere...

Page 25: ... used in accordance with the instructions may cause harmful interference to radio communications However there is no guarantee that interference will not occur in a particular installation If this equipment does cause harmful interference to radio or television reception which can be determined by turning the equipment off and on the user is encouraged to try to correct the interference by one or ...

Page 26: ...C as amended by Directive 93 68 ECC issued by the Commission of the European Community Compliance with these directives implies conformity to the following European Standards EN301489 1 Electronic compatibility and Radio spectrum Matters ERM ElectroMagnetic Compatibility EMC standard for radio equipment and services Part 1 Common technical requirements EN301489 3 Electronic compatibility and Radio...

Page 27: ... Never touch the adapter when your hands or feet are wet Allow adequate ventilation around the adapter when using it to operate the device or charge the battery Do not cover the AC adapter with paper or other objects that will reduce cooling Do not use the AC adapter while it is inside a carrying case Connect the adapter to a proper power source The voltage requirements are found on the product ca...

Page 28: ...of fire or burns do not disassemble crush puncture or dispose of it in fire or water Important instructions for service personnel only Caution Risk of explosion if battery is replaced by an incorrect type Dispose of used batteries according to the instructions Replace only with the same or equivalent type recommended by the manufacturer The battery must be recycled or disposed of properly Use the ...

Page 29: ... Memory 64MB SDRAM Built in 256MB FLASH EPROM Display 5 0 inch color TFT touch screen 480x272 Weight 0 178kg Input Method Touch Expansion Slot microSD card Speaker Built in 1 0 W loud speaker Headphone 3 5mm Mini jack USB USB Client for Active Sync Battery Re chargeable Lithium ion Polymer battery 950mAH Dimension 135mmx85mmx12 5mm ...

Reviews: