background image

VZN V SERIES

9

P/N 1011079 Rev. J 01/14

INSTALLATION

Unpacking

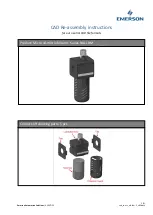
  1.  Open the large box. It should contain:

A. Plate-mounted VZN system with Ultra Filter 

Cartridge installed

B. Padded envelope containing:

•  Power Adaptor
•  Adaptor Plugs
•  Owner’s Manual
•  Mounting Bracket
•  Filter Wrench
•  Glove and Sticker Kit
•  Sanitizing T-Fitting and Plug

C. Carbon Element and Carbon Element Housing
D. TAC Cartridge and TAC Cartridge Housing  

(VZN-441V-T5 only)

  3.  Remove all packing materials and protective coverings 

from the system.

  4.  Remove the information packet. Fill out and mail the  

warranty card immediately to prevent any delay in 

obtaining warranty coverage. 

NOTE: If any parts are damaged, contact A.J. Antunes & 

Co. IMMEDIATELY at 1-800-253-2991 (toll free in the U.S. 

and Canada) or 1-630-784-1000.

Equipment Setup

GENERAL

When placing the system into service, pay attention to the  

following guidelines:
 

•  Do NOT immerse cord or plug in water.


•  Keep cord away from heated surfaces.

ELECTRICAL

The line voltage must match the voltage on the specification 

label. The plug on the power cord must match the appropriate 

outlet. Do NOT connect the system to a switched electrical 

outlet.

PLUMBING
NOTE: The system must be connected to the COLD water 

line. Do NOT connect the system to the hot water line. 

The VZN system uses the following connections:

System Inlet

3/4" NPT

System Outlet  

(Product Water)

3/4" NPT

Drain

3/4" FNPT

Rinse Outlet

3/4" (Garden Hose or 3/4" ID Hose)

When making a plumbing connection to the system, use a 

back-up wrench on the supporting plumbing. Always use a 

quality, approved pipe sealant or thread seal tape on pipe 

threads. Do NOT allow pipe sealant inside pipes.
Do NOT over tighten the connections. Use plastic fittings 

when connecting to the plastic connections of the system. 

If soldered plumbing is used, do NOT apply heat to, or near, 

the filtration system. Use union (O-ring seal) connections for 

ease of installation and future servicing.

SUGGESTED TOOLS AND SUPPLIES FOR INSTALLATION

The following tools and supplies are suggested to help with 

the installation:

• Screwdriver

• Adjustable Wrenches

• Drill with Bits

• Level

• Tape Measure

• Pipe Dope or Thread Seal Tape

• Two Gallon Bucket

• Fresh, Unscented Liquid Chlorine 

Bleach

• Pipe Wrenches

• Garden Hose (for rinsing)
• Hose or pipe for drain line

Summary of Contents for vizion VZN V Series

Page 1: ...VZN 441V http tiny cc ajaVZN441V System Tested and Certified by NSF International and WQA against NSF ANSI Standard 42 and 53 for the reduction of Standard No 42 Aesthetic Effects Nominal Particulate...

Page 2: ...Check Permeate Tank Air Pre Charge 18 Troubleshooting 19 Replacement Parts 20 Notes 23 Limited Warranty 24 General The VZN system is an innovative filtration system that uses proprietary multi bore ho...

Page 3: ...lumn and have it handy when calling for assistance The serial number is on the specification plate located on the system OWNER INFORMATION continued IMPORTANT A J Antunes and Company reserves the righ...

Page 4: ...ll electrical connections must be in accordance with local electrical codes and any other applicable codes WARNING ELECTRICAL SHOCK HAZARD FAILURE TO FOLLOW THESE INSTRUCTIONS COULD RESULT IN SERIOUS...

Page 5: ...ion in temperature The maximum operating temperature is 100 F 38 C Avoid abrupt variations in temperature Any temperature variation should be made slowly Protect from rough handling or dropping Mechan...

Page 6: ...00 240 10 08 50 60 VZN 441V T5 9700751 100 240 10 08 50 60 Electrical Cord Plug Configurations Kit Model Number Description Configuration 0012146 DC Power Supply 100 240 VAC Includes the 4 plug adapto...

Page 7: ...The concentration of the indicated substances in water entering the system was reduced to a concentration less than or equal to the permissible limit for water leaving the system as specified in NSF...

Page 8: ...ebris collecting on the membrane wall The Drain Valve is only powered during Flush Mode NOTE Do NOT unplug the power cord or turn off the sys tem during Flush Mode If there is a power outage or the sy...

Page 9: ...lug on the power cord must match the appropriate outlet Do NOT connect the system to a switched electrical outlet PLUMBING NOTE The system must be connected to the COLD water line Do NOT connect the s...

Page 10: ...ttom mount ing holes may be obscured Plan your mounting accordingly Follow these steps to secure the Mounting Bracket to the wall and seat the VZN system 1 Use a stud finder and level to attach the Mo...

Page 11: ...s flow rate is dependent on the inlet water pressure inlet pipe size and system The drain line leading out of the system must be as short as possible and slope downwards without any kinks or loops The...

Page 12: ...Inlet has a 3 4 NPT male thread at the Inlet Valve Figure 6 Do NOT overtighten fittings as this could cause the plastic ball valve to crack Use plastic fittings and a pipe thread sealant approved for...

Page 13: ...d wait for five minutes to flush out any remaining air 12 Close the Rinse Ball Valve and disconnect the garden hose 13 Press the FLUSH button to open the Drain Valve Repeat six times to ensure any rem...

Page 14: ...pen the Inlet Valve Allow the pipe to flush until all debris is removed Sanitizing the System and Lines The plumbing must be sanitized to eliminate possible contam ination that may have occurred durin...

Page 15: ...ght coating of lubricant to the inside cen ter tube at both ends of the new cartridge 10 Record the serial number of the new cartridge The cartridge serial number is engraved on one end of the outer t...

Page 16: ...ning the Carbon Element into place on the Carbon Element Head The Housing will come to a hard stop at the end of the thread Use a Filter Wrench if necessary NOTE Do NOT overtighten the Carbon Element...

Page 17: ...d or missing 7 Lubricate the O ring with an approved food grade lubricant and install into the TAC Housing 8 Install the new TAC Cartridge into the TAC Hous ing with the arrow on the cartridge pointin...

Page 18: ...d 4 The permeate tank should have a pressure of 28 31 PSI To add pressure to the permeate tank use a manual bicycle tire pump or other source of compressed air To release pressure from the permeate ta...

Page 19: ...efective Clean or replace the outlet check valve assembly The inlet flow restrictor may be plugged Clean or replace the inlet flow restrictor Water tastes bad Carbon Element need replacing Replace Car...

Page 20: ...VZN V SERIES 20 P N 1011079 Rev J 01 14 REPLACEMENT PARTS 2 35 3 31 16 11 4 5 6 7 7 8 9 10 13 19 17 18 23 23 22 34 15 36 32 12 14 30 33 25 24 28 14 20 21 14 29 26 27 8 9 10 1 VZN 441V Systems...

Page 21: ...ES 21 P N 1011079 Rev J 01 14 2 35 3 31 16 11 4 5 6 7 7 8 9 10 13 19 17 18 23 23 22 34 15 39 32 12 14 30 33 25 24 36 37 25 28 14 20 21 14 29 26 27 24 38 8 9 10 1 REPLACEMENT PARTS continued VZN 441V T...

Page 22: ...1 36 2180255 TAC 05 Housing and O Ring 1 37 7000554 TAC 05 Cartridge Kit 1 38 2190154 Adaptor 1 Stem 1 39 0021666 Flow Regulator Assy 15 gpm 1 40 0700769 Wiring Harness not shown 1 41 2190184 Tee PVC...

Page 23: ...VZN V SERIES 23 P N 1011079 Rev J 01 14 NOTES...

Page 24: ...operating and maintenance instructions of this manual and or labor involved in moving adjacent objects to gain access to the Equipment 2 A J Antunes Co reserves the right to make changes in design or...

Reviews: