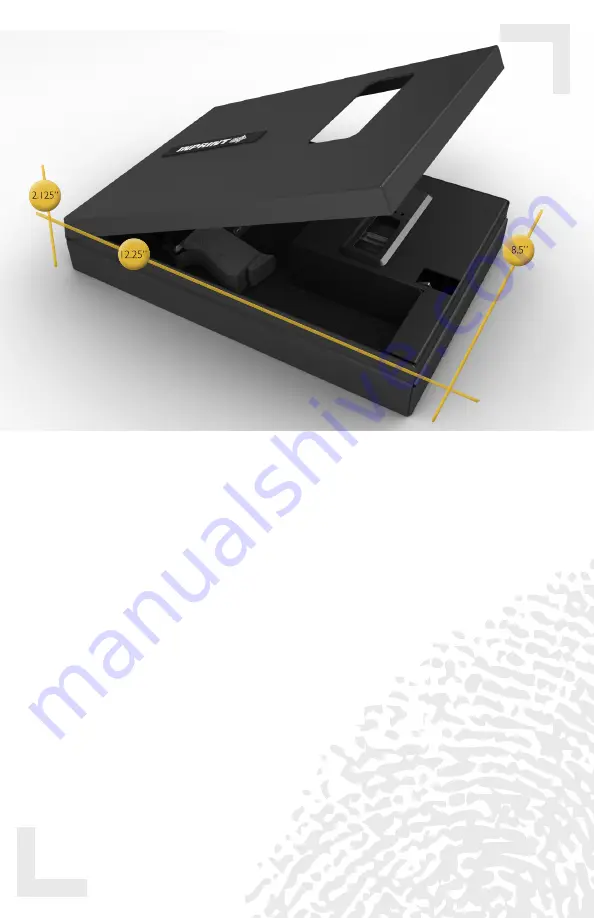
background image

3

INTERIOR VOLUME:

434 cubic inches

DISCLAIMERS

NEITHER SELLER NOR MANUFACTURER SHALL BE LIABLE FOR ANY 
INJURY, LOSS OR DAMAGE, DIRECT OR CONSEQUENTIAL, ARISING 
OUT OF THE USE OF, OR THE INABILITY TO USE, THE INPRINT-MICRO. 

THE USER SHALL DETERMINE THE SUITABILITY OF THE INPRINT-
MICRO BEFORE THE INTENDED USE AND USER ASSUMES ALL RISK 
AND LIABILITY WHATSOEVER IN CONNECTION THEREWITH.

TECHNICAL SUPPORT

Do not return to retailer. If you have questions about your INPRINT-MICRO 
or need help configuring the system, please contact us at 913-422-7400.

WEB SITE

www.inprintsecurity.com

Refer to our web site to download a copy of the current owner’s manual 
and other product information. Also, check frequently for updates on new 
options and products, as well as exclusive owner information.

COMPLETE & RETURN THE REGISTRATION CARD.

The serial number is located on the right side, inner surface of the door 
under the foam lining.


Summary of Contents for INPRINT-MICRO

Page 1: ...C Adapter Enrolling Fingerprints Safety Light Indications Troubleshooting Back up Keys Cleaning Optional Accessories Accessory Instructions Limited Warranty THE INPRINT MICROTM INSTRUCTION MANUAL 10...

Page 2: ...s into memory during a simple setup process Once these fingerprints are captured and encrypted they can never be stolen from the system To gain access slide your finger across the sensor The sensor sc...

Page 3: ...IN CONNECTION THEREWITH TECHNICAL SUPPORT Do not return to retailer If you have questions about your INPRINT MICRO or need help configuring the system please contact us at 913 422 7400 WEB SITE www i...

Page 4: ...SAFE Store your keys in another secure location INSTALLING BATTERY AND A C ADAPTER The INPRINT MICRO is powered by one 9 volt battery not included and or an optional A C adapter not included You may u...

Page 5: ...and hold to clear all memory 2 Press and release to initiate enrollment process To clear the INPRINT MICRO of all stored fingerprints locate the Administration Button Press and hold the button firmly...

Page 6: ...ess and release it Press the button once using the included straight tool or paperclip Do not hold the button down This will cause the GREEN light to appear solid indicating it is ready to enroll Duri...

Page 7: ...e finger that you have enrolled across the fingerprint sensor exactly as it was enrolled and slide as shown Ref Fig 6 The INPRINT MICRO will scan the finger and compare it to stored fingerprints When...

Page 8: ...cess the contents of the INPRINT MICRO using the key pull back the lock cover which will give you access to the lock Insert the key into the lock and turn to release the door catch which will open the...

Page 9: ...constantly at the ready The constant power means the device can bypass the 1 second wake up process and open nearly instantly Tie Down Cable For maintaining security in multiple locations you can purc...

Page 10: ...for the use and installation of the A C Adapter can be found on page 9 of this guide Tie Down Cable Insert cable into slot and wrap end with loop around fixed object to secure INPRINT MICRO INSTRUCTI...

Page 11: ...t repaired at our expense or will send you a new one at no cost to you You will be required to return your existing unit as well as all included parts as listed on page 4 of this manual to 9g prior to...

Page 12: ...PDATED INFORMATION CAN BE FOUND AT www inprintsecurity com ATTENTION DO NOT RETURN TO RETAILER If you have problems or questions regarding your INPRINT MICRO Please call or email 913 422 7400 info 9gP...

Reviews: