

7
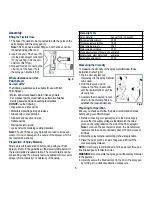
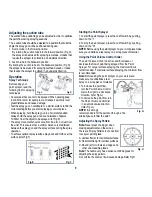
1. To select your spray pattern, first loosen the Air Cup Nut by
turning it approximately 1 full turn in an anti clockwise direction
or until the nozzle is loose enough to move.
2. To set the spray pattern to a Horizontal spray pattern, move
the air cap and air cap ears to the position as shown in Fig I.
Once the air cap is in position, hold the air cap in place whilst
re-securing the air cap nut by turning it in a clockwise direction.
Secure until tight.
3. To set the spray pattern to a Vertical spray pattern, move the
air cap and air cap ears to the position as shown in Fig J.
Once the air cap is in position, hold the air cap in place whilst
re-securing the air cap nut by turning it in a clockwise direction.
Secure until tight.
4. To set the spray
pattern to a Round
spray pattern, simply
adjust the angle of
the air cap ears so
they are
flat as shown in Fig K.
Changing the Air Cap ears.
The angle of the air cap ears can
be altered to change the size of the
selected pattern.
Please note the following:
1. Ensure both ears are set on the
same angle. (Ref Fig K.a)
for incorrect setting)
Changing the inner nozzle
IMPORTANT:
When replacing the inner nozzle align the small
keyway on the edge of the nozzle with the small slot in the top of
the spray gun.
When fitting the air cap and air cap nut, fit carefully to engage
the nozzle ie the air cap with the nut loose should be able to
move 90 degrees only.
When tightening the air cap nut, do not hold the air cap.
Cleaning and Maintenance
It is recommended to clean the Spray Gun after EVERY use.
If the spray gun is not cleaned properly after each use, the gun
will not perform correctly the next time of use. Failures due
to improper cleaning and maintenance are not covered
under warranty.
1. Turn off the sprayer and make sure it is disconnected from the
mains power supply.
2. Press the spray trigger so that the remaining material in the
spray gun runs back into the container.
3. Unscrew the container in an anti-clockwise direction and
remove the paint pot from the sprayer. Return the remaining
material in the paint pot back into the material can or other
suitable paint storage container.
4. Clean the paint pot and suction tube with a brush and water.
5. After cleaning the paint pot, fill it with solvent or water, and
screw the paint pot back onto the lid on the sprayer in order to
run the water/solvent back through the spray gun to clear any
remaining paint material within the suction tube and spray gun.
Note:
Only use solvent with a flash point of over 21°C
6. Plug the sprayer back into the mains power supply, turn on the
sprayer on, and then spray the solvent or water into another
container for disposal.
7. If the suction tube is not used, some solvent or water will be
deposited outside the container. This is due to the high air volume.
8. Repeat the above procedure until clear solvent or water comes
out of the nozzle.
9. Turn off the sprayer and make sure it is disconnected from the
mains power supply
10. Completely empty the paint pot. Always keep the container
seal free of coating material and check for damage.
11. Clean the outside of the spray gun and container with a cloth
soaked in solvent or water.
12. Unscrew the air cap nut. Remove air cap. Clean the air cap
and nozzle with brush and solvent or water.
Note:
Never clean the nozzle or air hole of the spray gun with
sharp metallic objects .
13. Remove and clean the suction tube.
Fig. I
Fig. J
Fig. K
Fig. K.a


