background image


Quick Installation Guide 

  O W L 4 0 0 / 4 1 0


L o n g  R a n g e  O u t d o o r  A P / B r i d g e / C P E  

ENGLISH 

©

 2 0 0 9  4 I P N E T ,  I N C .                                          


- 1 7  - 

Step 5: 

Security Settings 


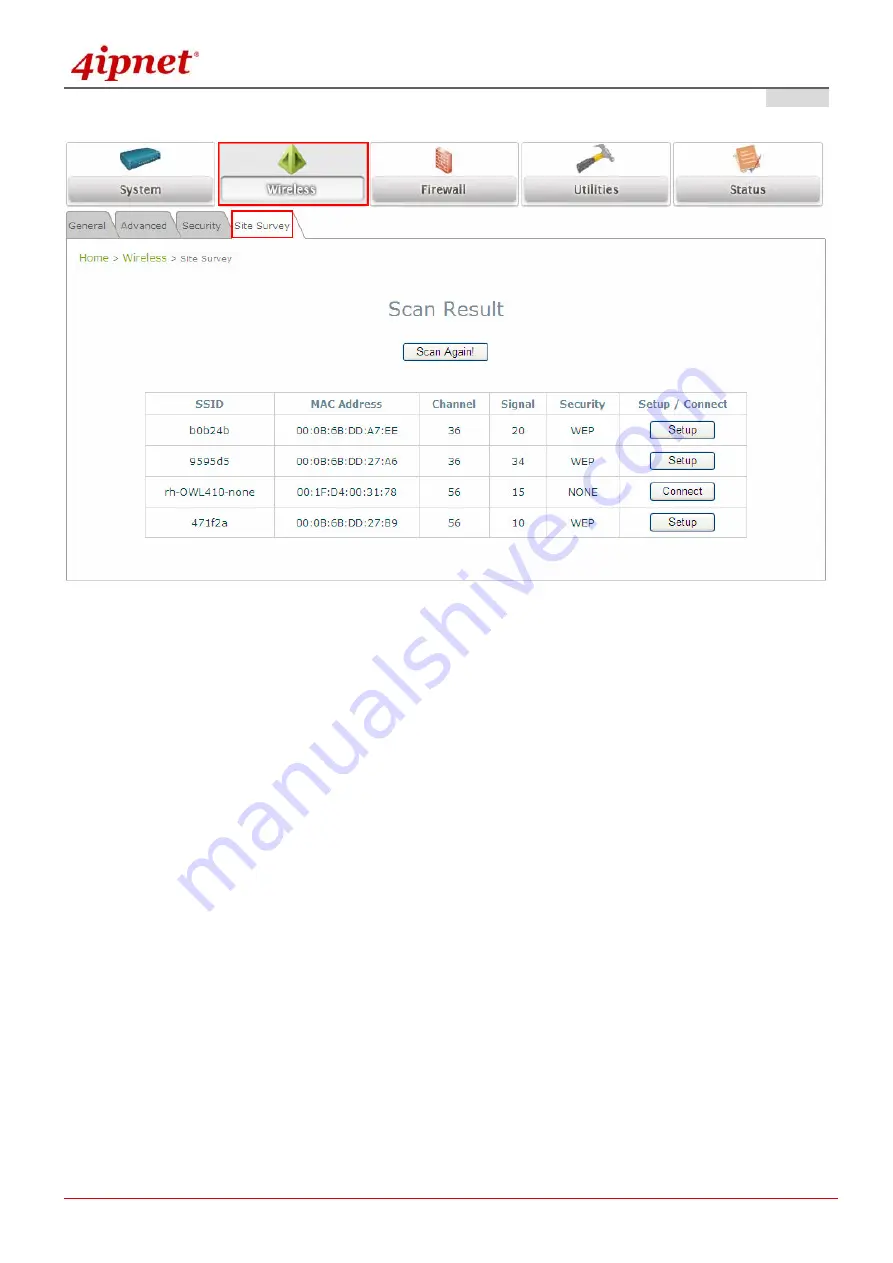
The above figure depicts an example of selecting one SSID (encrypted via one security type).   


Click Setup, and then a related encryption configuration box will appear. 


Enter the information required in the configuration box. Information to be entered must be exactly the 

same as configured in this selected AP. 


Click Connect to start the connection. 


4Gon   www.4Gon.co.uk   [email protected]   Tel: +44 (0)1245 808295   Fax: +44 (0)1245 808299 

Summary of Contents for OWL400

Page 1: ...OWL400 410 V1 00 ...

Page 2: ...ubl ish displ a y perf orm or modif y a ny pa rt of this publ ica tion in a ny f orm or by a ny mea ns w ithout prior w ritten permission f rom 4 I P N E T I N C Y ou ma y not a l ter or remov e a ny copyrig ht or other notice f rom copies of the content Al l other bra nd a nd product na mes a re cl a imed or reg istered ma rk s of their respectiv e compa nies or org a niz a tions Al l rig hts res...

Page 3: ... a mounting kit it can be mounted on a pole or wall It is suitable for both indoor and outdoor usage with its 200mW output power which is higher than a typical indoor AP 100mW This Quick Installation Guide including FAQ Instruction Guide provides instructions for getting started with OWL400 410 1 OWL400 410 x 1 2 Quick Installation Guide QIG x 1 3 CD ROM with User s Manual and QIG x 1 4 Power Sour...

Page 4: ...eset the system to its default settings 6 Primary N type Antenna Connector For connecting to an antenna 7 N type Connector For connecting to an antenna Note Reset Back to Factory Default Unscrew the screw beside the PoE hole Press and hold the button for seconds You can use a toothpick to help you reach the button The system is meant to be used in only one mode at a time Before you start with any ...

Page 5: ... ready 3 LAN Green LED ON indicates connection BLINKING indicates transmitting data OFF indicates no connection 4 PoE Connector For connecting to the Power Sourcing Equipment PSE 5 Reset Press more than 5 seconds and release to reset the system to its default settings 6 Built in patch antenna 10 dBi Horizontal 110 degree Vertical 60 degree 4Gon www 4Gon co uk info 4gon co uk Tel 44 0 1245 808295 F...

Page 6: ...400 410 Installation Steps Step 1 Connect the antennas to the connectors Step 2 Connect the PSE POWER DATA OUT to the PSE 1 connector on the lower panel Step 3 Connect one end of an Ethernet cable to the PSE 2 connector on the lower panel and the other end to a computer Step 4 Connect the power cord to the PSE Step 5 Power on the PSE in order to supply power to the OWL400 410 4Gon www 4Gon co uk i...

Page 7: ...he AP mode and CPE mode are as follows Mode AP Mode CPE Mode IP Address 1 9 2 1 6 8 1 1 1 9 2 1 6 8 1 1 Subnet Mask 2 5 5 2 5 5 2 5 5 0 2 5 5 2 5 5 2 5 5 0 Default User Name and Password There is only one management account for AP mode root In addition there are two system management accounts for CPE mode to maintain the system root and admin and each has different levels of management capabilitie...

Page 8: ...Below depicts an example of using 100 the underlined value can be changed as desired IP Address 192 168 1 100 Subnet Mask 255 255 255 0 Step 2 Launch Web Browser Launch a web browser to access the web management interface of AP mode by entering the default IP address http 192 168 1 1 in the URL field and then press Enter Using an incorrect default IP address will result in no Login page shown in t...

Page 9: ...anagement interface will appear To logout simply click on the Logout button at the upper right hand corner of the interface Note By default AP mode is enabled Therefore the administrator must access the system via the AP mode login page for the first time The administrator is then able to switch between modes afterwards 4Gon www 4Gon co uk info 4gon co uk Tel 44 0 1245 808295 Fax 44 0 1245 808299 ...

Page 10: ... C o mmo n Settin g s AP Mode Default Mode Step 1 Mode Confirmation Ensure the Operating Mode is currently in AP mode Click on the Status button and then select the System Overview tab The Operating Mode is at the System section on the System Overview page 4Gon www 4Gon co uk info 4gon co uk Tel 44 0 1245 808295 Fax 44 0 1245 808299 ...

Page 11: ... 4 I P N E T I N C 1 0 Step 2 Change Password Click on the Utilities button and then select the Password tab Enter a new password in the New Password field and retype it in the Re enter New Password field Click SAVE to save the changes 4Gon www 4Gon co uk info 4gon co uk Tel 44 0 1245 808295 Fax 44 0 1245 808299 ...

Page 12: ...N C 1 1 Step 3 Network Settings Settings here are for example only Click on the System button and then select the Network tab Enable Static and then enter the related information in the fields marked with red asterisks Click SAVE to save the settings 4Gon www 4Gon co uk info 4gon co uk Tel 44 0 1245 808295 Fax 44 0 1245 808299 ...

Page 13: ...ct an appropriate band from the drop down list box Click on the Wireless button and then select the VAP Config tab ESSID Enter respective ESSID for each VAP in the ESSID field or use the default ESSID Extended Service Set Identifier is a unique identifier used for networking devices to get associated with OWL400 410 Click SAVE to save the settings 4Gon www 4Gon co uk info 4gon co uk Tel 44 0 1245 ...

Page 14: ...xes The above figure depicts an example of selecting VAP 1 and WEP Enter the information required in the blank fields You must use the same information provided here to configure the network devices that are to be associated with OWL400 410 Click SAVE to s a v e a l l s e tti n g s c on f i g u r e d s o f a r all updated settings will take effect upon reboot Congratulations The AP mode is now suc...

Page 15: ...P N E T I N C 1 4 CPE Mode Step 1 Mode Confirmation Ensure the Operating Mode is currently in CPE mode Click on the Status button and then select the System Overview tab The Operating Mode is at the System section on the System Overview page 4Gon www 4Gon co uk info 4gon co uk Tel 44 0 1245 808295 Fax 44 0 1245 808299 ...

Page 16: ... Root Account Password Enter the old password in the Old Password field default password is admin Enter a new password in the New Password field and retype it in the Re enter New Password field Change Admin Account Password Enter a new password in the New Password field and retype it in the Re enter New Password field Click SAVE to save the changes 4Gon www 4Gon co uk info 4gon co uk Tel 44 0 1245...

Page 17: ... the Wireless button and then select the Site Survey tab The system will automatically scan and display all APs in its coverage area Click Scan Again if the APs to be associated with are not listed on the Scan Result list Step 4 Select AP to be Associated Select an AP to be associated with from the Scan Result list provided in Step 3 4Gon www 4Gon co uk info 4gon co uk Tel 44 0 1245 808295 Fax 44 ...

Page 18: ...example of selecting one SSID encrypted via one security type Click Setup and then a related encryption configuration box will appear Enter the information required in the configuration box Information to be entered must be exactly the same as configured in this selected AP Click Connect to start the connection 4Gon www 4Gon co uk info 4gon co uk Tel 44 0 1245 808295 Fax 44 0 1245 808299 ...

Page 19: ...on Settings here are for example only Click on the System button and then select Network tab For WAN configuration determine the way to obtain the IP address For example enable Static and then enter the related information in the fields marked with red asterisks Click Save to save the settings 4Gon www 4Gon co uk info 4gon co uk Tel 44 0 1245 808295 Fax 44 0 1245 808299 ...

Page 20: ...s configured so far all updated settings will take effect upon reboot Congratulations The CPE mode is now successfully configured After OWL400 410 s network configuration completes please remember to change the IP Address of your PC Connection Properties back to its original settings in order to ensure that your PC functions properly in its real network environments It is strongly recommended to m...

Reviews: