3xLogic VX-4V28-OD-I Quick Start Manual Download Page 3

V-Series Camera Quick Start Guide |


VX-2V28-OD-I 


10385 Westmoor Drive, Suite 210, Westminster, CO 80021 | www.3xlogic.com | (877) 3XLOGIC


1


Camera Overview   

1.1


Camera Description 

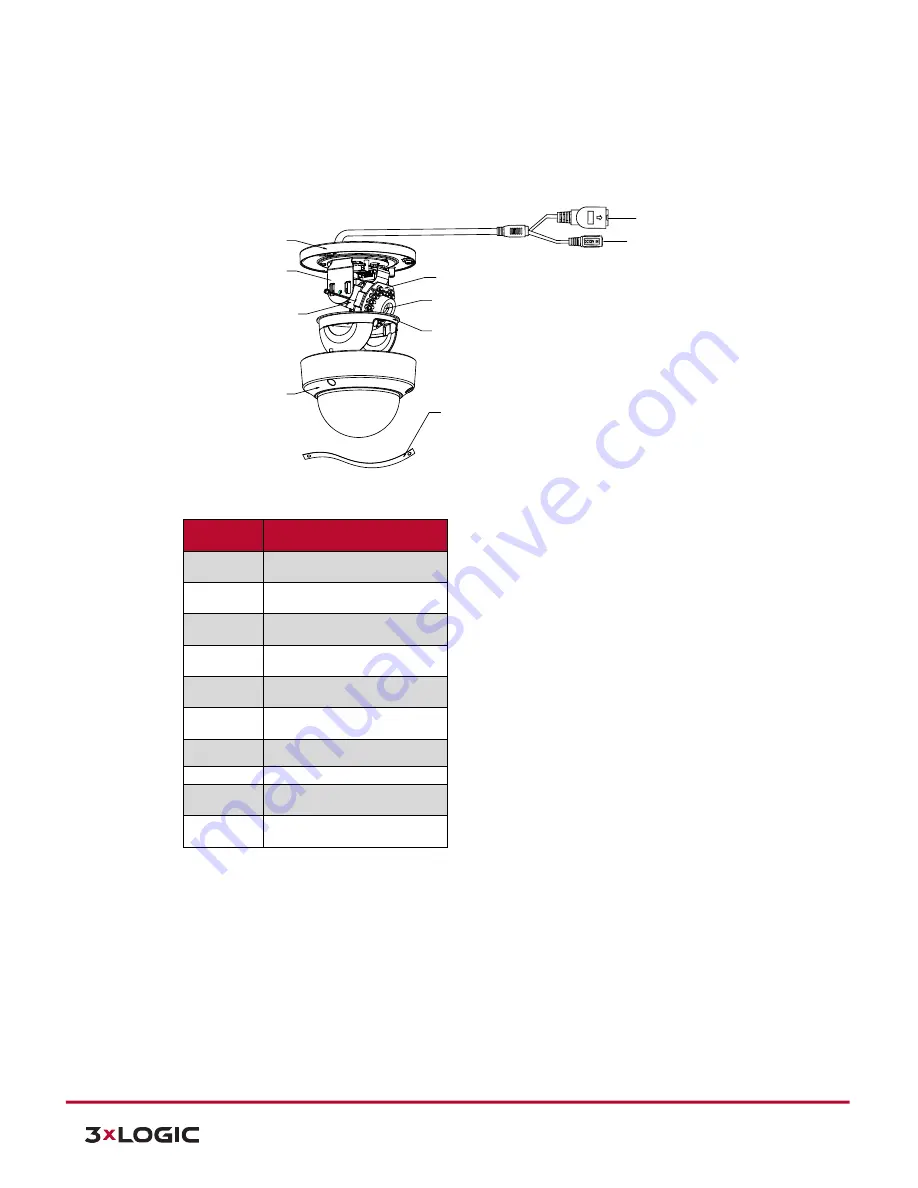
See below for descriptions of the different camera components.  

1
2

3

4

7

8

9

10

5

6


Figure 1-1


Overview 


Number


Description 

1


Mounting Base 

2


Horizontal Stand 

3


Vertical Stand 

4


Bubble 

5


Network Interface 

6


Power Interface 

7


IR LED 

8


Lens 

9


Black Liner 

10


Safety Rope 


AVAILABLE MOUNTS 


OD Wall Mount (3xLOGIC Product #: VX-WM-OD) 


OD Pendant Mount (3xLOGIC Product #: VX-PM-OD) 


Universal Corner Mount (3xLOGIC Product #: VX-CM) 


Universal Pole Mount (3xLOGIC Product #: VX-POLE) 


NOTE:


Press and hold RESET for 10s when the camera is powering on or rebooting to restore the default 

settings, including the user name, password, IP address, port No., etc. 

Summary of Contents for VX-4V28-OD-I

Page 1: ...ries Camera Quick Start Guide VX 2V28 OD I 10385 Westmoor Drive Suite 210 Westminster CO 80021 www 3xlogic com 877 3XLOGIC 1 VISIX V Series All in One Camera Gen II VX 4V28 OD I Quick Start Guide v01...

Page 2: ...Mounts 3 1 2 INSTALLATION 4 Installation Ceiling mount 4 Installation Micro sd card 6 2 CAMERA SETUP 8 2 1 AVAILABLE CAMERA SETUP TOOLS 8 2 2 CAMERA SETUP DHCP ENABLED NETWORKS 8 2 3 CAMERA SETUP NON...

Page 3: ...ounting Base 2 Horizontal Stand 3 Vertical Stand 4 Bubble 5 Network Interface 6 Power Interface 7 IR LED 8 Lens 9 Black Liner 10 Safety Rope AVAILABLE MOUNTS OD Wall Mount 3xLOGIC Product VX WM OD OD...

Page 4: ...tallation INSTALLATION CEILING MOUNT Steps 1 Drill the screw holes on the ceiling according to the drill template Figure 1 2 Drill Template 2 Loosen the set screws with a hex key supplied to remove th...

Page 5: ...f the mounting base Figure 1 5 Side Opening 4 Loosen the tilt lock screws adjust the tilting position within the 65 degree range and tighten the tilt lock screws 5 Rotate the black liner to adjust the...

Page 6: ...ite 210 Westminster CO 80021 www 3xlogic com 877 3XLOGIC 6 6 Reinstall the bubble and tighten the screws Figure 1 7 Bubble Reinstallation INSTALLATION MICRO SD CARD Steps 7 Loosen the lock screws on t...

Page 7: ...O 80021 www 3xlogic com 877 3XLOGIC 7 Insert the Micro SD card to the card slot Optional Push the inserted Micro SD card inside and the Micro SD card will be sprung out Figure 1 9 Insert the Micro SD...

Page 8: ...ected network provides a DHCP address and allows outbound access to the internet For installations where DHCP is not available or where the camera is being used with an appliance see Section 2 3 Camer...

Page 9: ...cycling the camera 2 4 Remote Monitoring and Viewing Adding a V Series Camera to VIGIL Client Steps To interface a V Series Camera with VIGIL Client 1 Launch VIGIL Client Local Mode only VCM mode will...

Page 10: ...Monitoring and Viewing Adding a V Series Camera to 3xLOGIC View Lite II Mobile Android and iOS Steps 1 To interface a V Series camera with 3xLOGIC s View Lite II mobile app launch the View Lite II app...

Page 11: ...c com 877 3XLOGIC 11 Figure 2 4 View Lite II Add Edit Server Form Android 7 Fill in the remaining required fields and tap Save to save the V Seies camera to View Lite II A user may now add the camera...

Page 12: ...77 3xLOGIC www 3xlogic com 2017 3xLOGIC Inc All rights reserved Information in this document is subject to change without notice 3xLOGIC and the 3xLOGIC logo are trademarks of 3xLOGIC Inc all other tr...

Reviews: