background image

―  6  ― 


3.3 Loading lens cover and spacer 

Viewter contains 2 sets of lens covers and spacers.   

● For x60 + x200


● For x80 + x150


Change lens cover and spacer to gain magnification you want. You could also 
remove them when you could not gain magnification you want with them. 


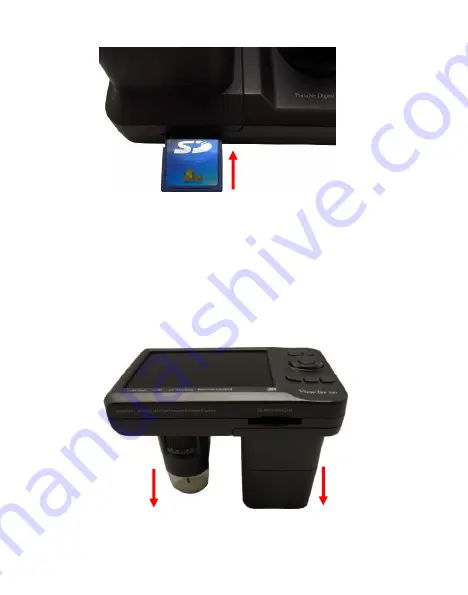
Pull this direction to remove 


Summary of Contents for Anyty 3R-VIEWTER-500UV

Page 1: ...Portable Digital Microscope Viewter 3R VIEWTER 500UV UV LED Model 3R VIEWTER 500IR IR LED Model Operating Instruction...

Page 2: ...point 9 4 3 Digital zoom 9 4 4 LED adjustment 10 4 5 Display scale 10 4 6 Capture still picture 11 4 7 Capture movie 12 4 8 Preview saved data 12 5 Settings 5 1 Setting of still mode 14 5 2 Setting o...

Page 3: ...kage Description without spacer in some parts of this manual Viewter Wired Controller Lens cover x2 Spacer x2 USB charging cable miniUSB cable AC USB charging adaptor Strap Simple scale Software CD VI...

Page 4: ...r capturing picture movie Controller connector Port for Wire controller Holder hock Hock for strap Lens cover Lens and lens cover for height adjustment Charging lamp Red light during charge period LED...

Page 5: ...Button for setting LED mode Menu button Button for displaying setting menu Mode button Button for switching mode Direction key keys for setting menu etc Confirmation button Button for confirming opti...

Page 6: ...charge battery until full power before first use We do not recommend you use it and charge it at same time or it will shorten battery life 3 2 Insert SD card Images captured by Viewter will be saved...

Page 7: ...contains 2 sets of lens covers and spacers For x60 x200 For x80 x150 Change lens cover and spacer to gain magnification you want You could also remove them when you could not gain magnification you w...

Page 8: ...ng lens cover and spacer as well as for finer adjustment during capturing The image shows magnification and focal range below Let the lens cover touch the object you want to observe If the object coul...

Page 9: ...3 5 Connect controller Connect attached controller to Viewter when you want to use it stable Please connect controller to controller port on Viewter Functions of controller Shutter Mode change LED cha...

Page 10: ...cover closed to object the image of object will be displayed on screen Please use magnification dial to adjust magnification and focal point 4 3 Digital zoom You could also use digital zoom function t...

Page 11: ...ase use LED dial on flank of Viewter Page 3 Light off White LED UV LED IR LED 4 5 Display scale You are able to long press OK button during Still Movie mode to display scale on the scale Use the scale...

Page 12: ...ture Mode of still is shown as below 1 Mark of still mode 2 Shows space of SD card and savable number of pictures 3 Icon of SD card X Mark will be on it if the SD card is not loaded properly 4 Setting...

Page 13: ...shown as below 4 8 Preview of captured data Please press mode button twice to switch to preview mode Then use direction key Left and Right to select picture movie Press shutter button to play saved m...

Page 14: ...for Movie Play time of Movies 3 Icon of SD card X Mark will be on it if the SD card is not loaded properly 4 Setting of resolution 5 Residual amount of inner battery 6 No of being previewed data 7 Mo...

Page 15: ...ode Settings in still picture mode See 5 4 to enter main setting page 16 Change color You are able to change color of saving data Change resolution The second icon from left side is resolution setting...

Page 16: ...quality of movies but the size of file will be larger as well 500M Save data in 2060 1920 pixel 300M Save data in 2048 1536 pixel 200M Save data in 1600 1200 pixel 100M Save data in 1280 960 pixel VGA...

Page 17: ...lected file or all files 5 4 Main body setting You are able to edit set still picture and basic setting of Viewter Exposure Adjust exposure between Adjust White balance Adjust white balance of still p...

Page 18: ...ent where the light is weak Incandescent lamp Setting in the environment of incandescent lamp Fluorescent lamp Setting in the environment of fluorescent lamp Normal Default setting Sharp Large change...

Page 19: ...rmally you do not need to adjust it Format Formatting data in SD card Default Reset all setting 1 min Set auto power off time in 1min 3 mins Set auto power off time in 3mins 5 mins Set auto power off...

Page 20: ...1Ghz or higher spec of CPU Optical drive required Memory above 256MB Space requirement above 1000MB Connection type USB1 1 2 0 Display space 15 Inches XGA or more Graphic 16bit color or above Operati...

Page 21: ...your PC until the installation is complete Press Continue anyway when UAC is activated during installation Set up menu will be launched after the Install CD is loaded in CD ROM Please click Install S...

Page 22: ...21 Install program will be launched Please click Next The End User License Agreement will show Please select I accept and click Next...

Page 23: ...22 The screen of selecting install folder will show Normally click Next to continue Click Install to start installation...

Page 24: ...installation 6 2 Preparation Remove captured data You are able to use VIEWTER Plus to edit captured data of which have been sent to the PC In order to do so please remove data to specific folder befor...

Page 25: ...24 Connect attached mini USB to USB port on Viewter Connect Viewter with PC and Card Reader Mode will show on monitor It will be shown as Removable Disk on PC Card reader mode...

Page 26: ...different type of PC If you use your own SD card of which the name of the folder has been edited the file name would not be 100DSCIM Then open picture folder in VIEWTER Plus Please follow the steps b...

Page 27: ...data from 100DSCIM to Picture folder in My document 100DSCIM in removable disc Picture folder in My document 6 3 Use of VIEWTER Plus Launch software We are now ready to use Software Please launch VIE...

Page 28: ...27 Summary of files Please click Open which is in File on the menu bar The files will be displayed at left side of the window Each operation could be done by clicking icons below...

Page 29: ...If you want to adjust display size please make use of zoom in or zoom out in image on menu bar For movie mode the playing menu bar will be shown Edition VIEWTER Plus allows you to edit current display...

Page 30: ...image 90 Rotate 90 CCW Contra rotate the image 90 Sharpen Enhance sharpness Soft Weaken sharpness Emboss Enable embossment effect on the image Menu bar color menu color menu could adjust color effect...

Page 31: ...iameter Circle Measure length of diameter Measurement Three Point Circle Measure a circle though 3 points Measurement Arc Measure size of an appointed arc Measurement Three points angle Select 3 point...

Page 32: ...Adjustment function Use Calibration to calculate more accurate value You need to prepare for an image of attached micro scale or something similar to it The image below is captured picture of attached...

Page 33: ...y clear of size same as calculate Linear size The window shows as below will be displayed Please enter the Value and click OK Value will be filled in left side of magnification From then on the measur...

Page 34: ...33 Line setting Select Setting in Measurement to display the window below Use it to change font and color of text and measured data...

Page 35: ...ng Also please press menu button and check if the menu screen could be displayed If the monitor is freezing during power on please press shutter and button at the same time to reset the Viewter Q No g...

Page 36: ...500IR High light whiteLED 4 IR LEDx4 LED 3R VIEWTER 500UV Wavelength 395nm Frequency7 59 10 14Hz 3R VIEWTER 500IR Wavelength 850nm Frequency3 53 10 14Hz ISO Sensitiveness 100 200 400 Monitor 3 5 inche...

Page 37: ...id using with wet hands DO NOT use the product with wet hands or the product in wet conditions It could lead to electric shock Decommissioning prohibited DO NOT decommission or modify the product It c...

Page 38: ...37...

Reviews: