background image

10

Selecting a Language

The first time you turn on the power, you are prompted to 
select your desired language. By default, the language is 
set to English.

Several language-related features of the printer, such as 
special characters, menu text, and so on, are determined 
by the language setting. You can change the language 
selection at any time from the Settings menu.

To select a language

1

Press  

.

2

Select 

System

 and press 

.

3

Select 

Language

 and press 

.

4

Select the language and press 

.

Getting to Know Your Printer

Become familiar with the location of the feature and 
function keys on your printer. See Figure 1 on page 7. 
The following sections describe each feature in detail.

Power

The 

 button turns the power on and off. To save 

power, the printer automatically turns off after five minutes 
of inactivity.

When the printer is turned off, the current label and 
settings are remembered for the next time the printer is 
turned on. If the batteries and power adapter are 
disconnected at the same time, some of the settings are 
remembered; however, the current label is lost and you 
will need to reset the label width when you reconnect the 
power and turn on the printer.
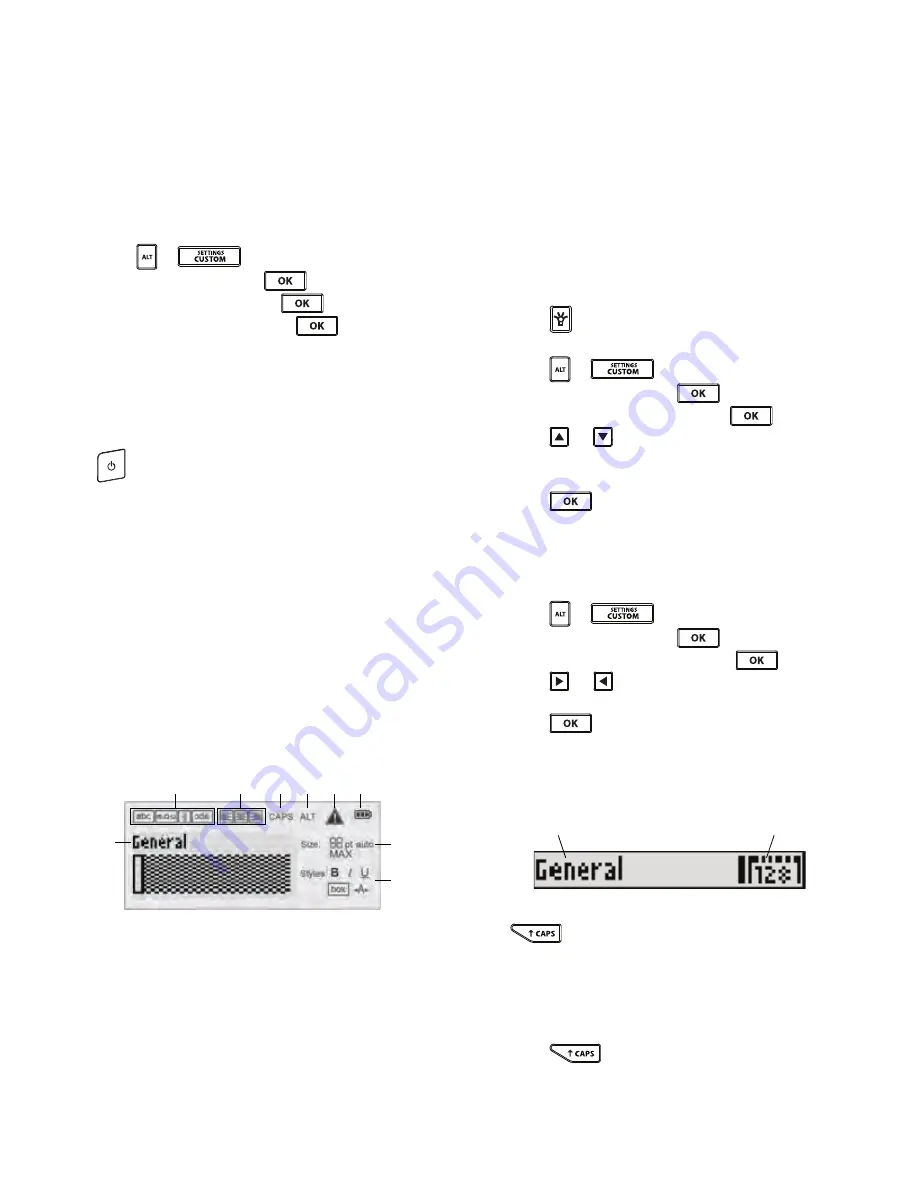
LCD Display

The LCD display includes a caption bar showing the 
current label type, and feature indicators across the top 
and on the right side showing which features are currently 
selected. Feature indicators appear black when selected. 
See Figure 6.

Figure 6 

When the text you have entered will not fit on the label as 
currently defined, the portion of the text that will not fit is 

shaded. If you attempt to print the label containing text 
that will not fit, the excess text will not be printed.

Using the Backlight

In low light conditions, you can turn on the backlight to 
see the display more easily. 

To save power, the backlight turns off automatically after 
15 seconds of inactivity. Pressing any key will turn the 
backlight back on again. The backlight key acts as a 
toggle to turn the light on and off.

You can increase or decrease the time for the backlight 
timer from the Settings menu.

To toggle the backlight on and off

Press .

To set the backlight timer

1

Press  

.

2

Select 

System

 and press 

.

3

Select 

Backlight timer

 and press 

.

4

Press 

 or 

 to increase or decrease the time for 

the backlight timer.

You can set the timer for 5 to 30 seconds.

5

Press .

Adjusting the Display Contrast

In addition to backlighting, you can adjust the display 
contrast for different lighting conditions.

To adjust the display contrast

1

Press  

.

2

Select 

System

 and press 

.

3

Select 

Screen contrast

 and press 

.

4

Press 

 or 

 to increase or decrease the 

contrast.

5

Press .

Caption Bar

The caption bar shows the current label type. For some 
label types, additional information, such as size or 
barcode type, is also shown.

CAPS Mode

The 

 key toggles capitalization on and off. When 

CAPS mode is turned on, the CAPS indicator is shown on 
the display and all letters that you enter are capitalized. 
The default setting is CAPS mode on. When CAPS mode 
is off, all letters entered appear in lowercase.

To toggle CAPS mode on and off

Press .

1

Caption bar

6

Error indicator

2

Rotation indicator

7

Battery indicator

3

Alignment indicator

8

Text size indicators

4

Caps indicator

9

Text style indicators

5

ALT indicator

1

2

3

5

4

6

7

8

9

Label type

Barcode type

Summary of Contents for PL150

Page 1: ...Portable Labeler PL150 User Guide ...

Page 2: ...ntrast 10 Caption Bar 10 CAPS Mode 10 ALT Key 11 Escape Key 11 Navigation Keys 11 Backspace Key 11 Clear Key 11 Cutter Button 11 Hot Keys 11 Working with Labels 11 Creating a Label 11 Adding a Label 11 Removing a Label 11 Printing Labels 12 Formatting a Label 12 Changing the Text Size 12 Changing the Text Style 12 Rotating Text 12 Aligning Text 12 Creating Multi Line Labels 12 Using International ...

Page 3: ...st 17 Inserting Items from the Favorites List 17 Deleting Items from the Favorites list 17 Printing Options 17 Printing Multiple Copies 17 Collating Multiple Copies 17 Printing Separator Lines between Cells 18 Pausing Between Labels 18 Advancing the Label 18 Adjusting the Print Contrast 18 Cleaning Your Printer 18 Symbols 19 Arrows and Brackets 19 Hazard and Warning 19 Pro AV and Security 19 Numbe...

Page 4: ... injury WARNING Indicates a potentially hazardous situation which if not avoided could result in death or serious injury and or property damage CAUTION Indicates a potentially hazardous situation which if not avoided may result in minor or moderate injury and or property damage NOTICE This is how important information is shown for proper handling of device Device Label Safety Information Only for ...

Page 5: ...dify the PSU Do not use the device and PSU outdoors or in a wet environment Do not operate with a damaged cord or plug Replace power supply immediately Do not disassemble don t try to repair the product Only authorized people should do this The product is not foreseen for any servicing Incorrect reassembly may result in electric shock or fire To reduce the risks associated with explosion and or ri...

Page 6: ...ed could result in serious injury or death and or property damage Stop charging the battery if charging is not completed within the specified time Never leave the batteries unattended during charging Do not attempt to charge a cell that is damaged Immediately remove the battery from the device or battery charger and stop use if the battery gives off an odor generates heat becomes discolored or def...

Page 7: ...slot 10 Favorites 18 Alt 3 LCD Display 11 Add Remove 19 Hot Keys 4 Cutter button 12 Custom Settings 20 Clear 5 Print 13 Serial Feed 21 Escape 6 OK 14 Library Save 22 Power 7 Navigation 15 Size Styles 23 Backlight 8 Backspace 16 Caps 4 3 7 5 6 8 9 10 11 12 14 15 17 16 18 19 20 21 22 23 2 1 13 ...

Page 8: ...battery pack or AC power adapter For optimal power use the optional rechargeable Lithium ion battery pack or the AC power adapter To save power the printer automatically goes into standby mode after two minutes of inactivity and automatically turns off after five minutes of inactivity Inserting the Batteries The printer can operate using six AA alkaline batteries To insert the batteries 1 Press th...

Page 9: ...nd Removing the Label Cartridge Your printer comes with a starter label cartridge Visit www 3m com electrical for information about purchasing additional label cartridges To insert the label cartridge 1 Gently lift the label cartridge door on the back of the printer 2 Make sure the label and ribbon are taut across the mouth of the cartridge and that the label passes between the label guides If nec...

Page 10: ...ot fit is shaded If you attempt to print the label containing text that will not fit the excess text will not be printed Using the Backlight In low light conditions you can turn on the backlight to see the display more easily To save power the backlight turns off automatically after 15 seconds of inactivity Pressing any key will turn the backlight back on again The backlight key acts as a toggle t...

Page 11: ...ing on when the power was turned off You need to clear that label text and formatting before you create a new label To create a new label 1 If necessary press to clear the previous label and formatting from the display 2 Enter some text using the keypad 3 Format the text size and style See Formatting a Label on page 12 4 Optionally save the label to the library See Saving Labels on page 16 Adding ...

Page 12: ...bels including most symbols To set the text style 1 Press 2 Select the desired text style and press 3 Select On or Off to turn the selected style on or off 4 Press To insert an underlined 6 or 9 character Press and hold or until 6 or 9 appears in the display and then press Rotating Text You can print the text on your label in one of four rotations horizontal vertical 90 degree and mirror the text ...

Page 13: ...1 Press 2 Select the length of the label and press Any text that does not fit within the fixed length appears shaded in the display and will not print Creating Wire Cable Labels A wire cable label is placed around a wire or cable The label text is repeated as many times as possible depending on the size of the text and the width or length of the label You can manually enter the diameter of the cab...

Page 14: ...e end of the label 6 Press Each module is separated by a line in the display 7 Enter the text for each module Press and to move from module to module By default a separator line is printed between each cell on a module label To turn off the separator lines see Printing Separator Lines between Cells on page 18 To create data for the modules automatically see Creating a Series of Labels on page 15 C...

Page 15: ...tom defaults 1 Press the Hot Key for the desired label type 2 Press 3 Make any desired adjustments to the settings for the label type and press 4 Do one of the following Press to use the settings for the current label only Press to save the settings as the new custom default for this label type Turning Off Custom Defaults You can choose to turn custom defaults on or off for each label type individ...

Page 16: ...de place the cursor within the text you want to save 2 Press 3 Select Term and press 4 Select a location for the term and press The term is added to the My terms category of the library Inserting Terms on Labels Terms inserted on a label are the same as text entered from the keypad Terms can be edited formatted or deleted To insert a term on a label 1 Press 2 Select Terms and press 3 Select a cate...

Page 17: ...you no longer need an item in the Favorites list you can delete the item from the Favorites list To delete an item from the Favorites list 1 Press 2 Select the symbol term or label to delete and press A confirmation message appears 3 Press to delete the entry A message appears confirming that the item was deleted Deleting a term or label from the library also deletes that term or label from the Fa...

Page 18: ...bel in 1 4 increments To advance the label 1 Press 2 Press to advance the label Adjusting the Print Contrast Depending on the label material you choose you may need to lighten or darken the printed text on the label To adjust the print contrast 1 Press 2 Select Print options and press 3 Select Print contrast and press 4 Press or to increase or decrease the print contrast 5 Press 6 Repeat as necess...

Page 19: ...19 Symbols The following tables show the commonly used symbols by category Arrows and Brackets Hazard and Warning Pro AV and Security Numbers Currency Electrical Ω Ø μ λ ...

Page 20: ... SPKR VOLUME CONTROL OPTICAL ZONE PHONO CATV NANNY CAM COMPONENT PROJECTOR COMPOSITE REMOTE DVD RF DVI RGB DVR RS 232 HDMI SAT HDTV S VIDEO IR TOUCH SCREEN KEYPAD TV MONITOR VCR BACK DOOR HIGH WATER CAMERA HORN CARBON MONOXIDE LOW TEMP CCTV MOTION SENSOR CELL PHONE CONTACT PIR CONTROLLER POOL DOOR POWER DOOR CONTACT REMOTE DRIVEWAY SENSOR DUAL TECH SHOCK SENSOR DUCT SIREN FAN CUTOFF SLIDERS FRONT ...

Page 21: ...serted properly See Inserting and Removing the Label Cartridge Unable to return to the previous menu Press to return to the previous menu Nothing shows in the display Ensure the printer is turned on Insert new batteries charge battery pack or plug in power adapter Remove power adapter and batteries reattach power to restart the printer No label found No cartridge is present Open the cartridge comp...

Page 22: ...E marked in accordance with the EMC directive and the low voltage directive and is designed to conform with the following international standards Applied Tests or Technical Standards for R4200 printer Emission EN55022 2006 EN 61000 3 2 2000 am 14 2000 EN 61000 3 3 1995 am 1 2001 Immunity EN55024 1998 am 1 am 2 EN 61000 4 2 1995 am 2 EN 61000 4 3 1996 EN 61000 4 4 2004 EN 61000 4 5 1995 EN 61000 4 ...

Page 23: ......

Reviews: