background image

8

Serializing Your Labels 

When Serial mode is turned on, the right-most 
number in the label text is increased by one each 
time you press 

For example, if the label text is RHO-123 and you 
press print three times, three labels would print as 
RHO-123, RHO-124, and RHO-125, and the 
display would show RHO-126 when the last label is 
printed.

To serialize your labels

1. Enter the text for your label including at least one 

number.

2. Press 

 and then use the arrow keys to turn 

on serial printing.

3. Press   or 

 to begin printing.

4. Repeat step 3 for each additional label in the 

series.

To print multiple copies of the same serialized 

label, choose  +

 and enter the number of 

copies of each label to print. See 

Printing Multiple 

Copies

 on page 7.

Adjusting Print Quality (Advanced)

Depending on the label material you choose, you 
may need to lighten or darken the print on the label. 
Adjusting the print head temperature allows you to 
control the print quality (±20). Five temperature 
settings are available to adjust the print head 
temperature. The default setting is 3.

To adjust the print quality

1. Press  +

 followed by 

.

2. Use the arrow keys to select the print head 

temperature


and press  .

3. Repeat as necessary until you are satisfied with 

the print quality.

Cleaning Your Printer

Your printer is designed to give you long and 
trouble-free service, while requiring very little 
maintenance. 
Clean your printer from time to time to keep it 
working properly. Clean the cutter blade each time 
you replace the label cartridge.

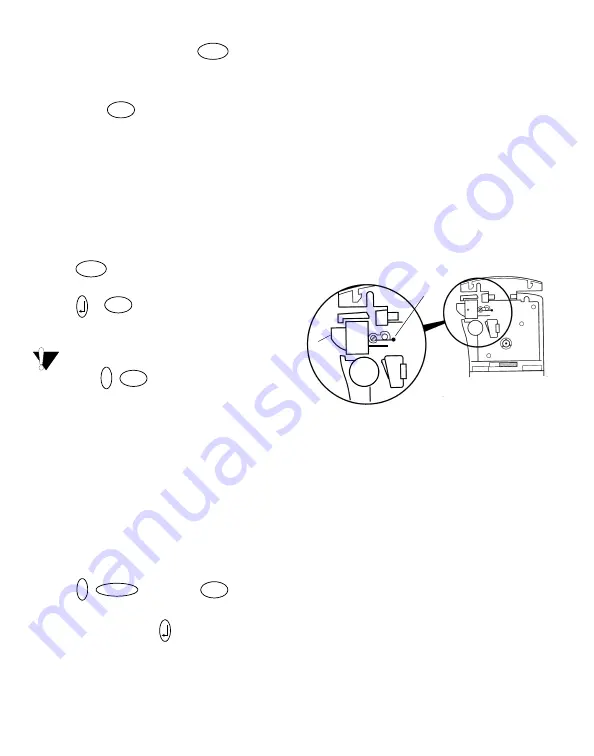
To clean the cutter blade

1. Remove the label cartridge.
2. Place the tip of a ball-point pen or pencil on the 

L-shaped piece as shown in Figure 10, and 
press the piece down.

Figure 10  

3. While holding the L-shaped piece down, press 

and hold the cutter lever to expose the cutter 
blade.

4. Use a cotton ball and alcohol to clean both sides 

of the blade.

5. Release the cutter lever.

To clean the print head

Clean the print head using the cleaning tool 
located inside the label compartment lid.

SERIAL

PRINT

SERIAL

PRINT

PRINT

SPACE

PRINT

Press in 

and hold

Press

Summary of Contents for PL100

Page 1: ...Portable Labeler PL100 User Guide User Guide Page 3 Guide de D Utilisation Page 12 Guía del usuario Página 22 ...

Page 2: ...Key Function Shift Key Serial Key Space Bar Symbol Key Symbol Hot Keys Power Key Enter Key Label Exit LCD Display Cutter Key Delete Clear Key Normal Key Flag Key Length Key Vertical Key Print Copies Key Language Key Size Key CAPS Key Style Key Box Underline Key ...

Page 3: ...umb catch on the back of the printer to open the battery compartment door See Figure 2 Figure 2 2 Insert the batteries following the polarity markings and 3 Close the battery compartment door Remove the batteries if the printer will not be used for a long period of time Inserting the Label Cassette Your printer comes with one label refill cartridge Visit www 3m com electrical for information about...

Page 4: ...l 1 Enter text to create a simple label 2 Press and press the Cutter key to cut the label Congratulations You have printed your first label Continue reading to learn more about the options available for creating labels Getting to Know Your Printer Become familiar with the location of the feature and function keys on your printer See Figure 1 on the inside of the front cover The following sections ...

Page 5: ...to the beginning of the label text Pressing moves the cursor to the end of the label text Formatting Your Label You can choose from several formatting options to enhance the appearance of your labels The printer remembers the last feature selection made so that each time you enter one of the feature menus described in this section you are positioned at the last item selected from that menu Changin...

Page 6: ...ble by using Hot Keys for easy entry See Figure 8 Figure 8 The symbols available for each Hot Key are shown on the 3M Portable Labeler PL100 Quick Reference Card To use a Hot Key 1 Press one of the Hot Keys shown in Figure 8 2 Use the arrow keys to move to the desired symbol 3 When you locate the symbol you want press to add the symbol to your label Using International Characters The printer suppo...

Page 7: ...of the label leaving a blank space in the middle that wraps around the cable When the label is applied to the cable both ends of the label are applied back to back leaving a tail or flag The result is a label that can be read from both sides To print a flag label 1 Enter the text for the label 2 Press and then press 3 Press Printing Options You can choose to print your labels vertically print mult...

Page 8: ...he print quality 20 Five temperature settings are available to adjust the print head temperature The default setting is 3 To adjust the print quality 1 Press followed by 2 Use the arrow keys to select the print head temperature and press 3 Repeat as necessary until you are satisfied with the print quality Cleaning Your Printer Your printer is designed to give you long and trouble free service whil...

Page 9: ...eplace discharged batteries Ensure label cartridge is installed properly Clean the print head Replace the label cartridge Poor Cutter Performance Clean the cutter blade See Cleaning Your Printer Memory Full Exceeded maximum number of characters in buffer Delete some or all of the buffer text Low Battery Batteries almost discharged Replace discharged batteries Motor Stall Motor is stalled due to la...

Page 10: ...10 ...

Page 11: ...es de navigation Fonction Alternance Sérialisation Espacement Symbole Touches d accès rapide Alimentation Entrée Sortie étiquettes Éncran LCD Coupe Normal Imprimer Copies Effacer Suppression Drapeau Longueur Vertical Boîte Underline Modèle Majuscule Taille Langue ...

Page 12: ...ix piles AAA Pour économiser l énergie l imprimante s éteint automatiquement si elle n est pas utilisée pendant 2 minutes Pour mettre les piles en place 1 Appuyez sur le loquet à l arrière de l imprimante pour ouvrir le couvercle du compartiment à piles Voir Figure 2 Figure 2 2 Insérez les piles selon les marques de polarité et 3 Fermez le couvercle du compartiment à piles Enlevez les piles si l i...

Page 13: ...gue Sélection des unités de mesure Vous pouvez choisir d afficher les mesures en pouces ou en millimètres Le pouce est l unité de mesure par défaut Pour sélectionner l unité de mesure 1 Appuyez sur 2 Utilisez les touches fléchées pour sélectionner l unité 3 Appuyez sur pour valider le choix de l unité Impression de votre première étiquette Vous êtes maintenant prêt à imprimer votre première étique...

Page 14: ... appuyer sur efface tout le texte et les paramètres de formatage de l étiquette en cours La touche sert également à quitter un menu sans effectuer de nouvelle sélection Touches de navigation Les touches fléchées gauche et droite vous permettent de revoir et de modifier votre étiquette ainsi que de voir les sélections de menu La touche fait reculer le curseur d un caractère et la touche le fait ava...

Page 15: ...ez sur 2 Sélectionnez le style d encadrement ou de soulignage puis appuyez sur Utilisation de symboles ou de carac tères spéciaux Vous pouvez ajouter des symboles ou des caractères spéciaux à vos étiquettes La première fois que vous sélectionnez Symbol ou l une des touches d accès rapide le premier symbole disponible s affiche Autrement c est le dernier symbole utilisé qui s affiche Ajout de symbo...

Page 16: ...de la première ligne puis appuyez sur Un caractère de nouvelle ligne s affiche à la fin de la première ligne mais il ne s imprimera pas sur l étiquette 2 Tapez le texte de la ligne suivante Modes d impression Outre le mode Normal deux modes d impression sont disponibles longueur fixe et mode fanion Le fait d appuyer sur vous renvoie au mode d impression normal Impression des étiquettes de lon gueu...

Page 17: ...puyez sur Impression de copies multiples Vous pouvez imprimer jusqu à 16 copies de la même étiquette en une seule fois Lorsque vous imprimez des copies multiples une ligne de découpe pointillée est imprimée entre les différentes étiquettes Pour imprimer des copies multiples 1 Appuyez sur 2 Appuyez sur pour augmenter le nombre de copies à imprimer Le nombre de copies par défaut est de deux 3 Appuye...

Page 18: ...autant de fois que nécessaire jusqu à ce que vous soyez satisfait de la qualité d impression Nettoyage de l imprimante Votre imprimante a été conçue pour vous procurer un service durable et sans problème tout en nécessitant une maintenance minimale Nettoyez votre imprimante de temps en temps pour qu elle continue à fonctionner normalement Nettoyez la lame de coupe chaque fois que vous remplacez la...

Page 19: ...ez vous que la cartouche est correctement instal lée Nettoyez la tête d impression Remplacez la cartouche Mauvaise performance du couteau Nettoyez la lame Voir Nettoyage de l imprimante Memory Full Nombre maximal de caractères dépassé dans le tampon Effacez une partie ou la totalité du texte tampon Low Battery Piles presque déchargées Remplacez les piles usagées Motor Stall Le moteur cale à cause ...

Page 20: ...20 ...

Page 21: ... navegación Mayús Función Serialización Espaciadora Símbolo Teclas de acceso directo Alimentación Intro Salida de etiquetas Pantalla LCD botón del cortador Normal Imprimir Copias Borrar Cancelación Bandera Longitud Vertical Caja Raya Estilo Bloq mayús Tamaño Lengua ...

Page 22: ...illo en la parte posterior de la rotuladora para abrir la tapa del compartimiento de las baterías Vea la Figura 2 Figura 2 2 Introduzca las baterías teniendo en cuenta la polaridad y 3 Cierre la tapa del compartimiento de las baterías Si la rotuladora no se utilizará por un período largo retire las baterías Introducir el cartucho de etiquetas La rotuladora se suministra con un cartucho de recarga ...

Page 23: ...edida están establecidas en pulgadas Para establecer las unidades de medida 1 Pulse 2 Utilice las flechas para seleccionar las unidades 3 Pulse para establecer las unidades Imprimir la primera etiqueta Ahora ya está listo para imprimir su primera etiqueta Para imprimir una etiqueta 1 Introduzca un texto para crear una etiqueta sencilla 2 Pulse y pulse el botón del cortador para cortar la etiqueta ...

Page 24: ...a selección Botones de desplazamiento Puede revisar y editar la etiqueta y ver el menú utilizando las flechas derecha e izquierda Al utilizar desplaza el cursor un carácter hacia atrás y al utilizar desplaza el cursor un carácter hacia adelante Al pulsar desplaza el cursor hasta el principio del texto de la etiqueta Al pulsar desplaza el cursor hasta el final del texto de la etiqueta Para dar form...

Page 25: ...l primer símbolo disponible De lo contrario aparece en la pantalla el último símbolo utilizado Agregar símbolos La rotuladora es compatible con el conjunto extendido de símbolos que se muestran en la Figura 7 Figura 7 Para agregar un símbolo 1 Pulse juntos 2 Utilice las flechas para desplazarse hasta el símbolo deseado Para ver rápidamente una fila de símbolos puede pulsar la letra correspondiente...

Page 26: ...odos de impresión disponibles el de longitud fija y el de señalización Al pulsar regresa al modo de impresión normal Cómo imprimir etiquetas de longitud fija Habitualmente el largo de la etiqueta está determinado por la longitud del texto Sin embargo posiblemente desee una etiqueta para un propósito específico que tenga una longitud fija sin importar la longitud del texto Puede especificar la long...

Page 27: ...rminada es de dos copias 3 Pulse para reducir el número de copias 4 Pulse o para iniciar la impresión Posiblemente observe una pequeña pausa en la impresión entre las etiquetas en formatos más complejos Una vez finalizada la impresión el número de copias a imprimir vuelve al valor predeterminado de 2 Impresión seriada de las etiquetas Cuando se activa el modo de impresión en serie el número más al...

Page 28: ... diseñado para funcionar sin problemas durante mucho tiempo Asimismo requiere muy poco mantenimiento Limpie la rotuladora de vez en cuando para que siga funcionando correctamente Limpie la cuchilla cada vez que reponga el cartucho de etiquetas Para limpiar la cuchilla 1 Retire el cartucho de etiquetas 2 Coloque la punta de un bolígrafo o lápiz sobre la pieza con forma de L como se muestra en la Fi...

Page 29: ...e de que el cartucho de etiquetas esté correctamente instalado Limpie el cabezal de impresión Sustituya el cartucho de etiquetas Problemas de corte Limpie la cuchilla Consulte Cómo limpiar la rotuladora Memoria llena Se ha superado el número máximo de caracteres en el búfer Elimine parte o todo el texto del búfer Baterías bajas Las baterías están casi descargadas Sustituya las baterías descargadas...

Page 30: ...30 ...

Page 31: ...N 61000 4 2 3 4 5 6 8 11 ENV 50204 UE Immunité EN 55024 addenda A1 A2 Compatibilité électromagnétique CEM Équipement relatif à la technologie de l information et caractéristiques d immunité Émissions EN 61000 6 3 Compatibilité électromagnétique CEM Partie 6 Normes génériques Section 3 Norme d émission dans les milieux résidentiels commerciaux et faiblement industriels Este producto lleva la marca ...

Page 32: ...010 All rights reserved 78 8127 9942 3 3M is a trademark of 3M Company Warranty Limited Remedy Limited Liability This product will be free from defects in material and manufacture for a period of one year from the time of purchase If this product is defective within the warranty period your exclusive remedy shall be at 3M s option to replace the 3M product or refund the purchase price of the 3M pr...

Reviews: