

3
MP8625 Multimedia Projector Quick Setup Instructions
Packout Items Show Above:
• Projector
• VGA Cable
• Remote Control
• MAC Adaptor
• Power Cord
• Video Cable
• Video/Audio Cable
Project Packout
Projector Controls
Packout Items Shown Above:
• PS/2 Mouse Cable
• ADB Mouse Cable
• Serial Mouse Cable
• Stereo Mini-Jack
8625-08A
Power Cord
110V - US
220 - UK, Europe
3-Conductor
Video/Audio Cable
MP8625 Multimedia Projector
Remote Control Transmitter
(batteries included)
VGA Cable
(15-15 pin M/M)
MAC Adapter
with dip switch
Video Cable
(S-Video mini DIN4-pin)
INPUT
RGB1/2
VIDEO1/2
BLANK
TIMER
MENU ON
MOUSE ON
RIGHT
LASER
VOLUME
OFF
MUTE
ST
ANDBY/ON
MAGNIFY
POSITION ON
RESET
Remote Control Transmitter
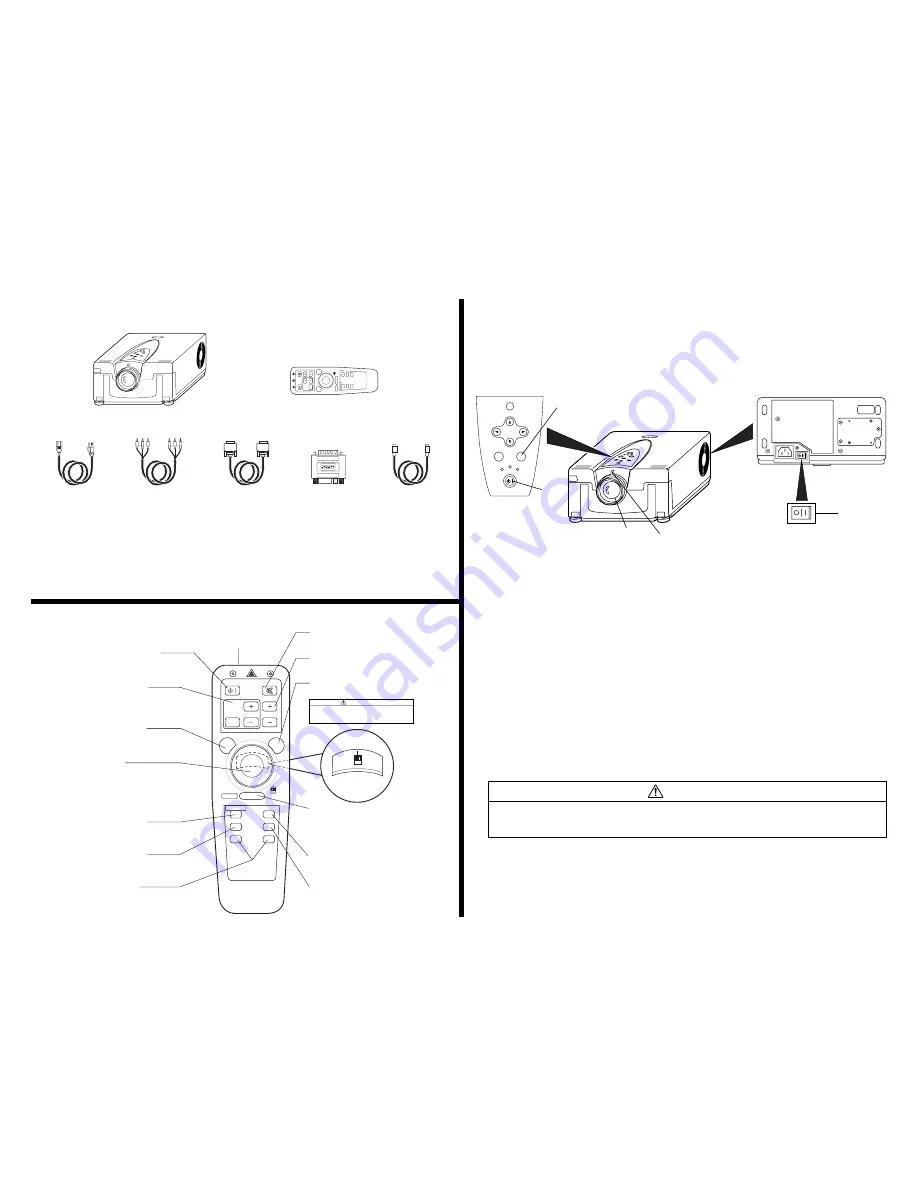
Start Up Procedure
1. Make all cable connections and line hookups with power off.
2. Press the projector power switch
(A)
to the “ON” position.
3. Press the STANDBY/ON button
(B)
.
4. Adjust the screen size by rotating the ZOOM CONTROL KNOB
(C)
.
5. Adjust the focus
(D)
by rotating the projection lens.
6. Turn on all connected equipment.
7. Press the INPUT button
(E)
on the projector or INPUT SELECT (Video or
RGB) button on the remote to select signal source.
Shutdown Procedure
1. Press and hold STANDBY/ON button for 3-5 seconds.
(The lamp turns off, the fan motor continues to run)
Caution
Do not turn off the projector power before pressing the STANDBY/ON button.
The fan motor will run for about 1 minute and cool the projector.
2. After fan stops, press main power switch to “OFF”.
3. Disconnect cables.
8625-11A
RESET
MENU
STANDBY/ON
MUTE
LAMP
ON
TEMP
INPUT
(B)
(E)
(D)
(C)
(A)
8625-14A
INPUT
RGB1/2
VIDEO1/2
BLANK
TIMER
MENU ON
MOUSE ON
RIGHT
LASER
VOLUME
OFF
MUTE
STANDBY/ON
MAGNIFY
POSITION ON
RESET
STANDBY / ON button
Set main power switch to ON. Press and
hold STANDBY/ON button for projector
mode (lamp on) or standby mode (lamp off).
MAGNIFY buttons
Press +/- to magnify image (4x
magification). Press POSITION button and
use disc pad to view entire image. Press
OFF button to return to normal image size.
POSITION button
Press and light POSITION button.
Move DISC PAD to adjust horizontal/
vertical image position.
DISC PAD
Select mode, then move DISC PAD to
position image, navigate menus or control
mouse functions. To select the mode:
• Press and light POSITION button for
position mode.
• Press and light MENU ON button for
menu mode.
MENU ON button
Press and light MENU ON button to display
the Main Menu. Move DICS PAD to select
menu and/or adjust screen values.
BLANK ON button
Press BLANK to display a blank
background with no image. Press again to
return the image to the screen.
INPUT buttons
RGB 1/2: Select computer video input
(RGB1
➔
RGB2
➔
RGB1).
VIDEO 1/2: Select video inputs
(VIDEO1
➔
VIDEO2
➔
VIDEO1).
MUTE button
Press MUTE to switch the audio
sound ON or OFF
VOLUME button
Press +/- to adjust internal/external speaker
volume.
LASER POINTER
Press and hold down button to project laser
pointer.
CAUTION
To prevent injury to eyesight, do not point
laser beam at other persons or look directly
into laser beam.
RESET / RIGHT MOUSE button
RESET: When a menu is being displayed,
press RESET to return menu value to factory
setting.
RIGHT MOUSE: When computer image is
being displayed, press for right mouse button
function.
MOUSE ON button
Press MOUSE ON button to activate mouse
mode. Move DISK PAD to control mouse
functions.
TIMER ON / OFF button
Press TIMER to display and start the timer as
set in OPT menu setting. Note: Timer will not
display on a blank screen. To remove TIMER
display press again.
Backside
of Remote
LEFT MOUSE
button
LASER APERTURE


