Page 2
Batteries
A set of four “AA” alkaline batteries are provided. To
install them in the unit, loosen the two screws on the
battery cover and follow the placement diagram in the
bottom of the battery compartment. The unit will operate
for about 25 hours of continuous use ( no backlite ) on a
fresh set of alkaline batteries. You can also install ni-cad
rechargeable batteries that have been charged in a separate
user provided charger.
There is a battery gauge on the main power on screen. See
page 6 for information on this gauge. When the batteries
drop to 4V, an X appears on the gauge indicating you
should change your batteries as soon as possible. The unit
won’t operate when the batteries drop below 3.7V.
Don’t install used batteries in the unit. If one battery in the
pack is discharged more than the others, it will effect the
operation of the battery gauge and could cause the unit to
switch off without the normal low battery warnings.
Screen
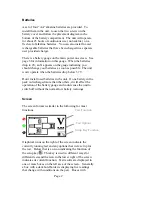
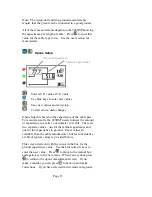
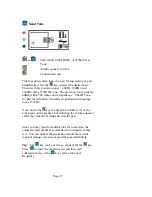
The screen format is similar to the following for most
functions.
Graphical icons on the right of the screen indicate the
currently running test and any options that were set up for
the test. Below that is an icon indicating the function of
the setup key
. This key is used in different ways for
different tests and the icon in the lower right of the screen
indicates its current function. Test results are displayed in
one or more boxes on the left area of the screen. Generally
a box with a dark bold border is displaying live readings
that change with conditions on the pair. Boxes with
Test Function
Test Options
Setup Key Function

