4
78-8124-5866-5-E
3M
™
Cold Shrink QT-lll Silicone Rubber Three Core Inverted Skirted Termination
with High-K Stress Relief
3.0 Install Shield Grounding Braid Assembly & Re-route Cable Ground Wire(s)
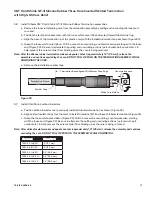
3.1 Position ground braid assembly over cable with assembly connector aligned to edge of armor (Figure 2).
Note: For single ground wire cables, apply assembly to side opposite cable ground wire. Assembly connector should not
overlap armor.
Hint: Use temporary vinyl tape wraps as needed to assist in holding braid assembly to cable (Figure 2).
3.2 Attach Ground Braid Assembly Legs to Cable Phase Metallic Shields
a. Short (Center) Braid Tail – Position ground braid assembly as shown (Figure 2). Wrap short, center ground
braid tail around metallic shield of first cable core. Trim excess braid length to prevent overlap (Figure 2).
Secure ground braid to cable metallic shield using small constant-force spring (Figure 2). Spring and braid
leg should be wrapped in the same direction. Cinch (twist with hand) constant-force springs to tighten.
b. Install Second & Third Ground Braid Tails-Wrap the second and third ground braids around core legs
to adjust length. Position ground braid tails so all constant force springs are equal distance from the
cable armor.
3.3 Apply two highly-stretched half-lapped layers of electrical grade vinyl tape over constant-force springs
(Figure 2).
Trim Here
Metallic
Shield
Connector
Cable Armor
Vinyl Tape
( typical )
Braid Assembly Leg
7.0" (178 mm)
Electrical Grade Vinyl Tape
Constant Force Spring
Solder Block
Figure 2


