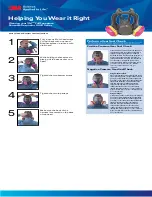
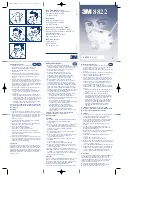
Fitting Instructions
Must be followed each time respirator is worn.
1
Open the respirator with two hands. Hold the attached hook in the left hand with the hook end facing
toward the outside.
2. Place the respirator on your face.
3. Place the upper part of the loops over your ears.
4. Keep the hook openings facing upward and connect the right band on the hook opening which is
near the end.
5. Hold the hook with your right hand and adjust the left band for even tension.
6. Hold the hook with your left hand and adjust the right band for even tension.
7. Adjust headband to lay smooth against your skin for comfort.
8. Adjust the respirator on your face for better fit and comfort. Make certain respirator is completely
opened, bottom edge is under the chin and edges lay flat against your face. Make certain hair, facial
hair, jewelry and clothing are not between your face and the respirator as they will interfere with fit.
9. Place your fingertips of both hands at the top of the metal nosepiece. Mold the nosepiece to the
shape of your nose by pushing inwards while moving your fingertips down both sides of the nosepiece.
Pinching the nosepiece using only one hand may result in improper fit and less effective respirator
performance. Use two hands to mold the nosepiece to your nose.
10. Perform a USER SEAL CHECK prior to each wearing. To check the respirator-to-face seal, place
both hands completely over the respirator and exhale sharply. Be careful not to disturb the position of
the respirator. If air leaks around your nose, readjust the nosepiece. If air leaks at the respirator edges,
adjust the straps back along the sides of your head. If you still cannot achieve a proper seal, place the
band on tighter hook openings. Repeat steps 8-10. If you cannot achieve a proper seal, don’t enter the
contaminated area and see your supervisor.
It is very important to press the nosepiece firmly to the nose bridge to form a good seal.