

How to contact us
3M Tech Assist Hotline
Phone 1800 024 464
________________________________
3M Australia Customer Service
Phone 1300 363 565
Fax 1800 656 222
________________________________
3M Australia Pty Ltd
Phone 136 136
________________________________
World Wide Web
www.3m.com/au/ohs
________________________________
P R O D U C T I N F O R M A T I O N S H E E T
Fitting
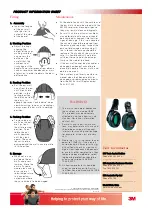
1. As se mb ly
Insert the tongue
of the ear muff
into the slot, lo-
cated at the side
of the helmet.
2. Work ing Po sit ion
Adjust the cups
aligning the
height of the cups
making sure the
cup covers the
entire ear. Be
careful that the
cushions seal
firmly against the
head with no interference from objects
such as respirator headbands or arms
of glasses, in order to obtain the best
performance.
3. Re stin g Po sit ion
Pull the ear muff
away from the ear
until it locks into
position. In the
resting position
the distance from
the ear is far
enough to prevent “echo noise” when
communicating. In noisy surroundings,
always wear the ear muffs in working
position.
4. Park in g Po sit ion
To store the ear
muffs on the hel-
met, just pull
them into resting
position. Then
rotate the ear
muffs upwards
until they lock
again. The cush-
ions will not be
damaged and the muffs can dry while
in this position.
5. Storage
When not in use,
pull down the ear
muffs and press
inwards. Store the
ear muffs some-
where clean and
dry at normal
room temperature
in a uncontami-
nated area where
they are unlikely to be damaged.
Maintenance
At the end of each shift the cushions of
the ear muffs should be wiped with the
3M 504 respirator cleaning wipes so
they may remain clean and hygienic.
Ear muffs, and in particular cushions,
may deteriorate with use and should
be examined at frequent intervals for
signs of damage. If this is discovered
the cushion should be removed from
the earcup and replaced. Inspect the
earcup for damage and cracking. If
this is found, the earcup should be
replaced. Finally check the arm to en-
sure it is flexible and still maintains
sufficient force to hold the earcups
firmly to the side of the head.
If the ear muff cannot be cleaned or a
damaged component cannot be re-
placed, dispose of the ear muffs and
obtain a new pair.
The cushions and inserts may be re-
moved when they become dirty or
damaged and replaced by new parts
from the 3M Ear muff Replacement
Parts Kit 1442
©Copyright 3M Australia Pty. Limited 2007
Neither whole or part of this publication may be reproduced without prior permission.
Ver. July 07
WARNING!
1. The arms are made of
Acetal
and
the cushions are made of
PVC
.
This product may be adversely
affected by certain chemical sub-
stances. For further information
contact 3M.
2. Ear muffs and in particular cush-
ions, may deteriorate with use and
should be examined at frequent
intervals for cracking and leakage,
for example, at the start of every
shift.
3. Where the L
Aeq, 8hr
is greater than or
equal to 110dB(A), if the noise is
narrow band in character with sig-
nificant tonality or has significant
high or low frequency components
or exhibits other complexities, then
the octave band method of select-
ing hearing protection should be
used as described in AS/NZS
1269.3:2005.
4.
All hearing protectors should be
used in accordance with Austra-
lian/New Zealand Standard AS/NZS
1269.3:2005.


