background image

Pannoramic SCAN II 2.2.0 User’s Guide

6.4.4 Removing the magazine from the transporting

system

6.4.4  Removing the magazine from the transporting system

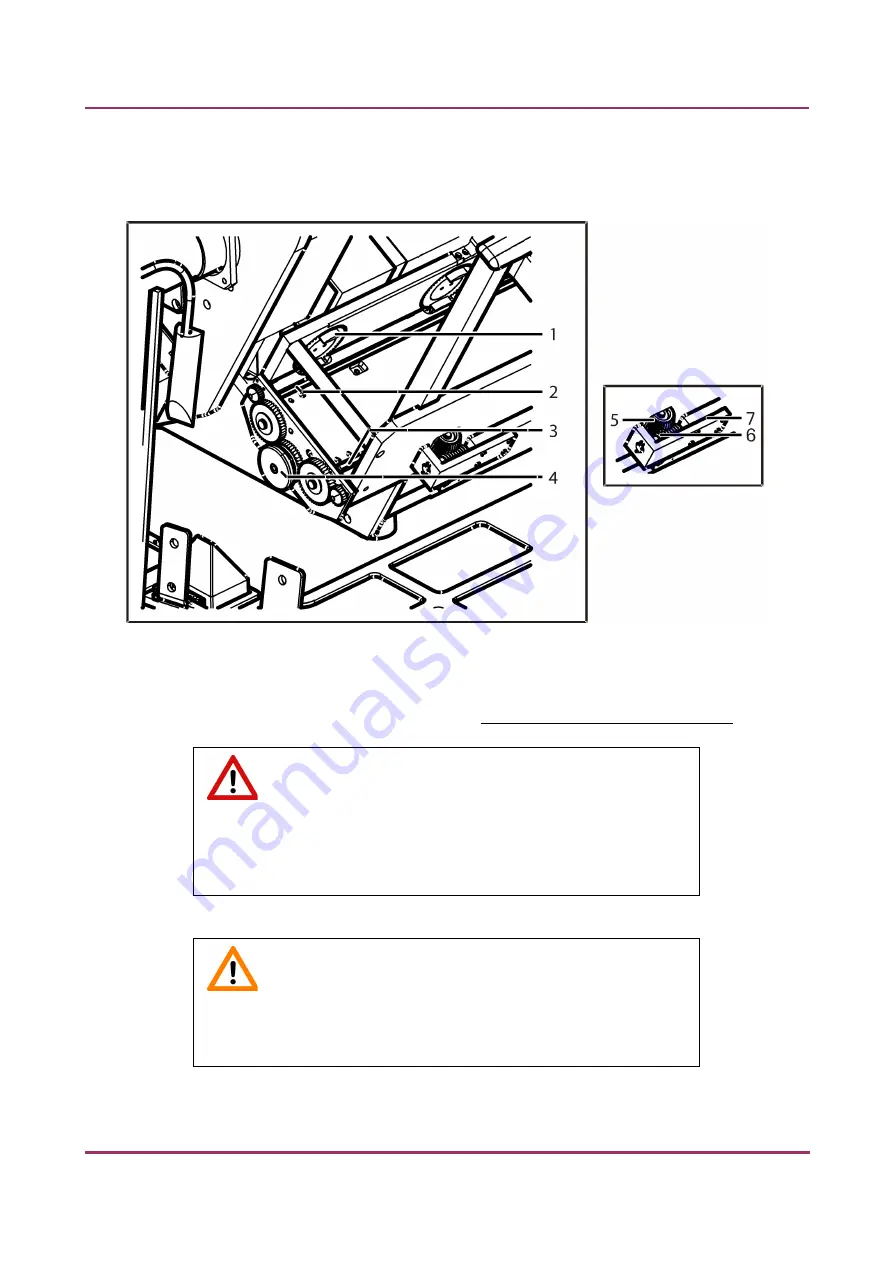
Figure 85 – Removing a magazine

1. Remove the protective covers (see chapter 

6.4.1 Removing the protective covers

).

  Warning!

Crush hazard! Remember to stop the running digitization


process, 

terminate the software session and turn off the power supply before 

removing a jammed magazine.

  Caution!

Check that the magazine is not tilted, so that it rests on both of the 

horizontal guide rails.

January 24, 2020 - Rev. 2

3DHISTECH Ltd.

143(156)

Summary of Contents for Pannoramic SCAN II

Page 1: ...PSII220 UG EN Rev2 Pannoramic SCAN II 2 2 0 User s Guide January 24 2020 Rev 2 ...

Page 2: ...tem 18 1 2 2 Hardware Options 19 1 2 3 Control Software 21 2 Installation 23 2 1 Operation system of the control computer 23 2 2 Control computer ports 24 2 3 Connectors and cables 25 2 4 Coupling the Lumencor SOLA SM II unit with the scanner 26 2 5 Coupling the Lumencor SPECTRA 6 unit with the scanner 26 2 6 External power supply unit 27 2 7 Power the scanner on off 27 3 Operating Slides and Maga...

Page 3: ...enu 104 5 3 3 General functions at the slide menu 104 5 3 4 Slide view with card 105 5 3 5 Table view mode 108 5 3 6 Card collection view mode 109 5 4 Profile and Preview overview on the Planner 110 5 5 Progress features 111 5 6 Settings and Service 112 5 6 1 Settings 112 5 6 2 Service 122 5 7 Hosting 129 5 8 Using Profiles 131 6 Troubleshooting and Maintenance 133 6 1 Recovery functions 133 6 2 S...

Page 4: ...echnical Data 146 Appendix Packaging instructions 150 Preparations 150 Main parts and their accessories 150 Packaging 152 Packing the SCAN II scanner 154 Packing the accessories 154 Closing the package 154 Handling of the package 155 Index 156 January 24 2020 Rev 2 3DHISTECH Ltd 4 156 ...

Page 5: ... 1644767 US 7327515 The above mentioned granted patents granted utility model registered trademarks pending international and national patent applications and the other corresponding IP are the sole properties of the 3DHISTECH Ltd 3DHISTECH Ltd is not liable for damage of whatever nature including but not limited to general or specific damage indirect damage consequential damage or incidental dama...

Page 6: ...s these may interfere with the proper operation THE SOFTWARE IS PROVIDED AS IS AND WITHOUT WARRANTY OF ANY KIND EXPRESSED IMPLIED OR OTHERWISE INCLUDING WITHOUT LIMITATION ANY WARRANTY OF MERCHANTABILITY OR FITNESS FOR A PARTICULAR PURPOSE Further Information For the latest information on 3DHISTECH products and services please visit our website at the following URL http www 3dhistech com Company A...

Page 7: ...or more information and a copy should be kept in the close proximity or near the scanner for reference whenever required This User s Guide is a part of the Pannoramic SCAN II system identified by the following article numbers SI2BGHM00010070001 SI2BGHM00010090001 SI2BGHM00020070001 SI2BGHM00020090001 SI2FPC40001007LUM1 SI2FPC40001009LUM1 SI2FPC4000A007LUM1 SI2FPC4000A009LUM1 SI2FGHM0001007SOL1 SI2...

Page 8: ...unction keys such as F11 or the Ctrl M key combination Example Cross references within the document or to other documents Warning It might cause irreversible damage or harm to the user of the product or the product itself if this instruction is not followed Caution It might cause the product to not work properly if this instruction is not followed and alerts to a potential danger situation Note Ca...

Page 9: ...ical equipment IEC 61010 2 081 2015 Safety requirements for electrical equipment for measurement control and laboratory use Part 2 081 Particular requirements for automatic and semi automatic laboratory equipment for analysis and other purposes IEC 62471 2006 Photobiological safety of lamps and lamp systems IEC 61326 2 6 2012 Electrical equipment for measurement control and laboratory use EMC requ...

Page 10: ... use of assemblies or single parts no liability will be assumed by the Manufacturer This shall also apply to service or repair work of any kind which is performed by other than duly authorized service personnel All claims for warranty and warranty services will be null and void in any such case Note The safety level of the equipment after servicing will be identical with level of the original equi...

Page 11: ...taken to eliminate such influences to a maximum possible degree During periods of non use the Pannoramic SCAN II must be protected with a dust cover Check that power is turned off before you put the cover on Caution Do not position the equipment so that it is difficult to operate and to disconnect the device if necessary Crush hazard There is crush hazard in the movement area of the slide insert d...

Page 12: ...will be accepted in cases of natural wear notably wear and tear parts or improper product handling The Product Manufacturer will refuse any liability in the event of damage resulting from faulty operation negligence or unauthorized intervention into the product notably from the replacement of product parts or the usage of accessory parts from other manufacturers Any such case will void the user s ...

Page 13: ...al Aperture Virtual Slide Slide A digital image of a thin glass plate on which specimens are mounted for microscopic study a dynamic interactive image that you can manage save magnify zoom name evaluate annotate mark comment send it to a colleague electronically for co operation or advice and so on January 24 2020 Rev 2 3DHISTECH Ltd 13 156 ...

Page 14: ...ation to a hardware or software component of the PC will highly affect the functionality of the scanner program 1 1 2 Features and Benefits The Pannoramic SCAN II offers world class brightfield and fluorescent whole slide scanning on up to 9 channels An outstanding 0 12 µm pixel in Brightfield and 0 16 µm pixel in Fluorescent resolution is achieved with the 40 NA 0 95 equivalent to 80 magnificatio...

Page 15: ...tofocus 3MP camera for barcode reading and preview image Image sharpening both for Fluorescence and Brightfield feature which improve the visual appearance of digital slides Focus algorithm finds the focus which is most appealing to the human eye Compact and robust device Good quality and stable manufacturing Pannoramic SCAN II is an optimal choice for customers who need high quality daily through...

Page 16: ...wing figure contains the labels used on the Pannoramic SCAN II main unit the external mains power supply unit and the Lumencor SOLA SM II illumination unit Figure 1 Warning and information labels NOTE The symbol at the feeder slot calls attention to bio hazardous materials in use January 24 2020 Rev 2 3DHISTECH Ltd 16 156 ...

Page 17: ... Magazine feeder door cover 6 Point Grey Grasshopper 3or pco edge 5 5 camera 7 Protectiverails Fluorescent option A 8 Lumencor SOLA SM II fiber coupled illumination unit can be used with Point Grey Grasshopper 3 camera only 9 Lumencor illumination adapter 10 Lumencor illumination cable Fluorescent option B 8 Lumencor SPECTRA 6 Light Engine fiber coupled illumination unit 9 Lumencor illumination ad...

Page 18: ...are components 1 2 1 Pannoramic SCAN II system The following figure shows the main parts of the Pannoramic SCAN II system Figure 3 Pannoramic SCAN II system overview 1 Lumencor SOLA SM II fiber coupled illumination unit optional 2 24 V external power supply unit 3 Lumencor SPECTRA 6 Light Engine optional 4 Monitor 5 Mouse January 24 2020 Rev 2 3DHISTECH Ltd 18 156 ...

Page 19: ...ing on the product order Cameras Point Grey Grasshopper 3 1 CCD monochrome camera for high quality sensitive fluorescent applications pco edge 4 2 Equipped with a high quality sCMOS image sensor for fluorescent applications allowing fast scanning and an outstanding low read out noise High quantum efficiency cooled with Peltier element Camera adapters 0 63 adapter for Point Grey Grasshopper 3 only ...

Page 20: ...ey Grasshopper 3 camera and Lumencor SOLA SM II non triggered or Lumencor SPECTRA 6 fluorescent illumination unit with filters for fluorescence scanning Pannoramic SCAN II Advanced Brightfield and Fluorescence Option base unit completely equipped with pco edge 4 2 camera and Lumencor SPECTRA 6 fluorescence illumination unit trigger cable and filters for fluorescence scanning NOTE If Lumencor SPECT...

Page 21: ...escent illumination unit can be used with Point Grey Grasshopper 3 camera only Lumencor SPECTRA 6 Light Engine illumination unit 1 2 3 Control Software Pannoramic Scanner control software Optional licensed features Fluorescence Extended focus Z stack Barcode reader Pannoramic Viewer software fully functional Optional CaseCenter January 24 2020 Rev 2 3DHISTECH Ltd 21 156 ...

Page 22: ...ide 1 2 3 Control Software TMA module 3D Reconstruction module QuantCenter HistoQuant NuclearQuant MembraneQuant CISHQuant FISHQuant and DensitoQuant modules TumorBoard module E School Encoder January 24 2020 Rev 2 3DHISTECH Ltd 22 156 ...

Page 23: ...from an outer storage or has been transported to the site please leave enough time to normalize the temperature differences before operating the device within the safe range 2 1 Operation system of the control computer The scanner is shipped with Windows 10 but it is also fully compatible with previously sold systems running Windows 7 if the PC meets the minimum hardware requirements see table Con...

Page 24: ...ntrol computer ports The following figure shows the location of the connectors in order to enable easier transportation of the product for a short distance by disconnecting cables and detaching hardware components from each other Figure 4 Ports on control computer 1 Status display 2 DVD drive RW 3 Power on off button 4 Earphone and microphone 3 5mm Jack ports 5 2x USB port 6 Power supply connector...

Page 25: ...ontrol computer Point Grey Grasshopper 3 USB 3 0 cable between Point Grey Grasshopper 3 camera and control computer pco edge 4 2 a pair of CameraLink cables between pco edge 4 2 camera and control computer Video cable between monitor and control computer Power supply cable between 230V 110V and monitor Power supply cable between 230V 110V and Lumencor SPECTRA 6 unit Power supply cable between 230V...

Page 26: ...wer supply cables both of the scanner and the illumination unit 2 5 Coupling the Lumencor SPECTRA 6 unit with the scanner To operate the Lumencor SPECTRA 6 Light Engine fluorescent illumination unit it has to be connected to the Pannoramic SCAN II base unit the camera and the control computer 1 Turn the control computer and the pco edge 4 2 camera off 2 Attach Lumencor SPECTRA 6 fluorescent illumi...

Page 27: ...Front panel 1 main power switch 2 power supply connector Back panel 3 detachable power cord to connect the external power supply unit with the main unit Figure 6 24V external power supply unit 2 7 Power the scanner on off To turn the scanner on press down the I side of the rocker switch at the front panel of the 24V external power supply unit Figure 6 1 and press O to power the scanner off January...

Page 28: ...19 mm Corners 45 beveled corners Edges Grounded or cut Warning Always wear personal protective equipment safety goggles gloves and coat when working with bio hazardous material or slides Warning Do not use a slide when it is broken or its edges are not properly cut or grounded Using such slides can lead to injury Warning If the scanner is equipped with a 40 objective the outer rim of the sample sh...

Page 29: ...d for marking area of interest Note The distance between slide edges and the edges of the mounted coverslip should be 1 2 mm and they should be parallel with each other Note Fluorescent signals become more easily detectable for the scanner therefore resulting in a brighter and better image by treating the slide with a formula that prevents rapid photobleaching of fluorescent reagents e g VECTASHIE...

Page 30: ... off the barcode sticker 2 from the roll 2 Stick it on the colored label area 1 of the slide on the specimen side Caution Ensure that a marginal space of 1 2 mm remains on all sides between the sticker and the label area outer limits It is vital for barcode identification Do not let barcode sticker protrude from slide edges or stick on the coverslip surface 3 The thickness of the barcode sticker o...

Page 31: ...serting slides into a magazine Caution Incorrect slide insertion may break the glass Always make sure that slides are correctly inserted in the magazine The edge of the broken area of the slide is sharp and its removal can lead to injury and contagion Broken slide can be removed only by a well trained person January 24 2020 Rev 2 3DHISTECH Ltd 31 156 ...

Page 32: ...ition 1 of the magazine Caution Only original 3DHISTECH magazines are allowed for use with Pannoramic SCAN II To insert or remove a filled magazine from the device or when transporting it without its cover 4 slightly tilt it to its closed side to prevent the slides from accidentally falling out Magazines should always be kept clean from dust broken glass and other mounting media residues Slide loa...

Page 33: ...prevents soiling and mechanical damage 2 Open the flap of the input stack 5 and put a magazine 1 into the input stack 4 The magazine s rack the back side of the magazine 2 must contact with the guide rails with its open side towards the scanner 3 Slide down the magazine on the input guide rails until it rests on the guide pins or magazines Caution Make sure that the magazines are not misplaced bec...

Page 34: ...magazine Caution Do not place magazines into the output stack 3 or remove magazines with already digitized slides from there during the digitization process Only remove magazines from the output stack when you have finished digitization of all slides January 24 2020 Rev 2 3DHISTECH Ltd 34 156 ...

Page 35: ...ns represent Microscope and Planner scanner modes and the Service mode Microscope mode for digitization of individual slide or individual rack set scanning profile of the slide run Live teleconsultation use Live microscope Planner mode plan the entire scanning procedure assign one or more profiles to each slide define Brightfield and Fluorescence or mixed scanning mode within a run define scanning...

Page 36: ...ner 2 2 0 main window The following functions are available for you to select from at the main menu bar Switch between Microscope and Planner modes Microscope initialization All motors and the preview camera during start up Brightfield mode the camera set for brightfield scanning is initialized Fluorescence mode the camera set for fluorescence scanning is initialized Remote server hosting Start an...

Page 37: ...loaded A slide that is loaded at the moment is highlighted with a blue background and outer line Microscope objectives Live view is on Live view is on with the shutter closed Toolbar for live images Click to display the toolbar for Live view These functions are only available for the displayed live image i e Live view is ON but not available for camera images during digitization When in Normal liv...

Page 38: ...ew where in spite of the higher noise level the resulting image will be refreshed as in normal mode Image intensity The intensity of the pixel at which the cursor is placed is displayed by I in the Image intensity window X and Y stand for the location of the pixel within the image coordinate system Screenshot Displays the magnifier window Displays or hides the vertical and horizontal scale bars Ca...

Page 39: ...r automatically If you want to name the slide manually turn on the Manual naming function and if you want to generate slide name based on the corresponding settings set in Preferences activate Generate function Barcode parsing Select the type of barcode profile from the drop down list for slide naming though parsing the barcode string By using Default barcode profile the barcode of the slide is be...

Page 40: ...edited If you click Add new item on the list blank input fields will be displayed Define modify profile name in the Name input field select barcode type from the Type drop down list Define modify ranges within the barcode string when Range is selected at Parsing modes to extract necessary information Slide name Profile Case Block Root folder January 24 2020 Rev 2 3DHISTECH Ltd 40 156 ...

Page 41: ...e path Set destination folder in the input field by typing in the path or clicking to browse for the folder Free space Free space capacity of selected local drive Conversion settings Apply conversion Turn on to convert the slide to other formats once the scanning has finished Keep original MRXS Slide The original MRXS format of the slide is stored in the local folder Target format The slide is con...

Page 42: ... An 8 16 bit grayscale TIFF image will be generated if not selected File size is smaller but some of the viewers cannot handle it TIFF type Automatic the converter automatically selects the most appropriate method based on the size of the source slide Force simple tiff TIFF files use 32 bit offset addressing therefore file size is limited to a maximum of 4Gb Force big tiff Big TIFF files use 64 bi...

Page 43: ... Optical path frame default 3 Pixel size accuracy default 7 X Y offset accuracy default 5 Depth accuracy default 3 Tile pool size default 1000 UTC time in minutes default 0 Basic offset table active by default Shared plane position active by default Shared optical reference active by default Conversion save path The folder set in this box is designed to store the final slides after conversion Conv...

Page 44: ...ter application only otherwise the control software may close due to an error Click to assign the appropriate Quant probe to the digital slide If the scanning of slide has finished the progress of Quant evaluation is displayed in the QuantCenter Processing Queue window For further information on QuantCenter please read QuantCenter User s Guide Other settings Scan separately The FOV areas of the pr...

Page 45: ... to scan from the Server drop down list Click the arrow to show the list of saved server profiles or click Add new item at the bottom of the list to create another server connection When creating another server connection define the following details of the server in the Server Editor window Display Name Host Name Protocol January 24 2020 Rev 2 3DHISTECH Ltd 45 156 ...

Page 46: ...r data By double clicking a list item server data will be loaded in the Scan to Server panel After loading server data user name and password is required to be added for authentication and accessing the server If connection is successful a green checkmark is displayed in the window Slide naming Barcode parsing Similarly to the settings of the Scan to local panel barcode settings for parsing can be...

Page 47: ... 5 Standard 2 of 5 IATA 2 of 5 Matrix 2 of 5 Telepen Code 93 Code 11 MSI Codabar Patch Code Pharmacode EAN 13 EAN 8 UPC A UPC E 2D barcode types Aztec Data Matrix PDF417 Compact Micro PDF417 QR Micro QR MaxiCode NOTE If embedded barcode library provided by Vintasoft barcode reader software is used refer to Figure 80 for the list of supported barcode types January 24 2020 Rev 2 3DHISTECH Ltd 47 156...

Page 48: ...the corresponding settings of the Preferences window Activate the option Manual naming to name slides manually Slide save path Synchronize server folders select Folder Case Block to synchronize folders Conversion settings Refer to Scan to local panel see above parameterization and settings are the same Quant settings Run QuantCenter Turn this function on for automatic evaluation of the completed d...

Page 49: ...can be initiated from the slide preview window as well The scanner software automatically saves the preview image of a slide that is loaded into the scanner and of which a preview image is recorded Whenever you add a new magazine in Planner mode as well the software asks you whether the magazine has previously been loaded or not Click Yes if the magazine has already been processed then enter the n...

Page 50: ...escence Additional profiles can be created after clicking Create You can also search for a specific profile by filtering based on the following data Objective type Multilayer mode Illumination Filters Modify date Last use date Click Search to run search based on the set criteria Click to make parameters of the selected profile available for editing After modification click Save to overwrite existi...

Page 51: ...to the text field and clicking Save as Reset Zoom This function is active only in Live view at 1 1 magnification Live image magnification Settings and Service function descriptions are detailed in chapter 5 6 Settings and Service Help In the About window the version of the software and licensing details are included January 24 2020 Rev 2 3DHISTECH Ltd 51 156 ...

Page 52: ... Settings and Service for more information Services see chapter 5 6 Settings and Service for more information In accordance with the selected mode the Profile Settings Panel and the Microscope Control Panel views are modified 5 1 Brightfield Scanning Mode Microscope View consist of three different sections Main functions Located at below the window header these functions are identical in both mode...

Page 53: ...Pannoramic SCAN II 2 2 0 User s Guide 5 1 Brightfield Scanning Mode January 24 2020 Rev 2 3DHISTECH Ltd 53 156 ...

Page 54: ...19 Focus settings for scan profile Limits of the range You can define focus limits by selecting Limits of the range for focusing You can set the upper and lower limits by selecting the desired value in the selection boxes This is useful if focusing was not targeted on the specimen but on a spot on the coverslip Focus distance the distance of focal points can be set to create a focus map based on w...

Page 55: ...amic SCAN II 2 2 0 User s Guide 5 1 1 Profile Settings Panel Sample detection This panel offers options for threshold setting and selection of the area to be scanned January 24 2020 Rev 2 3DHISTECH Ltd 55 156 ...

Page 56: ...e smaller specimen areas will not be digitized Auto Threshold By clicking the specimen will automatically be detected in the preview image Caution Make sure that the detection result is acceptable for you Otherwise set the threshold value manually or append missing areas with the help of appropriate functions in the Preview window Use marker with threshold If the specimen cannot be identified as r...

Page 57: ...Pannoramic SCAN II 2 2 0 User s Guide 5 1 1 Profile Settings Panel Figure 20 Scan everything within the marked area selected not selected January 24 2020 Rev 2 3DHISTECH Ltd 57 156 ...

Page 58: ... eliminate those areas Warning Do NOT use Remove coverslip function on TMA slides The layout of TMA slides may mislead the detecting algorithm Fill holes inside the scanmap If selected the holes inside the specimen will also be scanned Often these holes contain small sample objects that otherwise would not be scanned Remove specks If selected the scanner does not digitize objects smaller than the ...

Page 59: ... scanmap draws manually on the preview image is used for scanning Use selection box restriction If selected only the area inside the box is scanned It is useful if you only want to scan the area that is equivalent with the size of the coverslip so external specks will not be scanned Multilayer mode Select Single layer option if you want to scan a single layer of the slide Extended focus By choosin...

Page 60: ...but the use of a deconvolution algorithm can significantly increase the time that takes to create a digital slide Scan Settings Includes the Stop and go scanning mode by which the slide tray stands still during recording the FOV then it moves on so that the scanner can record the next FOV Use ColorMatrix Select an applicable preset color profile to be used for Brightfield scanning from the drop do...

Page 61: ...se saved compensation image function enables the use of previously recorded reference images for all slides Use this function when the slide is completely covered by the specimen for example blood smear thereby making compensation image capture impossible For such slides use an empty slide with coverslip to grab a compensation image If you select this the software will not create new compensation ...

Page 62: ... and selection of the area to be scanned Figure 24 Preview panel Threshold options This section is located at right side of the preview window Scanmap Source is designed to set which type of scanmap is used on the preview image This scanmap is displayed automatically in the Profile Scanmap Source setting Selectable scanmap types are the following Use threshold Load previously saved scanmap from fi...

Page 63: ...ng in Brightfield mode Remove Coverslip If selected the edges of the coverslip are not detected as specimen to be scanned Depending on the threshold level it is possible that the edges of the coverslip are detected as areas to be digitized Figure 25 Preview image with and without coverslip edge Caution It requires lots of time since it cannot find focus neither on the edges nor on specks to digiti...

Page 64: ...etects the specimen in the preview image Caution Make sure that the detection result is acceptable for you Otherwise set the threshold value manually Manual threshold Set threshold value manually or calculate value on the actual preview with Calculate Threshold function which is active only if setting the value manually This sets the sensitivity of the specimen detection To set the desired thresho...

Page 65: ...level selection box in the range of 0 255 This sets the sensitivity of the specimen detection inside the marker area To set the desired threshold value manually change the setting in the Threshold selection box in the range of 0 255 The default value is 212 Everything within marker This function is available only to select if the Use marker with threshold function is activated To scan everything w...

Page 66: ...ine the Live image that you can access from the Live view Union Add the selected areas to the preview Mark area for scanning based on the shape selected in the Preview Toolbar This area will not be scanned Erase Delete selected areas from the preview image Deselection is made based on the selected shape from the Preview Toolbar This area will not be scanned Figure 27 Not scanned selection Edit The...

Page 67: ...abled only if a TMA grid has already been placed on the preview image Set grid parameters row and column numbers and spot shape round or rectangle Figure 29 TMA tool Grid selector Delete TMA grid by clicking the X at the top right corner and rotate grid by clicking the icon at the bottom right corner Enter the number of rows and columns in the Rows and Columns fields or select the appropriate valu...

Page 68: ...frame displayed in the image and only the area inside the box is scanned It is useful if you only want to scan the area that is equivalent with the size of the coverslip so external specks will not be scanned Figure 30 Use selection box on the preview image The following colors are used in the preview image to demonstrate digitization and selection settings Figure 31 Colors in preview image and La...

Page 69: ...ected in the Preview panel the preview camera detects the marker pen The inside areas appear in red color and will be digitized Areas scanned in This color is only displayed during scanning Hide all layers All the layers will be hidden existing but not visible The original preview image is shown but layer information are still valid Note that while this function is active none of the other preview...

Page 70: ...imits by selecting the desired value in the selection boxes By using Set Range the Lower limit value is set to 32 of the current focus value and the Upper limit value is set to 32 of the current focus value This is useful if Auto Focus does not find the focus on the specimen but on the coverslip Also this makes the focusing sequence faster For manual focusing define the manual focus step size by a...

Page 71: ...yed in microsecond millisecond and also in second Figure 34 Window of Exposure Indicator in Brightfield scan mode 5 1 2 4 Image Intensity Click to open Image intensity settings window An image is defined as a two dimensional function f x y the amplitude of at any pair of coordinates x y is called the intensity or gray level of the image at that point The pixel intensity at the coordinate pointing ...

Page 72: ...tioning tool This tool offers easy and punctual slide navigation in distinctive steps Set step size FoV 1 or to determine the size of movement in proportion of one FOV Click an arrow to move to the required direction with the set step size 5 1 3 Quick preview functions Use Ctrl mouse wheel to zoom in or out to the preview area or the Live image A quick preview function toolset pops up by right cli...

Page 73: ...7 Quick toolset 5 1 4 Quick microscope functions A quick microscope functions tool can be displayed upon right clicking on the background of the main window outside the preview window It includes quick access buttons to main functions January 24 2020 Rev 2 3DHISTECH Ltd 73 156 ...

Page 74: ... s Guide 5 1 4 Quick microscope functions Figure 38 Quick toolset for microscope Autofocus Live tools Fast mode Screenshot Magnifier Ruler Image processor plugins Add scanmap Auto exposure January 24 2020 Rev 2 3DHISTECH Ltd 74 156 ...

Page 75: ...g Exp Time If Auto Exp is inactive exposure time of each filter can be defined manually Values such as Calc Exposure time in Microscope Control panel and those that are specified manually are loaded in these fields Value units can be the following microsec millisec sec Exc The given value specifies the excitation intensity in percentage of the illumination unit DG Digital Gain This is camera depen...

Page 76: ...he Coarse focus function the lower limit value is set to 64 and the upper limit value is set to 64 of the current focus value Note Before entering coarse focus value turn live image on and set a suitable focus position You can accept the current Z value by clicking Assign Current Interpolated focus If you select the Interpolated focus option the coarse focus level is calculated from three differen...

Page 77: ...he coverslip Focus frequency This value determines how many field of views will pass before the sample is refocused This value should be selected depending on the unevenness and size of the specimen Focus Exposure The exposure time during focusing it can have three states Short Normal Long Sample detection The Sample detection panel offers options for setting threshold and the selection of scannab...

Page 78: ...n a more sensitive scanning meaning that more areas will be digitized however this may also include specks or other imperfections of the slide Greater values result in a less sensitive scanning but it is possible that some of the smaller specimen areas will not be digitized Auto Threshold By clicking the specimen will automatically be detected in the preview image Caution Make sure that the detect...

Page 79: ...ctivate this function Figure 40 Scan everything within the marked area selected not selected Threshold enhancement Remove coverslip If selected the edges of the coverslip are not detected as specimen to be scanned Depending on the threshold level it is possible that the edges of the coverslip are detected as areas to be digitized Figure 41 Preview image with and without coverslip edge January 24 2...

Page 80: ...y adjusting the Speck size slider Dilate mask Adjust the slider to enlarge or decrease the scanned area The edge is extended discretely by 100 µm each time Scanmap option The previously saved scanmap can be loaded for use Use Threshold Preview settings set in Microscope Controller Panel Preview window are applied to create a scanmap Loaded scanmap This function is useful if the slides contain area...

Page 81: ...ls with the Levels selection box The current focus value is the initial level If you set 5 for example then the initial level plus four two focus levels above and below the FOVs are captured Therefore it is advised to choose an odd number for the focus levels Separate layers are created and stored this way and can be opened with Viewer applications The Z Stack slide contains the extended focus lay...

Page 82: ... time consuming Note Make sure to select the Change filters at each field of view option if using multi band filter for multi channel digitization Caution If the specimen area is barely visible it is possible that the software will analyze that area as an empty one Maximum exposure time A limit value can be set to determine that the exposure time cannot be longer than the time of focusing and calc...

Page 83: ...age compensation method is applied Extended focus Select the type of the extended focus algorithm used during scanning Legacy uses original extended focus algorithm it is recommended for wide field fluorescence scanning Note that this algorithm is optimized for scanning large areas so if the size of the area to be scanned is insufficient the correction might not be perfect Maxima the final image i...

Page 84: ...ss effective compression It is a raw data file PNG Lossless compressed image format JPG The quality can be set in the value box Greater values result in better quality but larger files The default setting is 80 Bit depth 8 bit Stitching Use Stitching function enables the seamless stitching of digital tiles Sharpening Select this option to improve the visual appearance of digital slides Save focus ...

Page 85: ...nned Figure 44 Pre scan preview image Threshold options This section is located at right side of the preview window Scanmap Source is designed to set which type of scanmap is used on the preview image This scanmap is displayed automatically in the Profile Scanmap Source setting Selectable scanmap types are the following Use threshold Load previously saved scanmap from file Custom scan map January ...

Page 86: ...0ms that is displayed in the Profile Wizard window Scanning process takes a couple of minutes only and cannot be interrupted Pre scan high resolution creates a High Resolution fast FL preview image of every FOV within the selected area in single layer DAPI with an illumination time of 20ms that is displayed in the Profile Wizard window Scanning process is initiated with a simple Pre scan the locat...

Page 87: ...oles inside the specimen will also be scanned Often these holes contain small sample objects that otherwise would not be scanned Remove specks If selected the scanner does not digitize objects smaller than the predetermined size This helps filtering specks and other uninteresting objects out Set the maximum volume of specks manually in the setting window Threshold Auto threshold Select this option...

Page 88: ...for example weak contrast it can help to encircle completely the specimen with a black marker pen You have to draw a full circle with the pen to enable the detection Marker pen detection will make specimen detection easier by limiting the scanned area Manual setting of Use marker with threshold If this option is selected only the area encircled with a marker pen will be scanned You can define the ...

Page 89: ...map Position To position the specimen holder that holds the current slide click Position sample and then click on the area of interest on the preview image This will define the Live image that you can access from the Live view Union Add the selected areas to the preview Mark area for scanning based on the shape selected in the Preview Toolbar This area will not be scanned Erase Delete selected are...

Page 90: ... You can select the area to be scanned with the different tools on the Preview toolbar Rectangle tool Draw rectangle shaped area Ellipse tool Draw ellipse selection Polygon tool Area selection by defining a polygon shape Finish area selection by double clicking with the mouse at or near the starting point TMA tool TMA tool is used for selecting TMA spots on TMA slides You can set the selection set...

Page 91: ...pots on the X and the Y axis in µm in the Core distance fields or select the appropriate values with the arrows Enter the average diameter of the spots in the Core size field or select the appropriate value with the arrows Clear scanmap The entire scanmap area will be cleared and reset to default Use selection box restriction If selected only the area inside the box is scanned It is useful if you ...

Page 92: ...n the basis of user settings for example Fill holes in scan area and not detected by the selected threshold value Detected sample areas that will be scanned These areas are digitized They are detected on the basis of the selected threshold value Detected sample areas that will not be scanned These areas are not digitized on the basis of their position for example they are outside the selection box...

Page 93: ...s shown but layer information are still valid Note that while this function is active none of the other preview functions can be selected Separate scanning Discrete sample areas will be scanned separately as individual slides If there are two samples on a slide two separate virtual slides will be created NOTE Discrete areas are numbered in the preview window You can select up to 650 discrete areas...

Page 94: ...or SetI3 If you want to go back to any of the previously set focus points click the appropriate button To delete the stored values click Clear Values The software calculates a coarse focus level from the three values determined this way as a basis for the fine focusing routine You can only define the start parameter here This will however speed up the focusing process If you deselect the Use fine ...

Page 95: ...Indicator in Fluorescence scan mode Select the types of filters you want to use during scanning You can select the filter types and the number of channels to be used The values in the EXC column define the excitation of the Lumencor illumination in TW define exposure time weight and in the DG the amount of digital gain is displayed It is also available for you to enable Extended Focus EF and or Z ...

Page 96: ...displayed in the Image Intensity window Figure 56 Window of Image Intensity 5 2 2 4 Stage positioning After clicking you can perform microscope movements on the Live image with this control function The number at the center of the controller defines the step size by which the stage is moved Value can be entered by hand or with the slider Figure 57 Stage positioning panel 5 2 3 Hidden functions Use...

Page 97: ... Retake preview Settings Toggle deletion always on top Reset Zoom Window auto size Clear Scanmap 5 2 4 Quick Microscope functions A quick microscope functions tool can be displayed upon right clicking on the background of the main window outside the preview window It includes quick access buttons to main functions Figure 59 Quick toolset for microscope Autofocus Figure 60 Autofocus January 24 2020...

Page 98: ...ser s Guide 5 2 4 Quick Microscope functions Objective type Figure 61 Objective type 20x 40x Filters Figure 62 Filters Microscope mode Brightfield Fluorescence Figure 63 Microscope mode January 24 2020 Rev 2 3DHISTECH Ltd 98 156 ...

Page 99: ...ar of the main window Profile History This function can be activated by clicking in Preferences During setting scanning profile all of the previously used parameter will be saved automatically Each modification in the profile creates a so called Milestone unit These stage units are linked in a row displayed at the bottom left corner of the main window Figure 66 Progress of the profile modification...

Page 100: ...parameter modification For the easier perspicuity modifications can be observed in a pop up window by clicking the button in which both the original and the modified values are presented Click to save parameters of the milestone unit into a new profile Click to restore a modification stage load parameters of a milestone unit if needed Figure 68 Profile history tree January 24 2020 Rev 2 3DHISTECH ...

Page 101: ...magazine can be planned but also profile assignment to slides of prepared virtual magazines is available to be performed It is also possible to scan to different locations with each profile and virtual slides can be created and stored in different folder or server Planner module offers you three window layout types for planning scans located under the Preferences Planner Layout Selector menu Slide...

Page 102: ...equired preview type from the following from top to bottom Brightfield Pre scan Pre scan high resolution Pre scan high resolution Figure 69 Take all preview selector By clicking Take all previews the scanner records all the preview images taken of all the slides that are loaded into the device If there are at least two racks added in Planner and Enable reloading of magazines with same slide set fu...

Page 103: ...oaded Save CSV Rack number slide position slide name profile name illumination type data can be saved to a CSV file Profile management for all the magazines The following profile related tasks applicable for the planner can be performed Add current profile to all racks Open profile for all racks Detach current profile from all racks Detach profiles from racks Clear planner Clear all slide result f...

Page 104: ...ides Clear all slide results 5 3 3 General functions at the slide menu Mark empty slide positions Define range in the Range to skip boxes to set multiple slide positions as empty For a single slide enter set slide position with the arrows in the Range to skip box or right click on a slide and select Skip Figure 71 General functions at the slide menu Click Reset at the Slides settings bar to cancel...

Page 105: ...e selected profile to the slides in the range 5 3 4 Slide view with card Select from Preferences Appearance settings Planner layout selector to activate this view Depending on the actual view preference selected at slide positions can have a horizontal or vertical layout Slide preview and the list of the assigned profiles are displayed Figure 72 Vertical slide view with card January 24 2020 Rev 2 ...

Page 106: ...ing or profiles can be added or removed for from the slide respectively The parameters of the assigned profile is displayed in a card The colors of a Brightfield and a Fluorescence profile cards are different Figure 74 Brightfield profile card and Fluorescence profile card January 24 2020 Rev 2 3DHISTECH Ltd 106 156 ...

Page 107: ...marked as Failed delete status before scanning by clicking If the virtual slide is created the scanning is finished the location path of the destination folder is displayed To re scan and thus recreate the slide click at the front of the displayed path to start the scanning process over Scan properties Profile editor for Scheduler NOTE Once scanning has finished the thumbnail of the digital slide ...

Page 108: ...files can either be BF or FL if the scanner is capable to operate in these two scanning modes Figure 75 Table view mode In Table view the following information are displayed in the profile strip based on the loaded profile Profile Illumination Priority Quant probe Objective Filters Progress Scan properties The location of the virtual slide with the selected profile can be defined Scan result Scan ...

Page 109: ...collection view mode If you click the button each of the slide previews are displayed in the window Add profiles by clicking and detach profiles by clicking Functions are the same as with the other modes Figure 76 Card collection view mode January 24 2020 Rev 2 3DHISTECH Ltd 109 156 ...

Page 110: ... of the profile settings in coherence with the view type of the Profile Setting panel Slide preview is displayed in the Preview window in which the scanmap can be modified until beginning the scanning process Every aforementioned Profile setting can be modified depending on the scan profile type being Brightfield or Fluorescence Figure 77 Selected profile and expanded Preview window in Planner mod...

Page 111: ...whenever there is a running hardware operation or scanning procedure Progress content can be therefore different depending on the type of the running procedure The following information is included in the progress log list during scanning Filter Elapsed time Location Slide name Free space FOV number January 24 2020 Rev 2 3DHISTECH Ltd 111 156 ...

Page 112: ...and Services by clicking at the right side of the main menu bar 5 6 1 Settings Activate Settings by clicking at the right side of the main menu bar Preferences This panel contains user settings that have global effect on the GUI and some of its functions Figure 78 Preferences January 24 2020 Rev 2 3DHISTECH Ltd 112 156 ...

Page 113: ...th card Table Card Collection Preview window start position Initial position Last position Center screen Live mode Rendered live image is displayed in an embedded window External legacy live image is displayed in an external window Default scanner mode selector Microscope or Planner mode Server scan result viewer Open digital slide with InstantViewer in web browser or CaseViewer when scanning to s...

Page 114: ...tification is successful Rotate barcode image by 180 degrees Unload slide after planner scan Enable reloading of magazines with same slide set Automatic empty slide position detection Slide positions of the magazines to which slides are not loaded into will be detected by the software and slides without including any marking etching label on the label area will be classified as slides to skip Upon...

Page 115: ...r Preview Light RGB Light Relay Scan Loader Service Shutter Slide Scanner Stage Software log All of the circumstances and states of the slide scanning procedure is saved LogID is the sequence number of scanning performed on the scanner in use Profile Name Illumination mode Scan type Scan Start Scan Finished URL Error January 24 2020 Rev 2 3DHISTECH Ltd 115 156 ...

Page 116: ...the bottom of the section under Usable abbreviations Basic settings On this panel you can define the swap file location set shutter auto close time in FL and set the number of compensation images for preview camera if needed For more comfortable and safer use by defining a location in the Planner autosave folder field a scan plan will be automatically saved The save frequency can be set in the Num...

Page 117: ... Profile content is automatically saved at the specified time frames Enable setting of focus time Parameters Short Normal Long related to focus time will be enabled on the profile settings panel Normal is set as default Prescan settings Unlike scan settings in Microscope or Planner mode Prescan toolbar includes the same settings for pre scanning but these depend on the hardware filter settings Jan...

Page 118: ...seViewer software can be opened after scanning is finished These calls can run only the following scripts cmd bat exe The application cannot handle script languages that are not supported by the Windows Operation System You can define external application call settings for the following cases Slide scanning has finished Scanning error has occurred January 24 2020 Rev 2 3DHISTECH Ltd 118 156 ...

Page 119: ...est whether the Scanning Error Occurred settings work by clicking Important If C ProgramData 3DHISTECH SlideScanner MessengerUserPreferences xml is missing or damaged the External application call feature will not be able to read the address book therefore it will not operate To solve this issue the address book must be repaired or created again In the Message Call section of the window complex me...

Page 120: ...n the Message Call section of the External application call settings window then enter Display name and Address of the recipient Select message functions under the Send Message if field for the selected recipients from the drop down list at the top of the section Click Delete user if you want to remove a user from the list after selection Report sender settings Add new recipients to the list by cl...

Page 121: ...lly after opening the cover see chapter 6 4 1 Opening the protective covers Slide removed Click this button to notify the software that you have removed the slide manually PSF settings This panel serves to specify Point Spread Function values PSF values are required to use the new deconvolution function Click Add filter to add another filter to the list Click Save to apply parameters January 24 20...

Page 122: ...in menu bar Service password Enter password first to enable service settings for modification Camera settings Position Objective type Select the type and the magnification level of the objective Magnification Use manual camera changer Changing of the cameras is performed manually January 24 2020 Rev 2 3DHISTECH Ltd 122 156 ...

Page 123: ... Gamma value 2 2 is applied sRGB standard Microscope Like Color scheme is defined by calibration standard Gamma value White Point D50 Legacy a Color scheme calibrated for the previous software version is applied Custom parameters are freely customizable as follows Color Scheme Calibrated Scheme is defined by the color calibration slide Legacy a Color scheme calibrated for the previous software ver...

Page 124: ... the coverslip so external specks will not be scanned Stitching overlap Set the amount how much the FOVs should extend over Measure camera rotation Camera rotation angle is measured Alpha blending The two images are blended Lower image position Moves the upper image sideways in distinctive steps Reset all camera rotation Click this button to set camera rotation values to default Save settings by c...

Page 125: ...d from the Filter type list in the available 10 filter positions in the turret Move filter wheel to insert position Enable position Note Whenever a selected physical filter is disabled the filter itself must be removed from the turret Select Filter type Filter channel and Filter name Check Available for scanning Set Lumencor LED light source set Excitation and Emission wavelength bandwidth values ...

Page 126: ...ere is only one active camera for Brightfield mode Objectives field displays the objective used for scanning There might be specks or minor etches on the surface of the compensation slide that require modifying the threshold settings Therefore the scanner will not use those areas for the creation of the compensation images To modify the threshold settings set the desired threshold value in the box...

Page 127: ... redefine the barcode reading area by dragging the edges of the blue square To check whether the barcode reading settings are correct display the barcode digits in the Barcode field by clicking If the label area is not correctly illuminated adjust Barcode LED intensity value Click to check that barcode settings are correctly set Click Reset barcode exposition time to load default exposition time u...

Page 128: ...e compensation A compensation image is used during barcode reading Grab new comp Click this button to create a new compensation image for barcode NOTE New compensation image for barcode can be recorded only if MIL is used for barcode identification Barcode types Linear Stacked linear Postal Two dimensional Second barcode priority The software is capable to read two barcodes at the same time If act...

Page 129: ... be tested in cycles based on the value set in the Loading cycle per magazine field Click Remove magazine when finished 5 7 Hosting Hosting a live teleconsultation session gives specialists the opportunity to examine the same Live microscopic image during a real time counseling even if being in laboratories far away from each other This means multiple users can connect to the device at the same ti...

Page 130: ...sion 3 Click to start hosting the session 4 The software displays the hosting address and the port number Join teleconsultation as a client 1 Start the Lite version of the scanner software 2 Type in your nickname used during the session 3 Enter Host address and Port number 4 Click Connect On Client side the following functions are unavailable inactive Selection box Scan properties Separate scannin...

Page 131: ...an Options Focus frequency in Fluorescent mode Focus frequency in Brightfield mode Compression procedure Use of a fixed compensation image in Brightfield mode ON OFF Use of Save focus quality ON OFF Use of stitching ON OFF Determination of the area to be scanned Use of automatic threshold specimen Use of specimen threshold value Use of marker pen threshold and specimen threshold values Use of scan...

Page 132: ...on ON OFF Intensity statistics Intensity reducing Intensity equalization Sharpening ON OFF Use of skip empty field of views ON OFF Do not use extended focus on empty field of views ON OFF Custom extended focus Other settings Limitation of focus range ON OFF Enable disable Multilayer options Use of extended focus or Z stack step size and focus level Output resolution January 24 2020 Rev 2 3DHISTECH...

Page 133: ... plan The backups are placed in the default document folder of the actual windows user and can be loaded by clicking the Load plan button 6 2 Safety Information Check cables plugs and connections before operation and if defective or cannot be replaced contact 3DHISTECH Service for support Check whether the device is compatible with your local line voltage It can operate at line voltages 100V to 24...

Page 134: ... NEVER switch on the Lumencor SPECTRA 6 Light Engine illumination unit when it is not connected to the microscope Ensure that the light source is properly connected Do not cover the unit as it would cause abnormal temperature rising Lumencor SOLA SM II illumination unit Keep inflammable and combustible materials outside the range of Lumencor SOLA SM II illumination unit Do not expose yourself to t...

Page 135: ...t in a room with proper air ventilation Do not let dust or fingerprints remain on optical surfaces 6 3 Troubleshooting This section describes the most common troubleshooting solutions for the Pannoramic SCAN II product If any problem arises that does not have solution in this manual contact 3DHISTECH service support at support 3dhistech com The product does not start Power supply is interrupted 1 ...

Page 136: ...tective covers 6 Reconnect 24V power supply and control computer to line power supply 7 Switch on the 24 V power supply 8 Switch on the control computer 9 Launch control software Virtual slide is improperly focused almost across its entire surface Focus range enabled Disable Limiting focus range Poor image quality Imaging error for example chromatic aberrations Contact 3DHISTECH Service for suppor...

Page 137: ...n Manual mode Focus range limit is activated Deactivate the Limiting focus range option Focus range setting is incorrect Change focus range setting All individual images show a shading effect Algorithm failed to find empty image fields Capture a reference image with a blank slide see chapter 5 6 2 Service Image compensation 6 3 1 Fluorescent Applications optional The switching of the Lumencor SPEC...

Page 138: ... to eliminate errors for example slide or magazine jamming Before removing the covers exit the control software switch off the 24 V power supply and disconnect the power cables Warning Avoid leaning over the device when opening it Figure 81 Removal of covers Five eccentric screws 3 are located on the bottom face of the base plate 4 They attach the covers to the base plate 1 Use an open end wrench ...

Page 139: ...ion Make sure that no cables of the scan camera are squeezed as you replace the covers 6 4 2 Removing a slide If a slide got jammed or has suffered breakage during the process of digitization stop the process and if possible move the slide holder to a position where the slide can be easily removed by clicking the Emerg position button see chapter 5 6 1 Settings Emergency slide operations Warning C...

Page 140: ...ective covers 2 Push locking lever 1 to the left and keep the lever in this position 3 Seize the slide loader 2 by the end where the lever is and turn it up by the necessary degree to make the removing of slide possible 4 Remove slide loader unit 5 Press clamping lever 4 down The slide position lock releases 6 Retrieve slide 3 from the holder January 24 2020 Rev 2 3DHISTECH Ltd 140 156 ...

Page 141: ... until the guiding pin connects with the motor block groove again 8 Press the slide loader down to mechanical stop position in which the locking lever must engage 1 Use moderate force to press the loader part opposite the motor in clamp direction 2 until this part mechanically engages too 9 Close the protective cover again see chapter 6 4 1 Removing the protective covers 10 Launch the control soft...

Page 142: ...ral side of the module and insert it in forward tilted position from above into the upper spring loaded clamps 1 at the filter wheel Warning Avoid touching the surface of the filters and store the modules in their own boxes when not used 6 Press the filter module down until it safely connects to the bottom spring loaded clamps 2 of the filter wheel Mounting position of the filters excitation filte...

Page 143: ...emove the protective covers see chapter 6 4 1 Removing the protective covers Warning Crush hazard Remember to stop the running digitization process terminate the software session and turn off the power supply before removing a jammed magazine Caution Check that the magazine is not tilted so that it rests on both of the horizontal guide rails January 24 2020 Rev 2 3DHISTECH Ltd 143 156 ...

Page 144: ... their initial position They are correctly positioned if vertically aligned exactly one above each other Turn the knurled wheel 4 by hand until the tappets are in their initial position again and the magazine flatly rests on both horizontal guide rails Note Any manipulation performed on a mechanical component for example transporting system by the user must be followed by a complete Pannoramic SCA...

Page 145: ...he laws of your country regarding load carrying capacity limitations You can find the weight data of the base unit in chapter 7 Technical Data To transport the Pannoramic SCAN II do the following 1 Turn power supply off and detach all cables 2 Pull carrying handles out 2 until mechanical stop position A 3 Turn carrying handles by 90 B towards the base unit to secure them 4 Now you can transport Pa...

Page 146: ...se unit with fluorescent option approx 29 kg 24V 100W power supply approx 550 g Ambient conditions Transportation shipment packed Permissible ambient temperature 40 C to 70 C Storage Permissible ambient temperature 0 C to 60 C Permissible relative air humidity non condensing 75 Operation Permissible ambient temperature 10 C to 35 C Permissible relative air humidity 25 75 Altitude at installation s...

Page 147: ...Base unit input voltage 24V DC 1V Power consumption of the complete device 60 VA SINPRO MPU101 108 24V external mains power supply unit Intended site closed room facilities Electrical protection class I Internal protection degree IP 20 Electrical safety in compliance with UL 2601 1 TÜV EN 60601 CE EN60601 1 2 2001 Over voltage category II Radio interference suppression in accordance with CISPR 11 ...

Page 148: ...iew camera VRmagic VRmC 8 PRO Sensor CMOS rolling shutter Sensor size Resolution 2056x1544 Pixel size 3 2 um x 3 2 um Max frame rate 13 Hz Bit depth 8 10 bit Scan cameras Point Grey Grasshopper3 GS3 U3 51S5M C Global Shutter Type CMOS Sony IMX250 Pixel size 3 45µm 3 45µm Camera resolution 2448 H 2048 W pixel Frames rates 75 fps Bit depth 10 bit 12 bit Pixel resolution with 20x objective and 0 63x ...

Page 149: ...t adapter 0 16µm Pixel resolution with 40x objective and 1 6x C mount adapter 0 10µm Cooling Peltier with forced air fan Connection type Dual Camera Link Full 10 taps 85MHz Control computer minimum system requirements Operating System Microsoft Windows 10 Professional 64 bit EN CPU Intel Xeon W 2245 RAM 64 GB DDR4 Hard disk 256 GB SSD 1 TB HDD 2 TB HDD Optical drive DVD RW Display 96 dpi Graphics ...

Page 150: ...n off the scanner with the main switch located on the backside of the device Disconnect all the cables of the scanner 4 Remove the main camera and camera adapter 5 Turn off and disconnect all the cables of the workstation and display Main parts and their accessories 1 BOX 1 Big carton box a fixing foams for the angles of the scanner box 2 BOX 2 SCAN II scanner large carton box a Scanner unit b obj...

Page 151: ... 4 BOX 4 Accessories 3 pcs a main camera b power supply connector c power supply cable d camera adapter s e 10 wrench f objective spacer set g magazines for SCAN 150 P250 h dongles software and driver disks in 3DH SW box i slide checker j filter cubes if any 5 BOX 5 Cables a 3 m USB cable b USB cable of the scanner c trigger cable d camera protector 6 BOX 6 FL lamp if any a FL lamp b lamp power su...

Page 152: ... divided into two areas with a vertical carton slab Space 1 for accessories PC cables etc Space 2 for BOX 2 scanner Figure 2 1 BOX 2 scanner box 2 Fixing foams for underneath BOX 2 3 Fixing foams for above BOX 2 4 Bottom part of BOX 1 5 Top of BOX 1 6 BOX 3 7 BOX 4 5 6 January 24 2020 Rev 2 3DHISTECH Ltd 152 156 ...

Page 153: ...Pannoramic SCAN II 2 2 0 User s Guide Packaging Figure 3 January 24 2020 Rev 2 3DHISTECH Ltd 153 156 ...

Page 154: ...scanner should be lifted up by holding the scanner at its motherboard between its feet and taken inside the BOX 2 s lower part onto the foams inside it The shape of the rubber foam defines the orientation how they should put on After the scanner and foams are taken in you can place the upper part of the box of the scanner Now place the BOX 2 into BOX 1 and place the fixing foams around Figure 4 Pa...

Page 155: ...ngly be stored under cover If particularly large or bulky packages cannot be stored in warehouses or sheds they must be carefully covered with tarpaulins Recycling This indicates that an object is capable of being recycled CE The symbol shows that the device complies with the essential requirements of the relevant European health safety and environmental protection legislation in practice by many ...

Page 156: ...21 25 26 29 131 132 137 141 146 Focus 15 21 94 126 131 132 136 137 L Lumencor 20 25 26 134 137 Lumencor SPECTRA 6 Light Engine 14 21 M Marker 131 P Pannoramic Viewer 136 Pannoramic 9 Pannoramic SCAN II 9 10 11 12 14 15 16 18 19 20 21 23 26 32 135 138 144 145 Pannoramic Viewer 21 Pco edge 15 149 Preview 25 30 94 S Scan 14 15 33 94 124 126 131 132 136 139 148 Scanner 9 126 January 24 2020 Rev 2 3DHI...

Reviews: