background image

3D Platform 

WorkSeries Quick Reference Guide 

Revision: B 


Date: November 13, 2017 

3DP-DOC-006 (11-2017)


www.3dplatform.com 

pg. 3 of 8 

Connecting to the Web Interface 

 
1.


After finishing Wi-

Fi connection setup, navigate to the “Console” tab on the touch screen.


2.


Select the keyboard symbol at the top of the touch screen. 


3.


Type 

M552

 into the keyboard. 

4.


Press the Enter symbol to run the command. 


Read the output for the IP address of the machine (Example: 172.27.10.13). 

5.


On your computer or mobile device, open a web browser and go to the IP address from the previous step. 

6.


If the web interface prompts for a password, e

nter “

3DP

.


Homing the Machine 

 
On initial machine startup perform the following steps 

after

 verifying the home sensors are fully operational using the 

procedure in the 3D Platform WorkSeries User Manual. 
 
1.


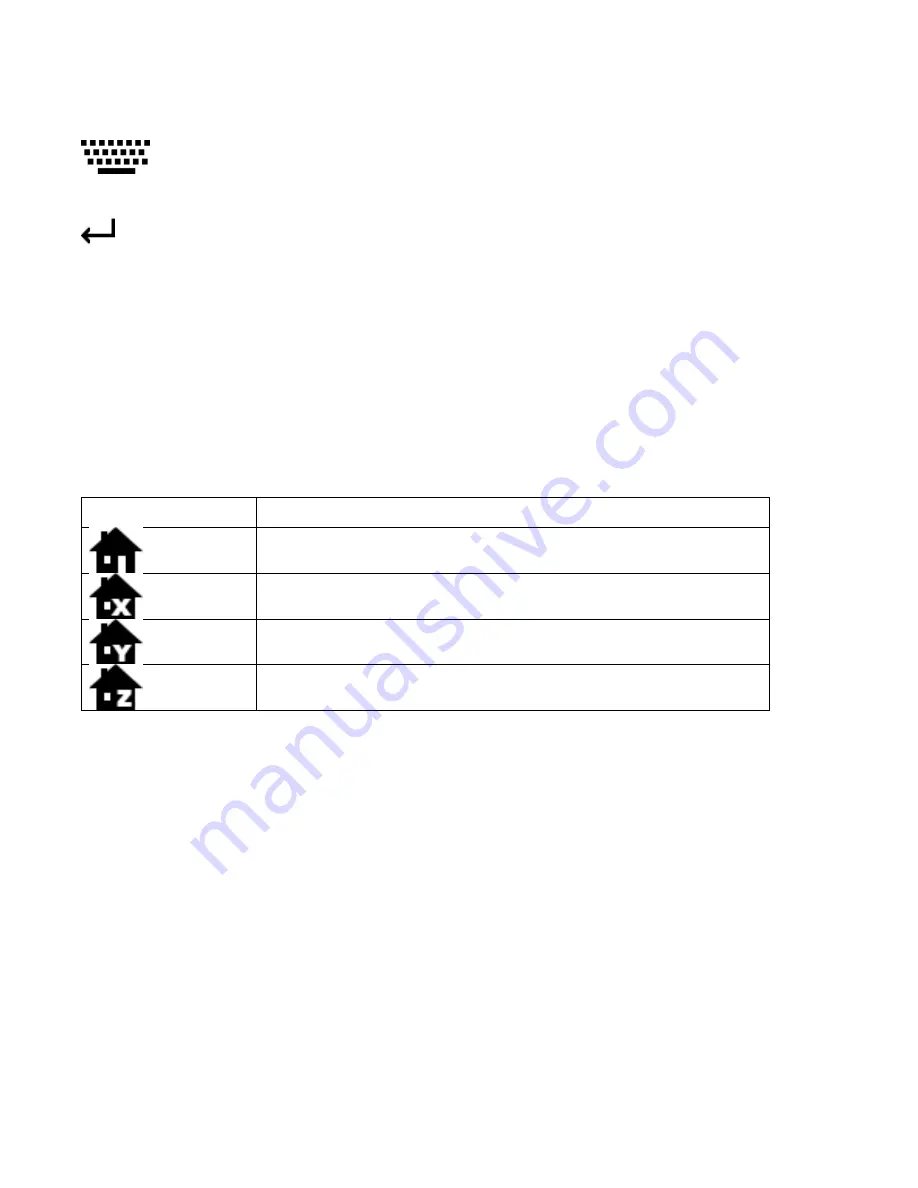
Locate the home symbol on the touch screen for the axis you wish to home and press one time.  


Symbol 

Function 


Home all axes 


Home X-axis only 


Home Y-axis only 


Home Z-axis only 

Note:

 Can only be performed when X and Y axes are at the home position


2.


Verify the axis moves to the home position properly. 

IMPORTANT:

 Monitor machine during initial homing to ensure axes do not travel past home sensors.  Overtravel 

may result in machine damage. If overtravel occurs, immediately press the emergency stop and contact your reseller 
or 3D Platform support team at support.3dplatform.com. 
 

Heating the Bed & Extruders 

 
Active Temperature 

 
When heating the nozzles or bed the active temperature is the temperature at which you wish to print. 
 

From the Touch Screen 

 
1.


On the touch screen, select the Active button for EXT1.  

2.


Using the different levels, increase or decrease the temperature as necessary. 

3.


Push the Set button.  

4.


Then click on the EXT1 symbol. This will activate the heater and the temperature reading will turn red. 


Summary of Contents for WorkSeries 200 Series

Page 1: ...J 3D PLATFORM WORKSERIES QUICK REFERENCE GUIDE 200 300 400 Series VERSION NOVEMBER 2017 6402 East Rockton Road Roscoe Illinois 61073 USA...

Page 2: ...6 Bed Compensation Mesh Bed Leveling 6 Macros 7 Need Help Have questions or need help with your WorkSeries 3D printer Please submit a ticket at our support page and our support team will be happy to h...

Page 3: ...enter 3 Read the feedback message corresponding to the command executed if applicable 4 Verify the result corresponds to the expected result of the command sent Note For a list of g codes and m codes...

Page 4: ...1 Locate the home symbol on the touch screen for the axis you wish to home and press one time Symbol Function Home all axes Home X axis only Home Y axis only Home Z axis only Note Can only be perform...

Page 5: ...rease the temperature as necessary 3 Push the set button 4 Then click on the EXT1 symbol Pushing the EXT1 symbol multiple times will cycle through the Active Standby states Red is Active Yellow is Sta...

Page 6: ...lect the amount you wish to extrude or retract 3 Select the speed you wish to extrude or retract 4 Press the extrude or retract button Note When retracting filament completely out of the hot end it is...

Page 7: ...speed to speed up or slow down the print as necessary 3 Adjusting Acceleration a Select Macros menu on the touch screen b Select the predefined high medium or low acceleration macro c Verify the accel...

Page 8: ...rrors macro 3 Verify the bed probe has a solid red light Note If there is no light verify that the probe is not extended by selecting the Retract Probe macro from the Macros menu If the probe still ha...

Page 9: ...nu on the bottom of the touch screen 2 Select the macro that you wish to run 3 Verify that the machine responded to the macro properly From the Web Interface 1 Navigate to the Macros menu on the left...

Reviews: