3D Nord magicolor 2300W Installation Manual Download Page 16

 Safety Information

12


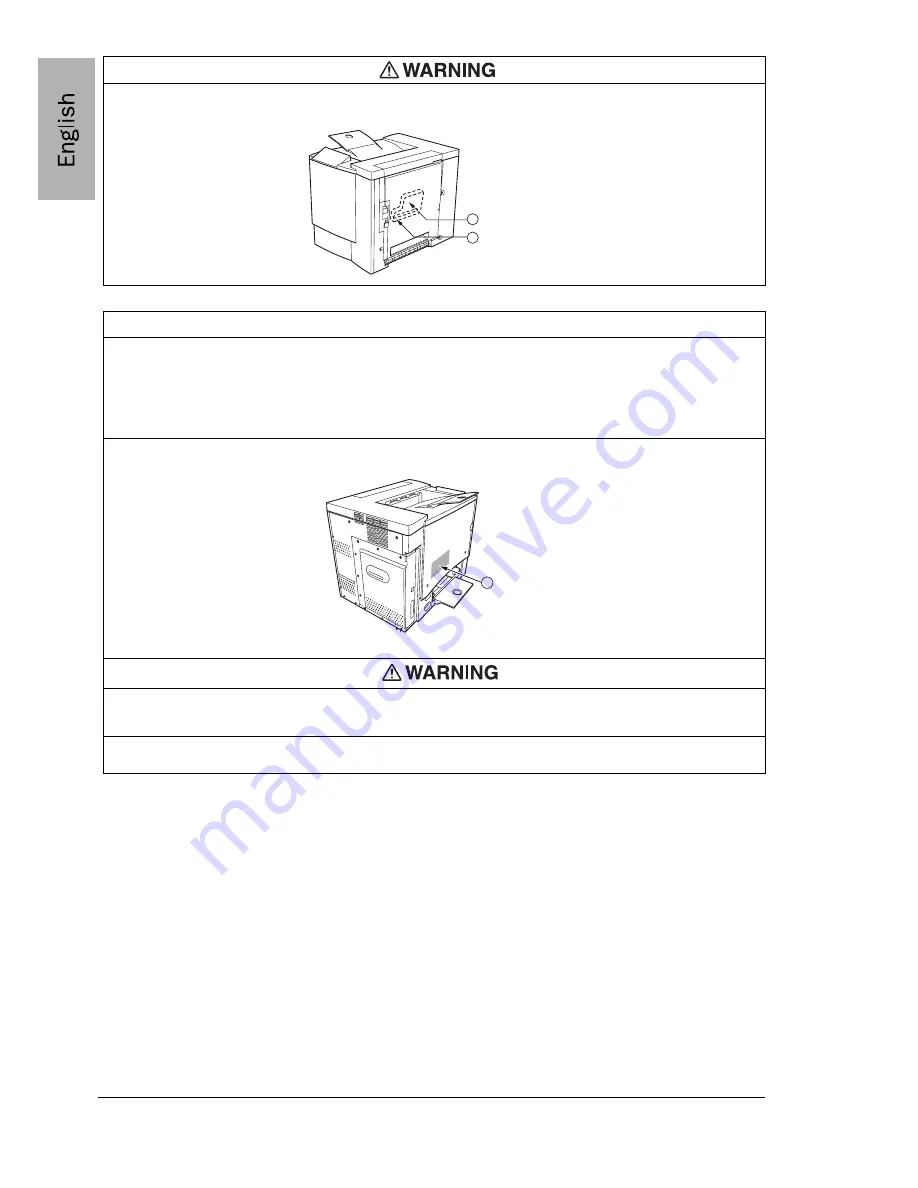
The internal components of the print head unit are NOT A FIELD SERVICEABLE ITEM. Therefore, the 
print head unit should not be opened under any circumstances.

Laser Caution For United States Users—CDRH Regulations

This printer is certified as a Class I laser product under the Regulation Performance Standard according to 
the Food, Drug, and Cosmetic Act of 1990. Compliance is mandatory for laser products marketed in the 
United States, and is reported to the Center for Devices and Radiological Health (CDRH) of the U.S. Food 
and Drug Administration (FDA) of the Department of Health and Human Services (DHHS). This means 
that the product does not produce hazardous laser radiation. The label shown below indicates compliance 
with the CDRH regulations and must be attached to laser products marketed in the United States.

Laser Safety Label—CDRH Requirement 

CAUTION: 

Use of controls, adjustments, or performance other than those specified 

in this manual may result in hazardous radiation exposure

.

This is a semiconductor laser. The maximum power of the laser diode is 5 mW, and the wavelength is 
770–795 nm.

1

2

1 - Print head unit

2 - Laser aperture

1

1 - Laser safety label

EDNord - Istedgade 37A - 9000 Aalborg - telefon 96333500

Summary of Contents for magicolor 2300W

Page 1: ...magicolor 2300W Installation Guide 1800726 001A EDNord Istedgade 37A 9000 Aalborg telefon 96333500 ...

Page 2: ...2003 by KONICA MINOLTA BUSINESS TECHNOLOGIES INC All Rights Reserved This software may not be reproduced modified displayed transferred or copied in any form or in any manner or on any media in whole or in part without the express written permission of KONICA MINOLTA BUSINESS TECHNOLOGIES INC Copyright Notice Copyrighted 2003 by KONICA MINOLTA BUSINESS TECHNOLOGIES INC Marunouchi Center Building 1...

Page 3: ...ill out and send in the registration card enclosed in your shipment Internet Go to http printer konicaminolta net register and follow the instructions CD ROM Follow the instructions on the CD ROM EDNord Istedgade 37A 9000 Aalborg telefon 96333500 ...

Page 4: ...EDNord Istedgade 37A 9000 Aalborg telefon 96333500 ...

Page 5: ...anel Hard copy and Utilities and Documentation CD ROM User s Guide Software Installation This chapter guides you through software driver and Status Display installation Day to day Operation of Your Printer These chapters guide you through printing files refilling print media and replacing toner This manual also includes information on additional accessories cleaning and maintaining your printer im...

Page 6: ...ght Side View 1 Output tray with output tray support 2 Control panel 3 Front door latch 4 Front door 5 Tray 1 media support 6 Tray 1 multipurpose tray all supported media sizes 7 Media size guides 8 Power cord socket 9 Power switch 10 Parallel interface connector 11 USB interface connector 12 Right side door 13 Right side door release Top View Side View 1 2 11 10 9 8 4 7 3 6 5 12 13 EDNord Istedga...

Page 7: ...m cartridge 17 Waste toner bottle 18 Toner cartridges cyan magenta yellow black Right Inside View 19 Fuser 20 Misfeed clearing dial manual paper feed dial 21 Transfer roller View with Accessories 22 Duplex option 23 Duplex option cover 15 17 18 14 16 19 20 21 22 23 EDNord Istedgade 37A 9000 Aalborg telefon 96333500 ...

Page 8: ...d Documentation CD ROM Installation Guide Interface cables are not included in the shipment If you need cables con tact your local vendor or computer store Unpacking the Printer Use the following instructions to unpack your printer 1 Remove the protective plastic cover 2 With another person s help lift the printer from the carton Do not tilt the printer in any direction at any time For best output...

Page 9: ...nd out from under the green levers Be sure to keep the fuser separators in case you need to ship the printer at a later data 7 Remove the separators and the attached label 8 Close the two green levers 9 Close the right side door 10 Grasp the front door latch and carefully open the front door Remove the tape from the inside of the printer EDNord Istedgade 37A 9000 Aalborg telefon 96333500 ...

Page 10: ... bottle into the printer b Push the top of the waste toner bottle into position so it is firmly seated If the waste toner bottle is not correctly installed or the transfer belt release lever is at its top position 11 o clock the front door cannot be closed 13 Close the front door Installing the Tray 1 Media Support Remove the media support from its plastic shipping bag and then attach it to Tray 1...

Page 11: ...media types sizes in the media trays 1 Adjust the media guides to fit the size of media that you are loading 2 Fan a stack of approximately 200 sheets of paper 3 Load the media face up short edge first Often an arrow on the paper package label indicates the face up printing side of the paper A fill limit mark is provided on the inside of the media guides Tray 1 holds 200 sheets of 80 g m or 22 lb ...

Page 12: ...e printer and into a dedicated grounded surge protected electrical outlet In compliance with UL guidelines The appliance inlet is considered to be the main disconnect device 3 Turn on the printer The Ready and Error indicators light up and then after 180 sec onds the Error indicator turns off while the Ready indicator stays on If the indicators do not light up in this way check the setup The print...

Page 13: ...t Do not use Plug and Play or the Windows Add Printer Wizard You must use the CD ROM Installer in order to correctly install all neces sary printer drivers and utilities 2 Insert the magicolor2300W Documentation Utilities CD ROM in the CD ROM drive of your PC 3 The CD ROM Installer automatically starts otherwise browse with the Windows Explorer to the CD ROM and double click on setup exe 4 Follow ...

Page 14: ...media size orientation etc on the Paper tab Click on Apply Close the Printing Preferences or Properties windows 3 From the Windows menu bar select Start Programs Select KONICA MINOLTA magicolor2300W Utilities Select KONICA MINOLTA magicolor2300W Status 4 Select the Printer tab Select Print Status Sheet Your printer prints a Status Sheet This sheet shows all control panel status combinations Close ...

Page 15: ...y This printer is a page printer which operates by means of a laser There is no possibility of danger from the laser provided the printer is operated according to the instructions in this manual Since radiation emitted by the laser is completely confined within protective housings and external covers the laser beam cannot escape from the machine during any phase of user operation This printer is c...

Page 16: ...l Health CDRH of the U S Food and Drug Administration FDA of the Department of Health and Human Services DHHS This means that the product does not produce hazardous laser radiation The label shown below indicates compliance with the CDRH regulations and must be attached to laser products marketed in the United States Laser Safety Label CDRH Requirement CAUTION Use of controls adjustments or perfor...

Page 17: ...ICA MINOLTA will not accept receipt These Actions Will Result in Voiding Your Warranty Print Media Use of nonsupported media such as inkjet paper See Using Media in the User s Guide for approved media Contact your local vendor or konicaminolta net printer for purchase information Electrostatic Discharge Failure to protect the printer controller board and any associated daughterboard or module from...

Page 18: ...Warranty Considerations 14 EDNord Istedgade 37A 9000 Aalborg telefon 96333500 ...

Reviews: