background image

4

4. Mounting the Access Point 

Wall Mounting

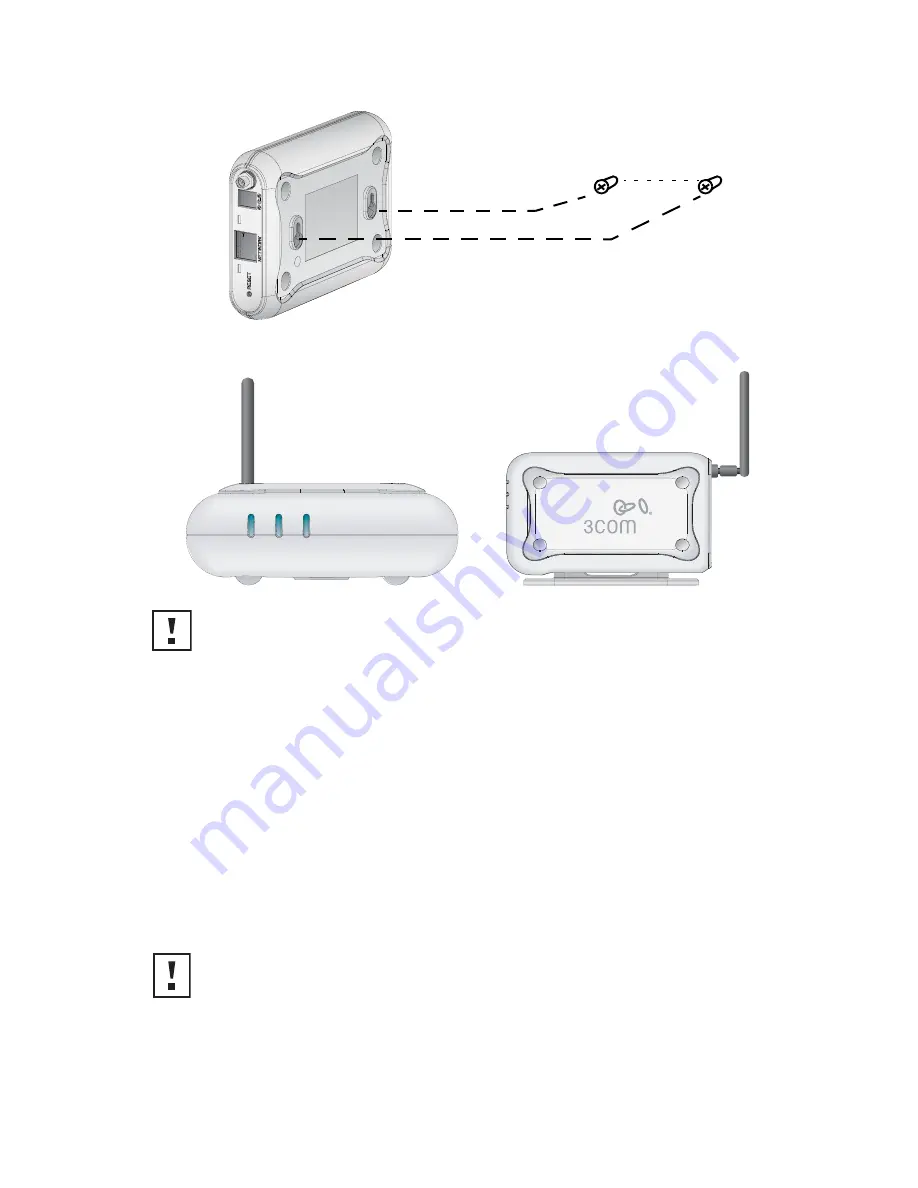
To mount the Access Point to a wall:

1

Locate a position on the wall which is free of obstructions.

2

Screw two mounting screws into the wall 85 mm apart.

3

Connect the Ethernet cable and power cable to the ports on the side of the Access Point.

4

Align the holes on the back of the Access Point with the screws and hang the Access Point 
on the screws.

Tabletop Mounting

To install the Access Point on a flat surface such as a table or desktop:

1

If you want to mount the Access Point vertically, secure the cradle to the bottom of the 
Access Point. If you want to mount the Access Point horizontally, simply leave off the cradle.

2

Place the Access Point on the table or other flat surface.

3

Connect the Ethernet cable and power cable to the ports on the side of the Access Point.

CAUTION:

  The Access Point is intended for indoor use only. Do not install the 

Access Point outdoors unless you install it in an appropriate outdoor enclosure.

CAUTION:

  Do not place the Access Point on any type of metal surface. Select a location 

that is clear of obstructions and provides good reception.

85mm

Wall Mount

Tabletop Mount (horizontal)

Tabletop Mount (vertical)

Summary of Contents for OfficeConnect 3CRWE454G75

Page 1: ...of the respective companies with which they are associated Part Number 10014994 Rev AC Published May 2007 Quick Start Guide 3Com OfficeConnect Wireless 54 Mbps 11g Access Point 3CRWE454G75 WL 524 Guid...

Page 2: ......

Page 3: ...Start Guide describes the basic steps necessary to install and configure your 3Com OfficeConnect Wireless Access Point 3CRWE454G75 WL 524 Throughout this guide the OfficeConnect Wireless 54 Mbps 11g A...

Page 4: ...r and network activity See Checking the LED Indicators on page 5 for details Antenna Connector One RSMA antenna connector allows you to connect an antenna that operates in the 2 4 GHz band Reset Butto...

Page 5: ...en it After network startup you may need to adjust the antenna to fine tune coverage in your area For best results adjust the antenna so that it is perpendicular to the floor and ceiling Installation...

Page 6: ...u want to mount the Access Point vertically secure the cradle to the bottom of the Access Point If you want to mount the Access Point horizontally simply leave off the cradle 2 Place the Access Point...

Page 7: ...ve 3 Follow the Setup Wizard s instructions on the screen 4 Optional Change the default settings The Access Point is preconfigured with common default parameters If you want to change these settings u...

Page 8: ...he factory default static IP address of 192 168 1 250 subnet mask 255 255 255 0 To communicate with the Access Point using the default address follow this procedure 1 Set the IP address of your PC to...

Page 9: ...sent guide de mise en route indique la proc dure suivre pour installer et configurer votre point d acc s 3Com OfficeConnect 3CRWE454G75 WL 524 Par souci de clart le point d acc s OfficeConnect Wireles...

Page 10: ...it un c ble crois Voyants Les voyants s allument lorsque l appareil est sous tension et lorsque des activit s sont en cours sur le r seau Consultez la section V rification des voyants la page 11 pour...

Page 11: ...sure ou d endommagement de l quipement vos installations lectriques doivent imp rativement r pondre aux normes UL CSA IEC ou toute autre norme nationale ou internationale en vigueur dans le pays d uti...

Page 12: ...z installer le Point d acc s en position verticale placez le sur le socle fourni Si vous souhaitez installer le Point d acc s l horizontale il vous suffit de retirer le socle 2 Posez le Point d acc s...

Page 13: ...sistant d installation s affichant l cran 4 Facultatif Modifiez les param tres par d faut Le Point d acc s est pr configur avec un ensemble de param tres courants Si vous souhaitez modifier ces param...

Page 14: ...se IP statique par d faut 192 168 1 250 masque de sous r seau 255 255 255 0 Pour communiquer avec le Point d acc s au moyen de l adresse par d faut proc dez comme suit 1 Param trez l adresse IP de vot...

Page 15: ...per installare e configurare l Access Point Wireless OfficeConnect 3Com 3CRWE454G75 WL 524 Nel corso di questa guida l Access Point Wireless 54 Mbps 11g OfficeConnect verr indicato semplicemente come...

Page 16: ...a porta dispone di una funzione MDI MDIX automatica che consente di utilizzare un cavo straight through oppure cross over LED I LED indicano lo stato dell alimentazione e l attivit di rete Vedere la s...

Page 17: ...VERTENZA per evitare possibili danni alla persona o all apparecchiatura utilizzare dispositivi di alimentazione elettrica dotati di certificazione di sicurezza UL CSA IEC o altri requisiti di sicurezz...

Page 18: ...l Access Point in verticale fissare il supporto al fondo dell Access Point Per montare l Access Point in orizzontale sufficiente non installare il supporto 2 Collocare l Access Point su un tavolo o su...

Page 19: ...del computer 3 Seguire le istruzioni del programma di configurazione guidata visualizzate sullo schermo 4 Facoltativo Modificare le impostazioni predefinite L Access Point preconfigurato con parametr...

Page 20: ...ver DHCP dopo 2 o 3 minuti dall avvio si autoassegner l indirizzo IP statico predefinito di fabbrica 192 168 1 250 con maschera di sottorete 255 255 255 0 Per comunicare con l Access Point mediante l...

Page 21: ...reibt die wesentlichen Schritte f r die Installation und Konfigurierung Ihres 3Com OfficeConnect Wireless Access Point 3CRWE454G75 WL 524 In diesem Handbuch wird der OfficeConnect Wireless 54 MBit s 1...

Page 22: ...ttstelle hat eine automatische MDI MDIX Funktion die den Einsatz entweder eines geraden oder gekreuzten Kabels erm glicht Leuchtdioden Die Leuchtdioden zeigen an ob das Ger t betriebsbereit und das Ne...

Page 23: ...HTUNG Um Verletzungen oder Sch den an der Ausr stung zu vermeiden d rfen nur nach UL CSA IEC oder anderen nationalen oder internationalen Bestimmungen des Einsatzlandes sicherheitsgepr fte elektrische...

Page 24: ...montieren wollen bringen Sie die Halterung an der Unterseite des Access Point an Wenn Sie den Access Point horizontal montieren wollen ist keine Halterung erforderlich 2 Den Access Point auf einem Tis...

Page 25: ...Laufwerks Ihres PCs ist 3 Befolgen Sie die Befehle des Installations Wizard auf dem Bildschirm 4 Optional ndern der Standardeinstellungen Der Access Point wurde auf die blichen Standardparameter vore...

Page 26: ...erver erkennt wird er sich eigenst ndig die statische IP Adresse 192 168 1 250 der Werkseinstellung Unternetzmaske 255 255 255 0 zuweisen Um mit dem Access Point ber die Standard Adresse zu kommunizie...

Page 27: ...pasos b sicos necesarios para instalar y configurar el Punto de acceso inal mbrico OfficeConnect de 3Com 3CRWE454G75 WL 524 A lo largo de esta gu a se hace referencia al Punto de acceso inal mbrico O...

Page 28: ...MDIX autom tica que le permite utilizar un cable directo o un cable transversal LED Los LEDs indican la alimentaci n y actividad de la red Para conocer mayores detalles consulte Revisi n de los indica...

Page 29: ...a evitar posibles lesiones o da os al equipo debe utilizar un equipo de suministro el ctrico cuya seguridad est certificada seg n UL CSA IEC u otros requisitos de seguridad nacionales o internacionale...

Page 30: ...desea montar el Punto de acceso verticalmente sujete la base a la parte inferior del Punto de acceso Si desea montar el Punto de acceso en forma horizontal simplemente deje fuera la base 2 Coloque el...

Page 31: ...de Setup Wizard Asistente de configuraci n que aparecen en pantalla 4 Opcional Cambie la configuraci n predeterminada El Punto de acceso est preconfigurado con par metros predeterminados comunes Si d...

Page 32: ...es minutos se asignar autom ticamente la direcci n IP est tica predeterminada de f brica 192 168 1 250 m scara de subred 255 255 255 0 Para comunicarse con el Punto de acceso mediante la direcci n pre...

Page 33: ...Este Guia de In cio R pido descreve as etapas b sicas necess rias para instalar e configurar o OfficeConnect Wireless Access Point 3Com 3CRWE454G75 WL 524 Neste Guia o OfficeConnect Wireless 54 Mbps...

Page 34: ...autom tico que permite a utiliza o de cabo direto ou invertido LEDs Os LEDs indicam a atividade de rede e alimenta o Consulte Verifica o dos Indicadores LED na p gina 35 para obter mais detalhes Conec...

Page 35: ...ar ao piso e ao teto ADVERT NCIA Para evitar poss veis danos a pessoas ou equipamentos deve ser usada uma fonte de alimenta o com certificado de seguran a UL CSA IEC ou em conformidade com outras norm...

Page 36: ...instala o vertical do Access Point fixe a base parte inferior do Access Point Para a instala o horizontal basta deixar o Access Point fora da base 2 Posicione o Access Point em uma mesa ou outra super...

Page 37: ...e de Instala o exibidas na tela 4 Opcional Altere a configura o padr o O Access Point j fornecido pr configurado com par metros padr o poss vel alterar as configura es do Access Point atrav s da inter...

Page 38: ...2 168 1 250 M scara de Subrede 255 255 255 0 Para comunicar se com o Access Point usando o endere o padr o siga este procedimento 1 Defina o endere o IP do PC como qualquer endere o na mesma subrede I...

Page 39: ...eferens beskriver de grundl ggande steg som beh vs f r att installera och konfigurera 3Com OfficeConnect tr dl s tkomstpunkt 3CRWE454G75 WL 524 I denna handbok anv nder vi genomg ende tkomstpunkt f r...

Page 40: ...switch Den h r porten har en automatisk MDI MDIX funktion som ger dig m jlighet att anv nda antingen en kabel som g r rakt igenom eller en verkorsningskabel Lysdioder Lysdioderna indikerar str m och...

Page 41: ...undvika m jlig personskada eller skada p utrustningen m ste du anv nda str mf rs rjningsutrustning som r s kerhetscertifierad i enlighet med UL CSA IEC och eller andra g llande nationella eller inter...

Page 42: ...denna tkomstpunkt vertikalt ska du s tta fast vaggan p undersidan av denna tkomstpunkt Anv nd inte vaggan om du vill montera denna tkomstpunkt horisontellt 2 Placera denna tkomstpunkt p bordet eller a...

Page 43: ...f r din dators CD ROM 3 F lj anvisningarna som visas p sk rmen i Set up Wizard installationsguiden 4 Valfritt ndra standardinst llningarna Denna tkomstpunkt r f rkonfigurerad med vanliga standardparam...

Page 44: ...er 2 eller 3 minuter under uppstart kommer rden att tilldela sig sj lv den fabriksinst llda standard IP adressen 192 168 1 250 och subn tmasken 255 255 255 0 F r att kommunicera med tkomstpunkt med st...

Page 45: ...peration is subject to the following two conditions 1 This device may not cause harmful interference and 2 this device must accept any interference received including interference that may cause undes...

Page 46: ...technical specifications were met To reduce potential radio interference to other users the antenna type and its gain should be so chosen that the equivalent isotropically radiated power EIRP is not...

Page 47: ...tive 1999 5 EC Espa ol Spanish Por medio de la presente 3Com Corporation declara que el RLAN device cum ple con los requisitos esenciales y cualesquiera otras disposiciones aplicables o exigibles de l...

Page 48: ...y b el r sainak Polski Polish Niniejszym 3Com Corporation o wiadcza e RLAN device jest zgodny z zasa dniczymi wymogami oraz pozosta ymi stosownymi postanowieniami Dyrektywy 1999 5 EC Portugu s Portugu...

Reviews: