background image

48

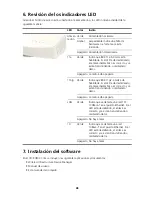
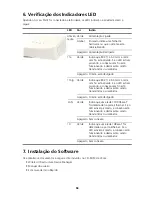
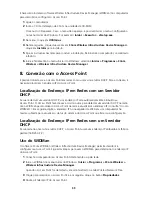
6. Revisión de los indicadores LED

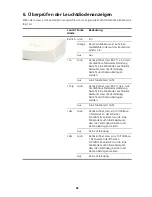
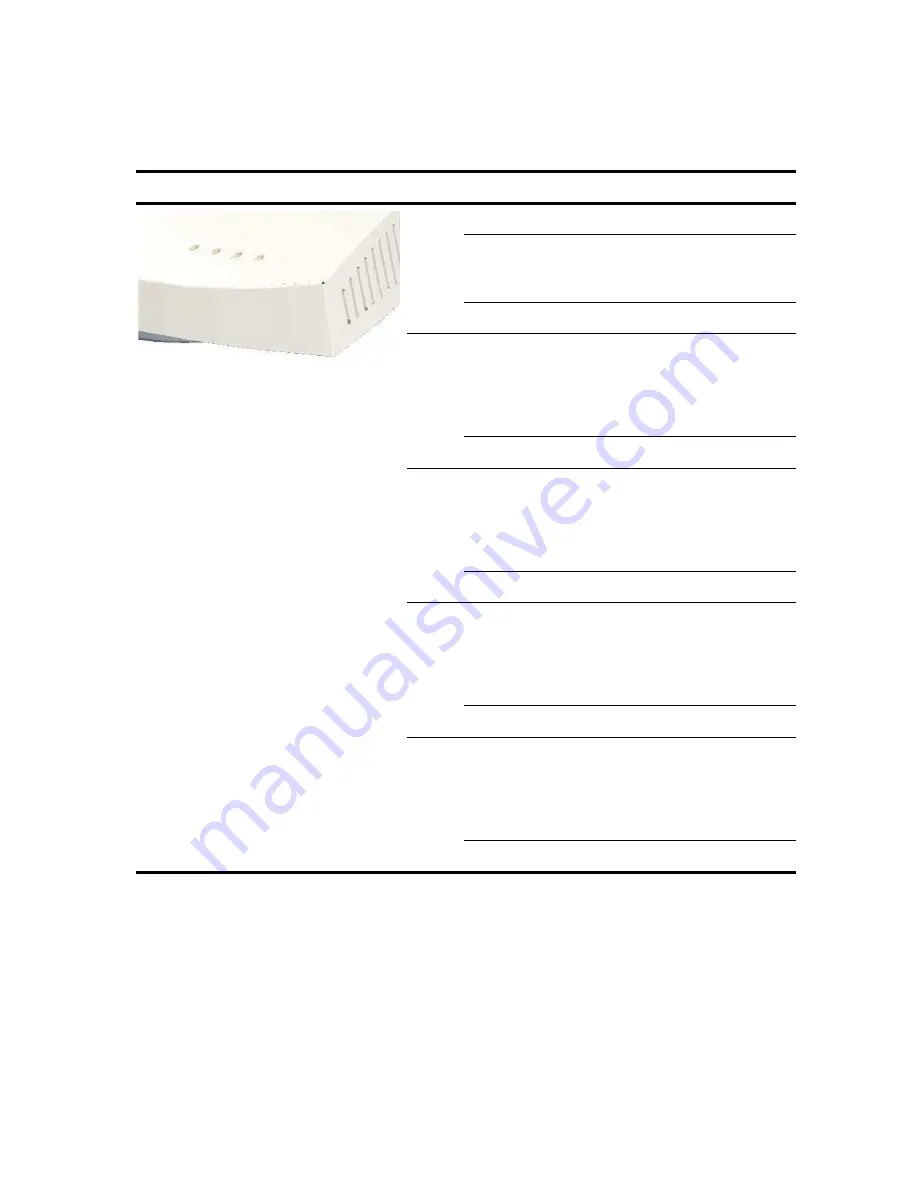
Cuando el Punto de acceso está conectado a la alimentación, los LED indican actividad de la 
siguiente manera: 

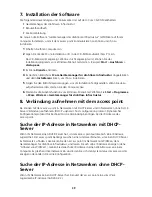
7. Instalación del software

En el CD-ROM 3Com se incluyen las siguientes aplicaciones y documentos:

Wireless Infrastructure Device Manager

Manual de usuario

Esta Guía de inicio rápido

LED

Color

Indica

Alimen
tación

Verde

Alimentación activada

Ámbar

parpadeante indica una falla de 
hardware o el sistema se está 
iniciando.

Apagado Alimentación desactivada

11a

Verde

Indica que 802.11a 5.0 GHz está 
habilitada. Si el LED está destellando, 
el enlace inalámbrico es correcto y se 
están transmitiendo o recibiendo 
datos.

Apagado La radio está apagada

11b/g

Verde

Indica que 802.11g2.4 GHz está 
habilitada. Si el LED está destellando, 
el enlace inalámbrico es correcto y se 
están transmitiendo o recibiendo 
datos.

Apagado La radio está apagada

LAN

Verde

Indica que se detecta una red 10/
100Base-T en el puerto Ethernet. Si el 
LED está destellando, el enlace es 
correcto y se están transmitiendo o 
recibiendo datos.

Apagado No hay enlace

10

Verde

Indica que se detecta una red 
10Base-T en el puerto Ethernet. Si el 
LED está destellando, el enlace es 
correcto y se están transmitiendo o 
recibiendo datos.

Apagado No hay enlace
Summary of Contents for 7608

Page 1: ...he respective companies with which they are associated Part Number 10015152 Rev AA Published May 2006 Quick Start Guide 3Com Wireless 8760 Dual radio 11a b g PoE Access Point 3CRWE876075 WL 546 Guide de mise en route 11 Français Guida introduttiva 21 Italiano Kurzanleitung 31 Deutsch Guía de inicio rápido 41 Español Guia de Início Rápido 51 Portuguese Snabbstartguide 61 Svenska ...

Page 2: ......

Page 3: ...radio 11a b g PoE Access Point 3CRWE876075 WL 546 Throughout this guide the Wireless 8760 Access Point is simply referred to as the Access Point Before installing or moving the Access Point you must read the safety information provided in Safety Information on page 3 of this manual About This Guide This guide describes the basic installation of the Access Point It covers the following topics 3Com ...

Page 4: ... 5 cable with straight through signaling and standard RJ 45 connectors to connect your Access Point to the switch on the network 4 Serial Port Provides a serial interface to the Access Point for diagnostic use 5 Reset Button To restore factory settings press the reset button during power up by inserting a pointed object into the reset hole on the back of the Access Point and holding for five secon...

Page 5: ...r to the unit and easily accessible You can only remove power from the unit by disconnecting the power cord from the outlet WARNING This unit operates under SELV Safety Extra Low Voltage conditions according to IEC 950 IEC 60950 The conditions are only maintained if the equipment to which it is connected also operates under SELV conditions WARNING There are no user replaceable fuses or user servic...

Page 6: ...zgodnie z normą IEC 950 IEC 60950 Warunki te są jednak zagwarantowane wyłącznie wtedy gdy sprzęt do którego podłączone jest urządzenie również pracuje w obwodzie SELV OSTRZEŻENIE Wewnątrz urządzenia nie znajdują się wymienne bezpieczniki lub części które mogłyby być oddane do naprawy W przypadku wystąpienia problemu którego nie można rozwiązać za pomocą wskazówek podanych w tej instrukcji obsługi ...

Page 7: ...nd tighten them After network startup you may need to adjust the antennas to fine tune coverage in your area For best results adjust the antennas so they are perpendicular to the floor and ceiling Feature Description Switch Port To connect your wireless network to your wired network you need a hub or switch connected to the Access Point Cabling Make sure that standard Ethernet cable with straight ...

Page 8: ... two sheet metal screws and two wall anchors If mounting to an electrical box NEMA enclosure use the two threaded screws The figures below show a cable being routed through the large opening in the cradle and then the cradle being mounted to a wall 3 Connect the Ethernet cable for power and network connection to the port on the rear of the Access Point 4 Twist the Access Point onto the mounting br...

Page 9: ...t s Ethernet port Power Over Ethernet from a PoE Injector To power the Access Point using the 3Com PoE Injector included with the unit do the following 1 Connect the LAN cable from the switch or hub to the Hub Switch port on the 3Com PoE Injector included with Access Point 2 Next connect a LAN cable from the Ethernet port on the Access Point to the other port on the PoE injector 3 Plug the PoE Inj...

Page 10: ...un d setup exe 3 On the menu click Utilities 4 On the next screen double click 3Com Wireless Infrastructure Device Manager and then click Install to install it LED Color Indicates Power Green Power On Amber Flashing indicates a hardware failure or the system is booting Off Power Off 11a Green Indicates that 802 11a 5 0 GHz wireless networking is enabled If the LED is flashing the wireless link is ...

Page 11: ...r If your network does not have a DHCP server the Access Point uses a default factory assigned IP address 169 254 2 1 Using WIDMan 3Com WIDMan Wireless Infrastructure Device Manager software lets you discover and configure your Access Point Follow these steps to use WIDMan to determine the Access Point s IP address 1 Connect your computer to the Access Point either directly or over the network 2 L...

Page 12: ...he prompts on the screen Use the Next and Back buttons to move through the screens Click Finish when you are done For complete details on using the Wireless Infrastructure Device Manager and configuring your Access Point refer to the 3Com Wireless 8760 Dual radio 11a b g PoE Access Point User Guide included on the product CD Updates to the user manual may be found on our website http www 3Com com ...

Page 13: ...ler et configurer votre point d accès 3Com Wireless 8760 11a b g PoE Access Point 3CRWE876075 WL 546 Par souci de clarté le point d accès Wireless 8760 Access Point est désigné par point d accès dans ce guide À propos de ce guide Le présent guide décrit les étapes d installation du point d accès Il comprend les sections suivantes Présentation du point d accès 3Com Wireless 8760 Informations relati...

Page 14: ...ermet d établir une connexion Ethernet 10 100BASE TX à un commutateur 3Com Utilisez un câble droit de catégorie 5 et des connecteurs RJ45 standard pour relier le point d accès au commutateur du réseau 4 Port série Ce port fournit une interface série au point d accès à des fins de diagnostic 5 Bouton de réinitialisation Pour rétablir les paramètres par défaut exercez une pression pendant deux à cin...

Page 15: ...acile d accès Le seul moyen de mettre l unité hors tension est de débrancher le cordon d alimentation de la prise AVERTISSEMENT Cette unité fonctionne en très basse tension et respecte les normes IEC 950 IEC 60950 de la Commission électrotechnique internationale Ces normes sont respectées uniquement si l équipement auquel elle est connectée fonctionne également en très basse tension AVERTISSEMENT ...

Page 16: ...ant d installer le point d accès à un emplacement difficile d accès Vérifiez également les points suivants avant de fixer ou de connecter le point d accès Fonction Description Port du commutateur Pour relier votre réseau sans fil à votre réseau câblé vous devez connecter un concentrateur ou un commutateur au point d accès Câblage Vérifiez que le site est équipé d un câble droit Ethernet standard a...

Page 17: ...staller sur un mur au plafond ou dans une armoire électrique Pour une sécurité optimale utilisez la tige de verrouillage et un cadenas non fourni pour verrouiller le point d accès au socle dans le cas d une installation murale Pour fixer le point d accès au mur 1 Faites passer le câble Ethernet dans la plus grosse encoche du support 2 Vissez le support au mur au plafond ou dans l armoire électriqu...

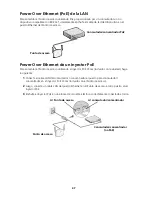
Page 18: ...es quatre pieds en caoutchouc et collez les sur le support de fixation assemblé au point d accès 2 Placez le point d accès sur la table 3 Insérez le câble Ethernet alimentation et connexion au réseau dans le port placé à l avant du point d accès 5 Mise sous tension Le point d accès peut être alimenté par les méthodes suivantes Alimentation électrique par câble Ethernet assurée à partir du réseau l...

Page 19: ...dez comme suit 1 Insérez le câble réseau connecté au commutateur ou au concentrateur dans le port Concentrateur Commutateur de l injecteur PoE 3Com fourni avec le point d accès 2 Insérez ensuite le câble réseau connecté au port Ethernet du point d accès dans l autre port de l injecteur PoE 3 Branchez l injecteur PoE à une prise de courant avec mise à la terre Commutateur Concentrateur PoE Point d ...

Page 20: ...t Hors tension 11a Vert La connexion 802 11a 5 0 GHz sans fil est établie Lorsque le voyant clignote des données sont actuellement transmises ou reçues Éteint La transmission radio est interrompue 11b g Vert La connexion 802 11g 2 4 GHz sans fil est établie Lorsque le voyant clignote des données sont actuellement transmises ou reçues Éteint La transmission radio est interrompue LAN Vert Un réseau ...

Page 21: ...Wireless Infrastructure Device Manager 8 Connexion au point d accès Vous pouvez vous connecter au point d accès sur un réseau équipé ou non d un serveur DHCP Pour procéder à la connexion vous devez disposer de l adresse IP du point d accès Recherche de l adresse IP sur un réseau équipé d un serveur DHCP Si votre réseau comprend un serveur DHCP une adresse IP est automatiquement attribuée au point ...

Page 22: ...on au point d accès tapez le nom d utilisateur et le mot de passe puis cliquez sur Log On Le nom d utilisateur et le mot de passe par défaut respectent la casse Nom d utilisateur admin Mot de passe password 4 Lorsque vous vous connectez au point d accès pour la première fois vous êtes invité à sélectionner le pays d utilisation de l unité Choisissez votre pays dans le menu puis cliquez sur Apply A...

Page 23: ... g PoE 3Com 3CRWE876075 WL 546 Nel corso di questa guida l Access Point Wireless 8760 verrà indicato semplicemente come access point per brevità Informazioni su questa guida Questa guida descrive la procedura di installazione di base dell access point Saranno trattati i seguenti argomenti Caratteristiche dell Access Point Wireless 8760 3Com Informazioni sulla sicurezza Passaggio 1 Apertura della c...

Page 24: ...izzare un cavo Categoria 5 straight through adatto e connettori RJ 45 standard per collegare l access point allo switch della rete 4 Porta seriale Fornisce un interfaccia seriale all access point per uso diagnostico 5 Pulsante Reset Per ripristinare le impostazioni predefinite dal produttore inserire un oggetto appuntito nel foro di reset sul retro dell access point e tenere premuto per un tempo c...

Page 25: ...ibile L unico modo per spegnere l unità consiste nello scollegare il cavo di alimentazione dalla presa elettrica AVVERTENZA questa unità funziona a bassissima tensione di sicurezza SELV Safety Extra Low Voltage in conformità alle norme IEC 950 IEC 60950 Tali condizioni SELV possono essere garantite solo se le apparecchiature a cui è collegata l unità funzionano a loro volta con alimentazione SELV ...

Page 26: ...le Prestare inoltre attenzione ai seguenti elementi prima di montare o collegare l access point Caratteristica Descrizione Porta switch Per collegare la rete wireless alla rete cablata è necessario collegare un hub o uno switch all access point Cavi Assicurarsi che i cavi Ethernet standard straight through siano installati sul sito prima di installare l access point Assicurarsi che il cavo sia alt...

Page 27: ... su una parete a soffitto o in un quadro elettrico Per ulteriore sicurezza utilizzare la staffa di bloccaggio fornita e un lucchetto non fornito per bloccare l access point al supporto dopo averlo montato su una parete Per montare l access point su una parete 1 Disporre il cavo Ethernet attraverso l apertura sul supporto 2 Avvitare il supporto di montaggio alla parete al soffitto o al quadro elett...

Page 28: ...na scrivania 1 Rimuovere la pellicola di protezione dai quattro piedini di gomma e applicarli sul fondo del supporto di montaggio fissato all access point 2 Collocare l access point sul tavolo 3 Collegare il cavo Ethernet per il collegamento all alimentazione e alla rete alla porta sul lato anteriore dell access point 5 Collegamento dell alimentazione L access point può essere alimentato tramite i...

Page 29: ...ornito con l unità eseguire le seguenti operazioni 1 Collegare il cavo LAN dallo switch o l hub alla porta Hub Switch dell iniettore PoE 3Com fornito con l access point 2 Quindi collegare un cavo LAN dalla porta Ethernet dell access point all altra porta dell iniettore PoE 3 Inserire l iniettore PoE in una presa elettrica con messa a terra Switch Hub PoE Access Point 3CRWX120 695A Wireless LAN Swi...

Page 30: ...Utilities 4 Nella schermata successiva fare doppio clic su 3Com Wireless Infrastructure Device Manager quindi fare clic su Install per installare il software LED Colore Significato Power Verde Unità accesa Ambra Lampeggiante indica un guasto hardware o che il sistema è in fase di avvio Spento Unità spenta 11a Verde Indica che la rete 802 11a 5 0 GHz wireless è attiva Se il LED lampeggia il link wi...

Page 31: ...edere la sezione Uso di WIDMan Immettere quindi l indirizzo IP in un browser Web su un computer connesso alla stessa sottorete per visualizzare lo stato di sistema dell access point o modificare la sua configurazione Individuazione dell indirizzo IP su reti senza server DHCP Se sulla rete non è presente un server DHCP l access point utilizza un indirizzo IP predefinito assegnato dal produttore 169...

Page 32: ...aese in cui si sta utilizzando il dispositivo Scegliere il paese dal menu e fare clic su Apply 5 Quindi utilizzare Setup Wizard per configurare l access point Fare clic su Setup Wizard nel menu nell area sinistra dello schermo 6 Seguire le istruzioni visualizzate sullo schermo Utilizzare i pulsanti Next e Back per passare da una schermata all altra Fare clic su Finish al termine dell operazione Pe...

Page 33: ...n Schritte zur Installation und Konfiguration Ihres 3Com Drahtloser 8760 11a b g PoE Access Point 3CRWE876075 WL 546 In diesem Handbuch wird der Wireless 8760 Access Point kurz mit access point bezeichnet Über dieses Handbuch Dieses Handbuch beschreibt die grundlegenden Schritte zur Installation des access point Es beinhaltet die folgenden Themen Merkmale des 3Com Drahtlosen 8760 Access Point Sich...

Page 34: ...alter Verwenden Sie ein passendes Kabel der Kategorie 5 US mit gerader Signalgebung und genormten RJ 45 Anschlüssen US um Ihren access point an dem Schalter des Netzwerks anzuschließen 4 Serielle Schnittstelle Hierüber verfügt der access point über eine serielle Schnittstelle zwecks Diagnose 5 Taste zum Zurücksetzen Um die Werkseinstellungen wieder herzustellen führen Sie einen spitzen Gegenstand ...

Page 35: ...nnen das Gerät nur durch Ziehen des Stromkabels aus der Steckdose vom Stromkreislauf trennen ACHTUNG Dieses Gerät wird unter SELV Safety Extra Low Voltage Sicherheits Niedrigspannung Bedingungen gemäß derIEC 950 IEC 60950 Norm betrieben Diese Bedingungen können nur gewahrt bleiben wenn die Ausrüstung mit der das Gerät verbunden ist auch unter Niederspannungsbedingungen betrieben wird ACHTUNG Es gi...

Page 36: ...chluss des access point Folgendes Funktion Beschreibung Schalter Schnittstelle Um Ihr Funknetzwerk in Ihr verdrahtetes Netzwerk einzubinden benötigen Sie einen Hub oder einen Schalter der an den access point angeschlossen ist Verkabelung Stellen Sie sicher dass das standardmäßige Ethernet Kabel mit gerader Signalgebung vor Ort installiert ist bevor Sie den access point installieren Stellen Sie sic...

Page 37: ...nt mitglelieferte Halterung zur Montage an Wand Decke oder im Schaltkasten Verwenden Sie für zusätzliche Sicherheit die mitgelieferte Sperrleiste und ein Schloss nicht mitgeliefert um den access point nach der Wandmontage in der Basisstation zu halten So bringen Sie den access point an einer Wand an 1 Ethernet Kabel durch die Öffnung in der Basisstation führen 2 Die Halterung an der Wand Decke ode...

Page 38: ...en Sie die Rückseite von den vier Gummifüßen und bringe Sie sie an der Unterseite der Halterung die mit dem access point verbunden ist an 2 Den access point auf dem Tisch platzieren 3 Schließen Sie das Ethernet Kabel für Strom und Netzwerkanschluss an dem Anschluss an der Vorderseite des access point an 5 Stromanschluss Der access point kann auf folgende Art und Weise mit Strom versorgt werden Dur...

Page 39: ... führen Sie Folgendes aus 1 Schließen Sie das LAN Kabel vom Schalter oder Hub an die Hub Schalter Schnittstelle des mit dem access point mitgelieferten 3Com PoE Injektors an 2 Danach verbinden Sie das LAN Kabel der Ethernet Schnittstelle des access point mit der anderen Schnittstelle des PoE Injektors 3 Schließen Sie den PoE Injektor an eine ordnungsgemäß geerdete Steckdose an PoE Schalter Hub Acc...

Page 40: ...den Aus Funk funktioniert nicht 11b g Grün Kennzeichnet dass 802 11g2 4 GHz die drahtlose Netzwerkverbindung besteht Eine blinkende Leuchtdiode bedeutet dass die Verbindung besteht und Daten übertragen werden Aus Funk funktioniert nicht LAN Grün Kennzeichnet dass ein 10 100Base T Netzwerk an der Ethernet Schnittstelle entdeckt wurde Eine blinkende Leuchtdiode bedeutet dass die Verbindung besteht u...

Page 41: ...art Wählen Sie Start Programme 3Com Wireless Gerätemanager für drahtlose Infrastruktur 8 Verbindung aufnehmen mit dem access point Sie können mit dem access point in Netzwerken mit DHCP Server und in Netzwerken ohne DHCP Server Verbindung aufnehmen DHCP dynamic host configuration protocol Dynamisches Konfigurationsprotokoll für Rechner Für die Verbindung benötigen Sie die IP Adresse des access poi...

Page 42: ...dresse Ihres access points in der Adressleiste ein und drücken auf Eingabe 3 Im Anmeldefenster des access points den Benutzernamen und das Kennwort eingeben und Anmelden anklicken Beim Standard Benutzernamen und dem Passwort ist auf Groß Kleinschreibung zu achten Benutzername admin Kennwort Kennwort 4 Beim erstmaligen Anmelden beim access point werden Sie aufgefordert das Land auszuwählen in dem S...

Page 43: ...cesarios para instalar y configurar su Punto de acceso inalámbrico PoE 11a b g 3Com 8760 3CRWE876075 WL 546 A lo largo de esta guía el Punto de acceso inalámbrico 8760 se denomina simplemente Punto de acceso Acerca de esta Guía Esta guía describe la instalación básica del Punto de acceso Se tratan los siguientes temas Características del Punto de acceso inalámbrico 3Com 8760 Información de segurid...

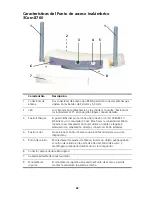
Page 44: ...la conexión del Punto de acceso al conmutador en la red utilice un cable Categoría 5 adecuado con señalización directa y conectores RJ 45 estándar 4 Puerto serial Proporciona al Punto de acceso una interfaz serial para su uso en diagnósticos 5 Botón de reinicio Para restaurar los ajustes de fábrica inserte un objeto puntiagudo en el orificio de reinicio en la parte de atrás del Punto de acceso y m...

Page 45: ...sólo puede retirar la alimentación de la unidad desconectando el cable de alimentación de la toma de corriente ADVERTENCIA esta unidad opera bajo condiciones de SELV Safety Extra Low Voltage o Voltaje extra bajo de seguridad según IEC 950 IEC 60950 Las condiciones sólo se mantienen si el equipo al que está conectado también opera bajo condiciones de SELV ADVERTENCIA dentro de la unidad no hay piez...

Page 46: ...Ethernet y los LED Además observe los siguientes elementos antes de montar o conectar el Punto de acceso Característica Descripción Puerto para el conmutador Para conectar su red inalámbrica a su red alámbrica necesita un concentrador o conmutador conectado al Punto de acceso Cableado Antes de instalar el Punto de acceso asegúrese de que se encuentre instalado en el sitio un cable Ethernet estánda...

Page 47: ...ra instalarlo en una pared techo o caja eléctrica Para mayor seguridad utilice la barra de bloqueo incluida y un cerrojo no incluido para bloquear el Punto de acceso en el soporte después de montarlo en una pared Para montar el Punto de acceso en la pared 1 Enrute el cable Ethernet a través de la abertura en el soporte 2 Atornille el montante de soporte a una pared techo o caja eléctrica gabinete ...

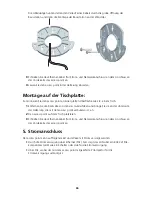
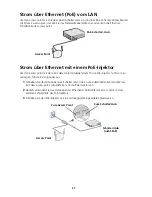
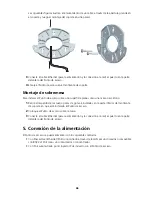
Page 48: ...critorio 1 Retire el respaldo de las cuatro patas de goma e instálelas en la parte inferior del montante de soporte en que está instalado el Punto de acceso 2 Coloque el Punto de acceso sobre la mesa 3 Conecte el cable Ethernet para la alimentación y la conexión a la red al puerto en la parte delantera del Punto de acceso 5 Conexión de la alimentación El Punto de acceso se puede alimentar con los ...

Page 49: ...te 1 Conecte el cable LAN del conmutador o concentrador al puerto para conmutador concentrador en el inyector PoE 3Com incluido con el Punto de acceso 2 Luego conecte un cable LAN del puerto Ethernet en el Punto de acceso al otro puerto en el inyector PoE 3 Enchufe el inyector PoE en una toma de corriente eléctrica correctamente conectada a tierra Conmutador concentrador PoE Punto de acceso 3CRWX1...

Page 50: ...1a 5 0 GHz está habilitada Si el LED está destellando el enlace inalámbrico es correcto y se están transmitiendo o recibiendo datos Apagado La radio está apagada 11b g Verde Indica que 802 11g2 4 GHz está habilitada Si el LED está destellando el enlace inalámbrico es correcto y se están transmitiendo o recibiendo datos Apagado La radio está apagada LAN Verde Indica que se detecta una red 10 100Bas...

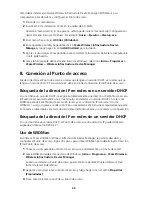
Page 51: ...tiene un servidor DHCP se asigna automáticamente una dirección IP al Punto de acceso El Punto de acceso tarda entre uno y dos minutos en detectar un servidor DHCP en la red Use WIDMan para ubicar el Punto de acceso en la red y ver su dirección IP consulte Uso de WIDMan Luego ingrese esa dirección IP en un explorador Web en una computadora que esté en la misma subred para ver el estado del sistema ...

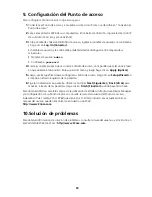
Page 52: ...rá el dispositivo Elija su país del menú y luego haga clic en Apply Aplicar 5 Luego use Setup Wizard para configurar su Punto de acceso Haga clic en Setup Wizard en el menú en el lado izquierdo de la pantalla 6 Siga las indicaciones en pantalla Utilice los botones Next Siguiente y Back Atrás para moverse a través de las pantallas Haga clic en Finish Finalizar cuando haya terminado Para obtener det...

Page 53: ...ar o 3Com Wireless 8760 11a b g PoE Access Point 3CRWE876075 WL 546 Wireless 8760 11a b g PoE Access Point 3CRWE876075 WL 546 Neste Guia o Wireless 8760 Access Point será chamado de Access Point Sobre este Guia Este guia descreve a instalação básica do Access Point Os seguintes tópicos são apresentados Recursos do 3Com Wireless 8760 Access Point Informações de Segurança Etapa 1 Componentes do Paco...

Page 54: ...o Categoria 5 adequado com sinalização direta e conectores RJ 45 padrão para conectar o Access Point ao switch na rede 4 Porta Serial Fornece uma interface serial ao Access Point para uso do diagnóstico 5 Botão de Reinicialização Para restaurar as configurações de fábrica insira um objeto pontudo no orifício de reinicialização na parte traseira do Access Point e mantenha por dois a cinco segundos ...

Page 55: ...fácil acesso Só é possível remover a alimentação da unidade desconectando o cabo de alimentação da tomada ADVERTÊNCIA Esta unidade funciona em condições SELV Safety Extra Low Voltage de acordo com o IEC 950 IEC 60950 As condições só serão mantidas se o equipamento ao qual ela estiver conectada também funcionar nas mesmas condições ADVERTÊNCIA Não há fusíveis substituíveis pelo usuário nem partes u...

Page 56: ...ess Point em um local de difícil acesso Além disso os seguintes itens devem ser observados antes de montar ou conectar o Access Point Recurso Descrição Porta de Switch Para conectar a rede sem fio à rede com fio é necessário conectar um hub ou switch ao Access Point Cabeamento Garanta que um cabo Ethernet padrão com sinalização direta já esteja instalado no local antes de instalar o Access Point G...

Page 57: ... Access Point para fazer a instalação na parede no teto ou na caixa elétrica Para segurança adicional use a barra de travamento incluída e uma trava não fornecida para fixar o Access Point à base após sua montagem na parede Para montar o Access Point na parede 1 Passe o cabo Ethernet pela abertura na base 2 Parafuse o suporte de montagem na parede no teto ou na caixa elétrica invólucro NEMA Se est...

Page 58: ...cie plana 1 Remova o revestimento dos quatro pés de borracha e coloque os na parte inferior do suporte de montagem fixado ao Access Point 2 Coloque o Access Point na mesa 3 Conecte o cabo Ethernet para conexão de alimentação e rede à porta na frente do Access Point 5 Conexão da Alimentação O Access Point pode ser alimentado das seguintes maneiras Por Power Over Ethernet PoE fornecida pela LAN por ...

Page 59: ...ecido com a unidade faça o seguinte 1 Conecte o cabo da LAN do switch ou hub à porta Hub Switch no Injetor PoE da 3Com fornecido com o Access Point 2 A seguir conecte um cabo de LAN da porta Ethernet no Access Point à outra porta no injetor PoE 3 Conecte o Injetor PoE a uma tomada elétrica aterrada adequadamente PoE Switch Hub Access Point 3CRWX120 695A Wireless LAN Switch WX1200 3CRWX120 695A Wir...

Page 60: ... ativada Se o LED estiver piscando a conexão sem fio está funcionando e dados estão sendo transmitidos ou recebidos Apagado O rádio está desligado 11b g Verde Indica que 802 11a 5 0 GHz a rede sem fio está ativada Se o LED estiver piscando a conexão sem fio está funcionando e dados estão sendo transmitidos ou recebidos Apagado O rádio está desligado LAN Verde Indica que uma rede 10 100Base T foi d...

Page 61: ...ede tiver um servidor DHCP um endereço IP será automaticamente atribuído ao Access Point O Access Point leva de um a dois minutos para detectar um servidor DHCP na rede Use o WIDMan para localizar o Access Point na rede e visualizar seu endereço IP consulte Uso do WIDMan Em seguida digite o endereço IP no navegador da Web em um computador na mesma subrede para visualizar o status do sistema do Acc...

Page 62: ...ionar o país em que irá usar o dispositivo Escolha o país no menu e clique em Aplicar 5 A seguir use o Assistente de Configuração para configurar o Access Point Clique em Assistente de Configuração no menu à esquerda da tela 6 Siga as instruções na tela Use os botões Avançar e Voltar para percorrer as telas Clique em Concluir quando terminar Para obter detalhes completos sobre como usar o Wireless...

Page 63: ...iver de grundläggande stegen för att installera och konfigurera din 3Com Trådlösa 8760 11a b g PoE Accesspunkt 3CRWE876075 WL 546 I denna guide kommer vi helt enkelt att kalla den Trådlösa 8760 Accesspunkten för Accesspunkt Om denna guide Denna guide beskriver den grundläggande installationen av Accesspunkt Den behandlar följande ämnen Egenskaper för 3Com trådlös 8760 åtkomstpunkt Säkerhetsinforma...

Page 64: ...ning till en 3Com switch Använd en lämplig rak kategori 5 kabel med standard RJ 45 kontakter för att ansluta dinAccesspunkt till nätverkets switch 4 Serieport Ger Accesspunkt ett seriellt gränssnitt för felsökning 5 Återställningsknapp För att återställa tillverkarens inställningar för in ett spetsigt objekt i återställningshålet på baksidan av Accesspunkt och håll in i två till fem sekunder 6 Ken...

Page 65: ...placerat i närheten av enheten och vara lättåtkomligt Du kan endast bryta strömtillförseln till enheten genom att dra ut kontakten ur eluttaget VARNING Denna enhet uppfyller villkoren för SELV Safety Extra Low Voltage enligt IEC 950 IEC 60950 Dessa villkor kan endast uppfyllas om utrustningen som enheten är ansluten till också uppfyller villkoren för SELV VARNING Det finns inga delar inuti enheten...

Page 66: ...an man installerar Accesspunkt på en svåråtkomlig plats Lägg också märke till följande innan du monterar och ansluter din Accesspunkt Funktion Beskrivning Switchport För att ansluta ditt trådlösa nätverk till ditt kablade nätverk måste du ha en hubb eller switch ansluten till Accesspunkt Kablar Se till att en rak standard Ethernetkabel finns installerad innan du installerar Accesspunkt Se till att...

Page 67: ...ade låskolven och ett lås ej inkluderat för att låsa fast din Accesspunkt på hållaren efter att den monterats på en vägg Väggmontera Accesspunkt 1 Routa Ethernetkabeln genom den öppningen i hållaren 2 Skruva fast monteringsfästet på en vägg ett tak eller i en kopplingslåda NEMA kapsling Vid montering på en fast vägg eller takyta använd de två plåtskruvarna Vid montering på gipsvägg använd de två p...

Page 68: ...unkt Power Over Ethernet PoE från LAN et För att få ström till Accesspunkt genom PoE via en switch eller annan 802 3af kompatibel enhet anslut helt enkelt enhetens nätverkskabel till Accesspunkt s Ethernetport Power Over Ethernet från en PoE Injector För att få ström till Accesspunkt genom 3Com PoE Injector inkluderad gör följande 1 Koppla LAN kabeln från switchen eller hubben till hubb switch por...

Page 69: ...röm på Gul blinkning anger hårdvarufel eller att systemet startar upp Av Ström av 11a Grön Indikerar att 802 11a 5 0 GHz trådlösa nätverket är aktiverat Om LED indikatorn blinkar är den trådlösa länken OK och data sänds eller mottas Av Radion är avstängd 11b g Grön Indikerar att 802 11g2 4 GHz trådlösa nätverket är aktiverat Om LED indikatorn blinkar är den trådlösa länken OK och data sänds eller ...

Page 70: ...ccesspunkt att upptäcka en DHCP server på nätverket Använda WIDMan Enhetshanteraren för trådlös infrastruktur för att hitta Accesspunkt på nätverket och visa dess IP adress se Använda WIDMan Ange därefter IP adressen i en webbläsare eller på en dator som tillhör samma undernät för att visa Accesspunkt s systemstatus eller för att ändra dess konfiguration Hitta IP adressen på nätverk utan en DHCP s...

Page 71: ...mer att använda enheten Välj ditt land från menyn och klicka sedan på Verkställ 5 Använd sedan inställningsguiden för att konfigurera din Accesspunkt Klicka på Inställningsguiden i menyn till vänster på skärmen 6 Följ uppmaningarna på skärmen Använd knapparna Nästa och Tillbaka för att förflytta dig mellan skärmarna Klicka på Avsluta när du är klar För fullständiga detaljer om hur man använder Enh...

Page 72: ...70 ...

Page 73: ...a rpb This equipment complies with IC radiation exposure limits set forth for an uncontrolled environment End users must follow the specific operating instructions for satisfying RF exposure compliance This equipment should be installed and operated with minimum distance 20 cm between the radiator and your body This product must maintain a minimum body to antenna distance of 20 cm Under these cond...

Page 74: ...t the equipment into an outlet on a circuit different from that to which the receiver is connected Consult the dealer or an experienced radio TV technician for help The user may find the following booklet prepared by the Federal Communications Commission helpful The Interference Handbook This booklet is available from the U S Government Printing Office Washington DC 20402 Stock No 004 000 0034504 ...

Page 75: ...rs is subject to licensing Pour empecher que cet appareil cause du brouillage au service faisant l objet d une licence il doit etre utilize a l interieur et devrait etre place loin des fenetres afin de Fournier un ecram de blindage maximal Si le matriel ou son antenne d emission est installe a l exterieur il doit faire l objet d une licence High power radars are allocated as primary users of the 5...

Page 76: ...l RLAN device est con forme aux exigences essentielles et aux autres dispositions pertinentes de la directive 1999 5 CE Italiano Italian Con la presente 3Com Corporation dichiara che questo RLAN device è con forme ai requisiti essenziali ed alle altre disposizioni pertinenti stabilite dalla direttiva 1999 5 CE Latviski Latvian Ar šo 3Com Corporation deklarē ka RLAN device atbilst Direktīvas 1999 5...

Page 77: ...unity country This device must be used with the radar detection feature required for European Community operation in the 5 GHz bands This device will avoid operating on a channel occupied by any radar system in the area The presence of nearby radar operation may result in temporary interruption in communications of this device The Access Point s radar detection feature will automatically restart o...

Page 78: ...76 ...

Reviews: