background image


iv 

Appendix C  Installing the AP 

Note: 

1)  Make sure that no metal particles (such as screws) fall into the Ethernet or 

console interfaces during installation.   

2)  Before  installing  the  AP9152  to  the  wall-mounting  bracket,  connect  the 

network cable. The network cable can only be UTP cat-5.   

3)  Before  connecting  the  console  cable  to  the  AP9152  for  debugging  or 

pressing  the  reset  button,  you  need  to  remove  the  device  from  the 
wall-mounting bracket.   

Determining the Installation Site 

Determine the installation site by observing the following principles:   


Install  the  AP  in  an  area  away  from  obstacles  that  can  cause 
interference. 


Keep the  AP far  away  from electronic devices (such  as microwave 
ovens) that may generate RF noise.   


Ensure that the installation site will not cause any inconvenience or 
nuisance. 

Note: 

1)  Make sure the ceiling is strong enough and the structure is suitable in case of 

ceiling mounting. Reinforce the ceiling if needed.   

2)  Us a Kensington lock if physical security is required to protect the AP from 

being stolen.   

Installing the AP 

The AP9152 support three installation methods: 


Mounting the AP on a wall


Mounting the AP on a ceiling 


Mounting the AP to a T-rail 

Mounting the AP on a Wall 

The following describes how to mount an AP9152 on a wall:   


Installing the wall-mounting bracket on the wall 


Installing the AP on the wall-mounting bracket 


Locking the AP onto the wall-mounting bracket (optional) 

Installing the wall-mounting bracket on the wall 

Summary of Contents for 3CRWE915275

Page 1: ...02 11n 2 4 5GHz Single Band Access Point Quick Installation Guide Model WL 607 3CRWE915275 3CRWE9152A75 BOM 3104XXXX Manual Version APW100 www 3com com 3Com Corporation 350 Campus Drive Marlborough MA USA 01752 3064 ...

Page 2: ...T or LICENSE TXT If you are unable to locate a copy please contact 3Com and a copy will be provided to you UNITED STATES GOVERNMENT LEGEND If you are a United States government agency then this documentation and the software described herein are provided to you subject to the following All technical data and computer software are commercial in nature and developed solely at private expense Softwar...

Page 3: ...sed and disposed of safely Ensuring that all products are labelled according to recognized environmental standards Improving our environmental record on a continual basis End of Life Statement 3Com processes allow for the recovery reclamation and safe disposal of all end of life electronic components Regulated Materials Statement 3Com products do not contain any hazardous or ozone depleting materi...

Page 4: ...ntroduces how to install the 3Com AP9152 and how to connect the power supply by PoE 4 Connecting to AP Introduces how to connent to and log into the 3Com AP9152 Conventions The manual uses the following conventions Symbols Convention Description Means reader be extremely careful Improper operation may cause bodily injury Means reader be careful Improper operation may cause data loss or damage to e...

Page 5: ...ii Convention Description configuration with ease Obtaining Documentation You can access the most up to date 3Com product documentation on the World Wide Web at this URL http www 3com com ...

Page 6: ...ation Site iv Installing the AP iv Mounting the AP on a Wall iv Mounting the AP on a ceiling viii Mounting the AP to a T Rail ix Power Supply by PoE xi 4 Connecting to the AP xii Approved Channels xii Finding the IP Address on Networks with a DHCP Server FIT AP xii Finding the IP Address on Networks Without a DHCP Server FAT AP xii Log into the AP xii Converting your Managed AP FIT to a Stand alon...

Page 7: ...or WLAN users The factory default configuration is FAT mode and it can easily be switch between the FIT mode Hardware Specifications The physical dimensions and weight of the AP9152 Physical dimensions diameter thickness Weight Φ190 60 mm Φ7 48 2 36 in Note Φ means diameter 0 5 kg 1 10 lb The basic configurations of the AP9152 Protocols and chassis material Internal antenna Power consumption IEEE ...

Page 8: ...rface is in the link up state Off The Ethernet interface is in the link down state Blinking Data is being transmitted or received at 1000 Mbps 2 4G Wireless link LED Green Off The wireless link is not initialized or the link is faulty Blinking slowly The wireless link is working normally Blinking rapidly Data is being transmitted or received 5G Wireless link LED Green Off The wireless link is not ...

Page 9: ...istakes Appendix B Preparing for Installation Unpacking and Inspection Before unpacking the unit make sure that the package is intact without any sign of damage When unpacking the unit avoid excessive force otherwise the unit inside the package may get damaged After unpacking the unit check that all items listed on the packing list are contained If any of the items are missing contact your local d...

Page 10: ...AP far away from electronic devices such as microwave ovens that may generate RF noise Ensure that the installation site will not cause any inconvenience or nuisance Note 1 Make sure the ceiling is strong enough and the structure is suitable in case of ceiling mounting Reinforce the ceiling if needed 2 Us a Kensington lock if physical security is required to protect the AP from being stolen Instal...

Page 11: ...ting holes in total in the wall mounting bracket of the AP9152 Select the three round holes with a diameter of 5 mm or 0 20 in for the installation Figure1 Mounting hole pattern of the AP9152 wall mounting bracket Step2 Insert the pointed end of wall anchors into the drilled holes and tap the flat end of wall anchors with a rubber hammer until they are all flush with the wall surface Step3 Align t...

Page 12: ...e Install the wall mounting bracket with the arrow on the bracket pointing upwards Installing the AP on the wall mounting bracket Step1 Align the AP with the key hole clips on the wall mounting bracket and hang the AP on the bracket See callout 1 in Figure3 Step2 Press or rotate the AP to fix it See callout 2 in Figure3 Fix the shaped holes on the AP s rear panel to the key hole clips on the wall ...

Page 13: ... upper left side which can be used to lock the AP to a fixed object to prevent theft Follow these steps to lock the AP to a fixed object Step1 Fix the security cable to a nearby fixed object Step2 Insert the locking plate in the security slot to lock the AP Figure4 Lock the AP9152 to a fixed object 2 3 1 Before installing the security lock 1 Security slot After installing the security lock 2 Secur...

Page 14: ...th the nut to secure the installation Select the two mounting holes of the wall mounting bracket as shown in Figure5 to mount the AP on the ceiling in mm Follow these steps to mount the AP on the ceiling Step1 Drill two holes in the ceiling corresponding to the two mounting holes in the wall mounting bracket Figure5 mounting holes on the wall mounting bracket 1 Mounting holes for mounting on a cei...

Page 15: ...t Mounting the AP to a T Rail Note The width of the T rail must be in the range of 14 mm 0 55 in to 24 mm 0 94 Follow these steps to mount the AP to a T rail Step1 Loosen the two M3 6 screws on each clip holder until the screw heads are lower than the upper edge of the nuts do not remove the screws or they may get lost Step2 Adjust the T rail clips to make the T rail holder wider than the T rail a...

Page 16: ... screws Step4 Check that the T rail holder is fixed to the T rail Step5 Hook the mounting clip of the wall mounting bracket to the mounting hook of the T rail holder as shown Figure8 Step6 Insert the two M4 8 screws through the two holes with a diameter of 5 mm or 0 20 in on the wall mounting bracket according to the dashed line shown in Figure8 and fix the screws to the T rail holder Step7 Check ...

Page 17: ...le clip 10 M4 8 screw Power Supply by PoE Power is supplied to the AP9152 through a PoE module or PoE switch Connect one end of an Ethernet cable to the Ethernet interface of the AP9152 and the other end to an Ethernet interface of the PoE device Caution Identify the mark on the device to avoid confusing the console interface for the Ethernet interface or vice versa ...

Page 18: ...he IP Address on Networks Without a DHCP Server FAT AP If your network does not have a DHCP server the AP uses a default factory configuration which includes the following information Configure the IP address of the AP as 192 168 0 50 Configure the AP to enable the Telnet server function the default authentication username is admin password is password case sensitive You can remotely manage and ma...

Page 19: ... the web page http www 3com com to get the instructions Table of Contents A Regulatory Compliance Information E 1 Regulatory compliance standards E 1 Support Antennas Accessories information E 1 EU Compliance information E 1 CE Marking E 1 EU Country Restriction in 2 4GHz band E 5 EU Country Restriction in 5GHz band E 5 WEEE Directive 2002 96 EC E 6 USA Compliance information E 6 US Federal Commun...

Page 20: ... 2 EN 61000 3 2 EN 61000 3 3 ETSI EN 301 489 1 ETSI EN 301 489 17 Safety UL 60950 1 CAN CSA C22 2 No 60950 1 IEC 60950 1 EN 60950 1 Support Antennas Accessories information This product can only be used with the supplied antenna s This product does not contain any user serviceable components Any unauthorized product changes or modifications will invalidate the warranty and all applicable regulator...

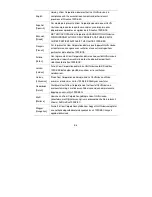
Page 21: ... electromagnetic fields 0Hz 300GHz R TTE declaration statements Česky Czech 3Com Coporation tímto prohlašuje že tento RLAN device je ve shodě se základními požadavky a dalšími příslušnými ustanoveními směrnice 1999 5 ES Dansk Danish Undertegnede 3Com Corporation erklærer herved at følgende udstyr RLAN device overholder de væsentlige krav og øvrige relevante krav i direktiv 1999 5 EF Deutsch German...

Page 22: ...rporation dichiara che questo RLAN device è conforme ai requisiti essenziali ed alle altre disposizioni pertinenti stabilite dalla direttiva 1999 5 CE Latviski Latvian Ar šo 3Com Corporation deklarē ka RLAN device atbilst Direktīvas 1999 5 EK būtiskajām prasībām un citiem ar to saistītajiem noteikumiem Lietuvių Lithuanian Šiuo 3Com Corporation deklaruoja kad šis RLAN device atitinka esminius reika...

Page 23: ...direktiivin muiden ehtojen mukainen Svenska Swedish Härmed intygar 3Com Corporation att denna RLAN device står I överensstämmelse med de väsentliga egenskapskrav och övriga relevanta bestämmelser som framgår av direktiv 1999 5 EG Íslenska Icelandic Hér með lýsir 3Com Corporation yfir því að RLAN device er í samræmi við grunnkröfur og aðrar kröfur sem gerðar eru í tilskipun 1999 5 EC Norsk Norwegia...

Page 24: ...Hz and 5GHz channel limitations apply The user should check the current channel of operation If operation is occurring outside of the allowable frequencies as listed above the user must cease operating the 3Com AP9152 Dual Band 802 11n PoE Access Point 3CRWE915275 M N WL 607 at that location and consult the local technical support staff responsible for the wireless network 3 This device must be us...

Page 25: ...ical Electronic Equipment WEEE Directive and must be disposed of in a responsible manner USA Compliance information US Federal Communications Commission statement This device complies with Part 15 of the FCC Rules Operation is subject to the following two conditions This device may not cause harmful interference This device must accept any interference received including interference that may caus...

Page 26: ... radio TV technician for help RF Requirements RF exposure Hazard Warning This device generates and radiates radio frequency energy In order to comply with FCC radio frequency exposure guidelines for an uncontrolled environment this equipment must be installed and operated while maintaining a minimum body to antenna distance of 20 cm approximately 8 in RF Frequency Requirements This equipment compl...

Page 27: ...cessful communication To prevent radio interference to the licensed service this device is intended to be operated indoors and away from windows to provide maximum shielding Equipment or its transmit antenna that is installed outdoors is subject to licensing Pour empecher que cet appareil cause du brouillage au service faisant l objet d une licence il doit etre utilize a l interieur et devrait etr...

Page 28: ...teção contra interferência prejudicial mesmo de estações do mesmo tipo e não pode causar interferência a sistemas operando em caráter primário Para maiores informações consulte o site da ANATEL www anatel gov br Korea RF Compliance This device may cause radio interference during its operation Therefore service in relation to human life security is not available Taiwan regulatory statement 1 經審驗合格之...

Page 29: ...your network Expert assessment and implementation services are offered to fill resource gaps and ensure the success of your networking projects More information on 3Com maintenance and Professional Services is available at http www 3com com Contact your authorized 3Com reseller or 3Com for a complete list of the value added services available in your area Troubleshoot Online You will find support ...
Page 30: ...gnostic error messages Details about recent configuration changes if applicable To send a product directly to 3Com for repair you must first obtain a return authorization number RMA Products sent to 3Com without authorization numbers clearly marked on the outside of the package will be returned to the sender unopened at the sender s expense If your product is registered and under warranty you can ...

Reviews: