background image

4

To link the access point to your Ethernet network, plug one end of another Ethernet cable into 
the port labeled To

 Hub/Switch

 on the power supply, and plug the other end into a LAN port 

(on a hub or in a wall).

Using a Power-Over-Ethernet LAN Port

If your LAN equipment complies with the IEEE 802.3af power-over-Ethernet standard, you can connect the 
access point directly to a LAN port. For example, the illustration above right shows a connection through a 
3Com Ethernet Power Supply to a 3Com SuperStack

®

 Switch.

4

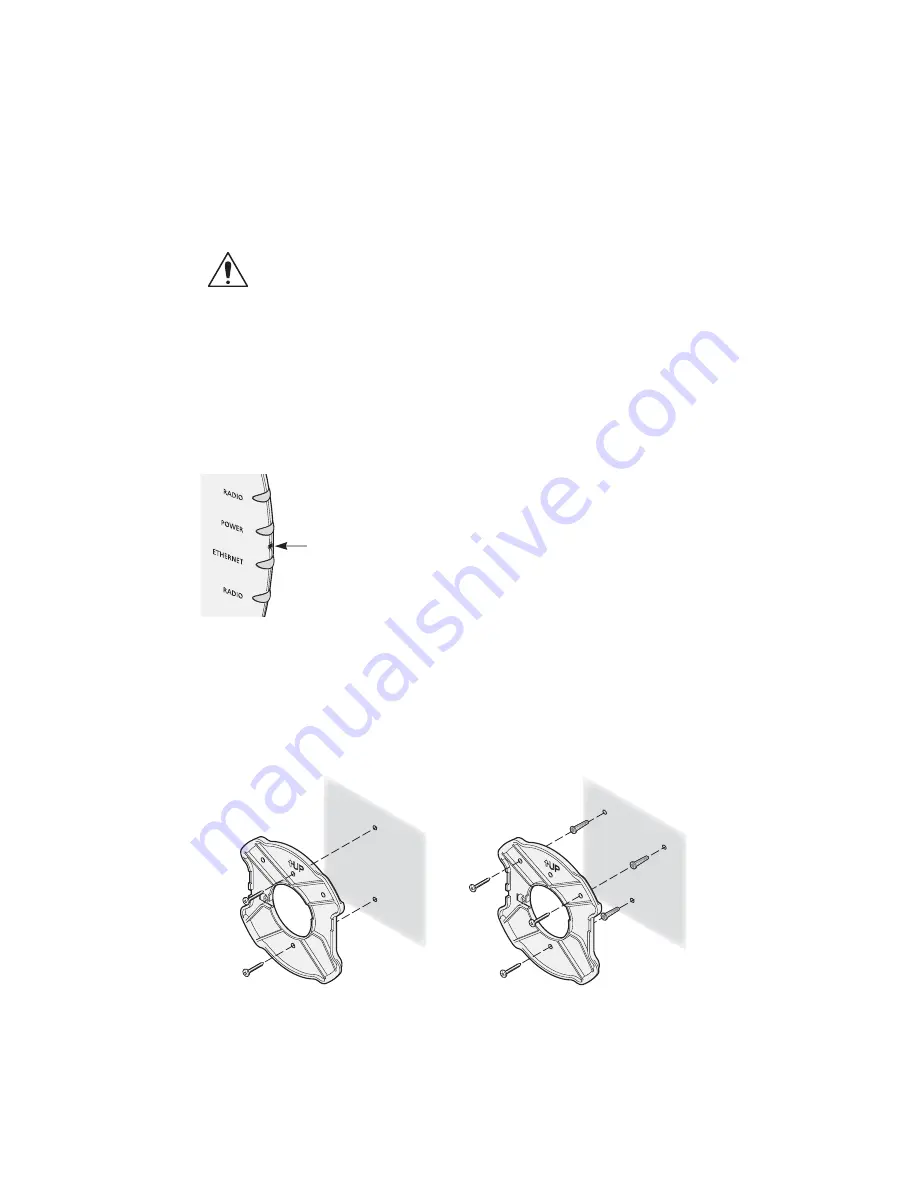
Check the LEDs

When power is connected, the access point LEDs light. The illustration and the following table describe the 
LEDs and their functions.

5

Wall Mount Installation

1

Install the mounting plate as shown in the following illustration, on either a stud (or other 
hard wall surface), or onto drywall.

CAUTION:

 To avoid damaging network equipment, make sure that the cables are connected 

from access point to power supply to LAN as shown and described above.

Name

Description

Radio

LED blinks red to indicate radio activity. Faster blinking 
indicates more activity.

Power

LED lights green when operational code is running.

Reset 
Button

Press this button in for 15 seconds to restore the factory 
defaults.

Ethernet

LED lights yellow when Ethernet link is established. LED 
blinks to indicate activity on the Ethernet. Faster blinking 
indicates more activity.

Radio

LED blinks red to indicate radio activity. Faster blinking 
indicates more activity. This LED is only active when a 
second radio is installed.

Reset
Button

If installing into drywall,  use
3 plastic anchors and 3 screws.

If installing into a stud or other
secure vertical surface, use 2 screws.

Summary of Contents for 3CRWE825075A

Page 1: ...lexible and expansive connectivity and scalability They extend networks and boost productivity for centrally managed enterprises requiring scalable security solutions NOTE This product must be install...

Page 2: ...compliant power supply equipment output power rated 48 V DC 350 mA maximum Such equipment must be safety certified according to UL CSA IEC or other applicable national or international safety require...

Page 3: ...omply with the IEEE 802 3af standard Using the Power Supply The power supply can be located at any point between the access point and the LAN access port wherever a convenient power outlet exists If y...

Page 4: ...the following illustration on either a stud or other hard wall surface or onto drywall CAUTION To avoid damaging network equipment make sure that the cables are connected from access point to power su...

Page 5: ...side of the unit allowing it to trail along the wall o If you have routed the Ethernet cable through the center opening secure the cable on the hook located on the mounting plate as shown in the illus...

Page 6: ...n Server Tool This tool can act in four different capacities o As a TFTP Server necessary for firmware upgrades and backup and restore functions Use this option if you do not have a TFTP server set up...

Page 7: ...ke sure the computer is connected to the same network as the device to be configured After installing and launching the device manager select the device to be configured from network tree and click Co...

Page 8: ...eserved 3Com the 3Com logo and SuperStack are registered trademarks of 3Com Corporation All other company and product names may be trademarks of the respective companies with which they are associated...

Reviews: