background image

Siting OfficeConnect Remote on a Desk

2-7

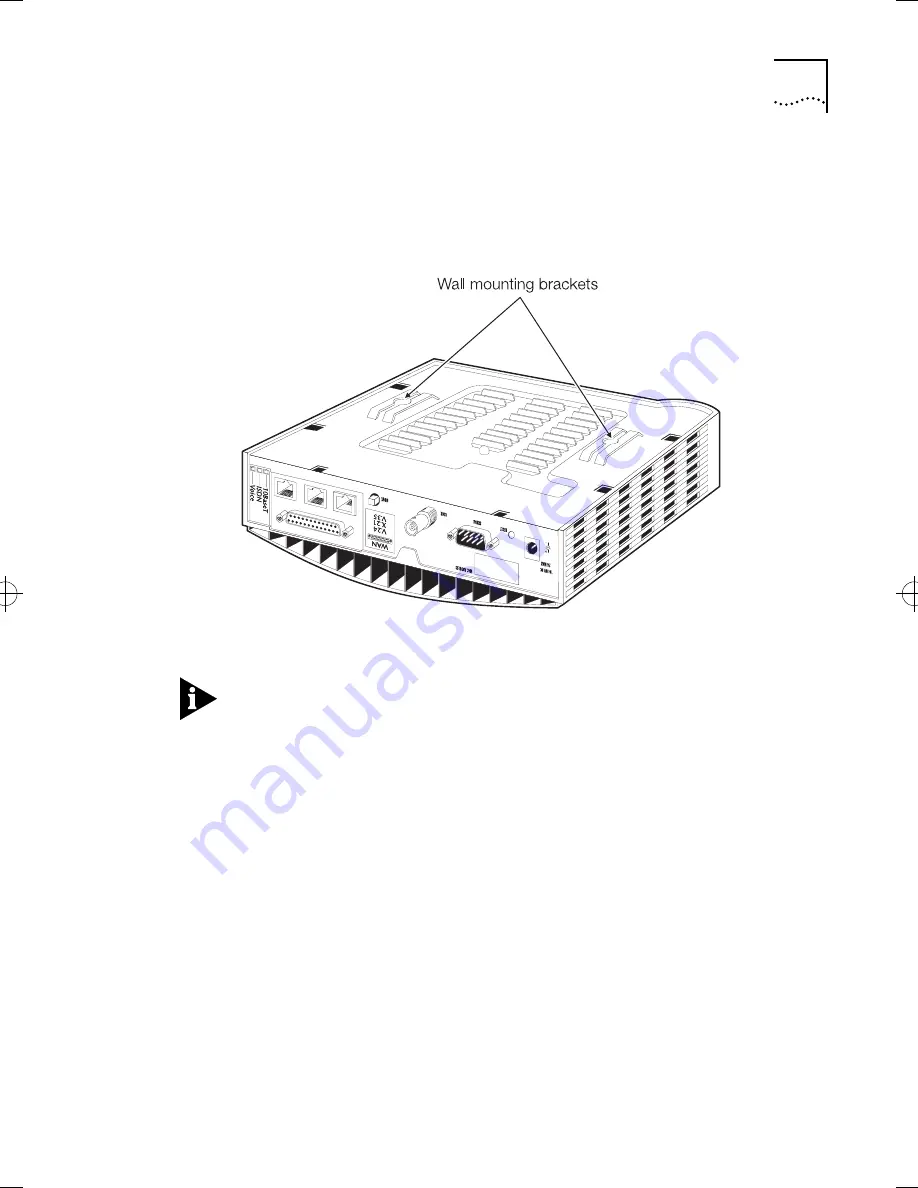
Wall Mounting the OfficeConnect Remote

There are two slots on the underside of the OfficeConnect Remote 
which are used for wall mounting. Mount the unit with the LEDs 
facing upwards.

Figure 2-7   

Wall Mounting Brackets

When wall mounting the unit, ensure that it is within easy reach of 
the mains socket.

Only single units can be wall mounted.

Two suitably sized screws and corresponding rawl plugs are needed 
in order to wall mount the unit. 

Ensure that the wall upon which the unit is to be mounted is smooth, 
flat, dry, sturdy, and non-conductive. 

getstart.bk : INSTALL.FRM  Page 7  Friday, October 3, 1997  10:40 AM

Summary of Contents for 3C410012A - OfficeConnect Remote 531 Access...

Page 1: ... OFFICECONNECTTM REMOTE GETTING STARTED GUIDE Model Numbers 511 521 531 http www 3com com Part No 980 000075 002 Published September 1997 ...

Page 2: ...ble media described in this documentation it is furnished under a license agreement included with the product as a separate document in the hard copy documentation or on the removable media in a directory file named LICENSE TXT If you are unable to locate a copy please contact 3Com and a copy will be provided to you Unless otherwise indicated 3Com registered trademarks are registered in the United...

Page 3: ...e unit and is accessible Power can only be removed from the OfficeConnect Remote by disconnecting the power adapter from the unit or from the socket outlet Only connect apparatus complying with the relevant interface requirements to the ports on this unit The safety status of the ports on this equipment are as follows Ports identified by the labels VOICE and ISDN TNV TNV telecoms network voltage i...

Page 4: ...with the unit that cannot be solved with problem solving actions in this guide contact the supplier Disconnect the power adapter before moving the unit WARNING Twisted Pair RJ45 data port This is a shielded RJ45 data socket It cannot be used as a telephone socket Only connect RJ45 data connectors to this socket ...

Page 5: ...nnect Remotes befinden und frei zugänglich sein Sie können den OfficeConnect Remote nur spannungsfrei schalten indem Sie das Steckernetzteil aus der Netzsteckdose ziehen oder die Verbindung zum Gerät unterbrechen An den Anschlussbuchsen der Geräte dürfen nur die dafür vorgesehenen Anschlüsse verwendet werden Der Sicherheitsstandard der Anschlüsse fuer dieses Gerät sind wie folgt Anschlüsse bezeich...

Page 6: ...fficeConnect Remote haben das nicht mittels der Fehleranalyse in dieser Anleitung behoben werden kann setzen Sie sich mit Ihrem Lieferanten in Verbindung Bevor der OfficeConnect Remote ausgebaut wird ist das Netzteil zu ziehen ACHTUNG gedrehte paarfache RJ45 Datenanschluss Es ist eine abgeschirmte RJ45 Datenanschlußbuchse Sie darf nicht als Telefonanschluß verwendet werden Verbinden Sie nur RJ45 D...

Page 7: ...au soit localisé proche du moyeu et soit accessible Vous pouvez seulement enlever l alimentation au moyeu en débranchant la pièce de raccordement d alimentation de l unité ou du socle de prise de courant Connecter uniquement des unités conformes aux normes relatives des interfaces de cet équipement Les normes de sécurité des ports d interconnexion sur cet équipement sont les suivants Les ports mar...

Page 8: ...z un problème physique avec le moyeu qui ne peut pas être résolu avec les actions de la résolution des problèmes dans ce guide contacter votre fournisseur Débrancher la pièce de raccordement d alimentation avant de remuer le moyeu AVERTISSEMENT Le port de données RJ45 de paire tordue Ceux ci est un socle de données RJ45 blindé Il ne peut pas être utilisé comme socle de téléphone Seulement brancher...

Page 9: ...entions 2 Additional Safety Information 3 1 INTRODUCTION Introduction 1 1 OfficeConnect Remote Features 1 1 Pack Contents Checklist 1 3 Registering Ownership of OfficeConnect Remote 1 4 LED Indicators and Connectors 1 5 2 INSTALLATION Installation Requirements 2 1 Siting OfficeConnect Remote 2 2 Siting OfficeConnect Remote on a Desk 2 2 The Rubber Feet 2 2 Stacking the Units 2 3 ...

Page 10: ...Interface 531 only A 1 ISDN Connector Interface A 1 Voice Connector Interface 521 531 A 2 Management Connector Interface A 2 Protocol Support A 2 Bridge Characteristics A 2 Performance A 2 Environmental Considerations A 3 Interface Cable Characteristics A 4 WAN Port Connecting Cables A 4 Manager Port Connecting Cable A 7 LAN Port Connecting Cable 10Base T A 9 Ordering Information A 10 Wall Fixing ...

Page 11: ...Returning Products for Repair B 7 INDEX 3COM CORPORATION LIMITED WARRANTY CE CERTIFICATION FCC CLASS A VERIFICATION STATEMENT ...

Page 12: ......

Page 13: ...nformation in this guide follow the instructions in the release notes Finding Specific Information in this Guide This table shows where to find specific information in this guide Information about how to configure the unit can be found in the Getting Connected Guide which accompanies this guide More detailed configuration information can be found in the Software Reference guide on the Documentatio...

Page 14: ...ures or instructions Caution Information to alert you to potential damage to a program system or device Warning Information to alert you to potential personal injury Table 2 Text Conventions Convention Description Words in italicized type Italics emphasize a point or denote new terms at the place where they are defined in the text Words in bold face type Bold text denotes key features ...

Page 15: ...n line surge suppressor or uninterruptible power supply Products manufactured by 3Com are safe and without risk provided they are installed used and maintained in good working order and in accordance with their instructions and recommendations Should any of the following conditions occur isolate the electricity supply and refer to your 3Com reseller If the case or cover is not correctly fitted If ...

Page 16: ... Ensure nothing rests on the unit s system cables and that the cables are not located where they can be stepped on and cause damage to the unit Keep the unit away from radiators and heat sources Allow 25mm 1 inch around the unit or stack to provide adequate air circulation Install the unit in a clean area that is free from dust or extreme temperatures The unit has been designed to be a free standi...

Page 17: ...ted OfficeConnect hub In order to interconnect hubs in different locations the OfficeConnect Remote unit transmits information over a WAN Wide Area Network service provided by telephone carrier organizations This may be an ISDN line or a permanent leased line The WAN port connects to a permanent leased line available from your telephone carrier organization Leased lines work at a range of speeds T...

Page 18: ...n Control Protocol Internet Protocol TCP IP or Novell Internetwork Packet Exchange IPX Offering full LAN to LAN connectivity at speeds up to 64 Kilobits per second Kbps on each ISDN channel and up to two Megabits per second Mbps on the WAN port where fitted the OfficeConnect Remote is a compact desktop unit with unrivalled price and performance The principal features of the OfficeConnect Remote in...

Page 19: ...the contents of the box against the pack contents checklist below If any of the items have been damaged in transit or are missing contact the 3Com reseller from whom the equipment was purchased Figure 1 1 Pack Contents 1 x OfficeConnect Remote unit 1 x power adapter fitted with an appropriate plug for the national power supply 1 x 1 5m RJ45 to RJ45 male plug ISDN 2 connecting cable 1 x 1 5m DB9 to...

Page 20: ...ntation CD 1 x Warranty Registration Card Please save the box and protective packing material in case the unit needs to be stored or transported in the future Registering Ownership of OfficeConnect Remote A warranty registration card is enclosed in the box with the OfficeConnect Remote Please take a few moments before installing the unit to complete the card and mail it ...

Page 21: ... Shows the status of the power supply On Power is being supplied to the unit Slow flash New software is being downloaded to the unit Quick flash Self test or software loading during power up Off No power supplied to the unit LINK orange Shows the status of the LAN connection On LAN connected Off No LAN connection detected ISDN OK green Shows the status of the ISDN line On The unit is connected to ...

Page 22: ...ing dialled a call is ringing out or a call is coming in Off The voice channel is not in use WAN yellow Shows the state of the WAN link 531 only On The WAN link is available to pass data Flashing There is a fault on the WAN port Off The WAN link is not configured ISDN Utilization green yellow Shows ISDN usage as a percentage of network loading If an ISDN loading of 100 is consistently seen and fas...

Page 23: ...e connected to the OfficeConnect Remote using the 9 pin V 24 Serial Manager cable supplied with the unit The port provides VT100 terminal emulation running at 9600 bps Refer to Appendix A for more information about cables A proprietary communications software package such as Windows 95 HyperTerminal is needed in order to communicate with OfficeConnect Remote COAX The coaxial LAN port allows a 10Ba...

Page 24: ...piece of equipment as opposed to multi point LAN connections using 10Base2 cabling systems The 10Base T LAN port simulates the characteristics of a workstation port This allows it to be directly connected to a LAN or network hub port as required If the LAN port is connected directly to a single PC or workstation the crossover must be implemented by setting the MDI MDIX switch to the Out position I...

Page 25: ...e of transmission voice calls are automatically directed to the appropriate port The Voice port has an RJ11 socket If your telephone equipment uses a different connector you will need to obtain a suitable convertor to connect to the Voice port A British Telecom to RJ11 convertor is supplied with UK models ...

Page 26: ...1 10 CHAPTER 1 INTRODUCTION ...

Page 27: ...e proposed installation site If a suitably sited wall socket is not available contact your ISDN supplier for assistance The ISDN telephone number of the remote ISDN unit This is needed in order to carry out the connection configuration procedure A suitable cable for connection to the LAN or workstation if only a single workstation is attached to this unit Although OfficeConnect Remote has two LAN ...

Page 28: ...1 inch clearance around the unit or stack To prolong the operational life of the equipment Never stack OfficeConnect units more than four high and ensure that they are clipped securely together Do not place objects on top of any unit or stack Siting OfficeConnect Remote on a Desk If the OfficeConnect Remote is to be sited on a desk or table units may be stacked on top of each other The following e...

Page 29: ...ct units together securely CAUTION Never stack more than four units high If the units are different sizes stack them by size largest on the bottom smallest on top 1 Stick the rubber feet supplied to the bottom unit of the proposed stack Figure 2 1 2 Place the first bottom unit on a flat surface and locate the slots into which the clips fit ...

Page 30: ...or example the eight port hub Always stack units so that the front panels are aligned Figure 2 2 Figure 2 2 Stacking Alignment for OfficeConnect Units 3 Fit the clips on one side Hook a clip into the front stacking slot and press it forward until its spikes click into the locating holes Figure 2 3 Repeat the process for the rear stacking slot use the middle slot if the top unit is three quarter de...

Page 31: ...Keeping the front of the units aligned fit the second unit to the first Hook the top edge of the clips into the stacking slots on the bottom edge of the second unit the unit should rest on the clips spikes Push the clips into place Figure 2 4 Figure 2 4 Fitting the Second Unit ...

Page 32: ... on the two fitted clips 6 Locate the two remaining clips over the relevant slots and push them into place Figure 2 5 Stacked OfficeConnect Units To remove a clip squeeze the sides of the clip together and use reasonable force to pull it off Figure 2 6 Figure 2 6 Removing a Clip ...

Page 33: ...unit with the LEDs facing upwards Figure 2 7 Wall Mounting Brackets When wall mounting the unit ensure that it is within easy reach of the mains socket Only single units can be wall mounted Two suitably sized screws and corresponding rawl plugs are needed in order to wall mount the unit Ensure that the wall upon which the unit is to be mounted is smooth flat dry sturdy and non conductive ...

Page 34: ...re 2 8 Wall Fixing Template 2 Fix the screws into the wall leaving their heads 3 mm 0 12 in clear of the wall surface Figure 2 9 Figure 2 9 Screw Clearance 3 Remove any connections to the unit and locate it over the screw heads When in line gently push the OfficeConnect Remote onto the wall and move it downwards to secure Figure 2 10 When making connections be careful not to push the unit up and o...

Page 35: ...Siting OfficeConnect Remote on a Desk 2 9 Figure 2 10 Wall Mounting the OfficeConnect Remote CAUTION Only single units can be wall mounted ...

Page 36: ...witches at the outlet socket are set to their OFF positions 1 Connect the jack of the power adapter to the power connector on the rear panel of the OfficeConnect Remote Figure 2 11 Figure 2 11 Connecting the Power Adapter 2 Plug the mains plug of the power adapter into a standard mains wall socket and if necessary switch it on The OfficeConnect Remote performs a self test and loads the software Du...

Page 37: ... wall mounted LAN connection box Follow the appropriate instructions below Connecting to an OfficeConnect Hub Figure 2 12 Connecting an OfficeConnect Hub 1 Connect a UTP cable not supplied to the 10Base T port of the OfficeConnect Remote 2 Connect the other end of the cable to a 10Base T port on the hub Figure 2 12 ...

Page 38: ...x Figure 2 13 Connecting an In House LAN Connection box 1 Attach a UTP cable not supplied to the 10Base T socket on the OfficeConnect Remote 2 Attach the other end of the cable to the socket of the in house LAN connection box Figure 2 13 or directly to a 10Base T hub port ...

Page 39: ...T socket on the workstation s Ethernet adapter Figure 2 14 Figure 2 14 Connecting a PC or Workstation Connecting the 10Base2 LAN Use Y piece connectors to attach the LAN Due to the compact nature of the unit a traditional T piece may not provide enough clearance to allow space for fingers and cables when units are stacked together 1 Attach a 10Base2 Y piece to the Coax port on each OfficeConnect u...

Page 40: ...LLATION 3 Terminate the two free ends of the segment by fitting 50 Ohm end pieces Figure 2 15 Connecting a 10Base2 Cable When using 10Base2 cable both ends of the segment must be properly terminated with 50 Ohm end pieces ...

Page 41: ...AUTION Do not to connect the ISDN line into the OfficeConnect Remote LAN port The ISDN line voltage may damage the unit 2 Plug the other end into the ISDN wall box Figure 2 17 Figure 2 17 Connecting to a Proprietary ISDN wall box ISDN connection boxes differ from country to country and different telephone companies may have proprietary wallboxes The wall box illustrated here is for example purpose...

Page 42: ...ly The OfficeConnect 531 can be connected directly to a WAN Network Terminating Unit NTU fitted by a WAN service supplier Use a suitable WAN cable to connect the WAN port on the OfficeConnect Remote unit to the NTU Figure 2 18 Figure 2 18 Connecting to a WAN ...

Page 43: ...mmended that voice equipment is only connected to ISDN services offering the standard 2 B channel Basic Rate service Some service providers offer Basic Rate ISDN connections with a single B channel If a handset is attached to a unit connected to this type of ISDN service data cannot be passed whilst the voice port is in use The voice port is terminated with an RJ 11 socket If your telephone equipm...

Page 44: ...nagement terminal to the OfficeConnect Remote to configure it to communicate with remote sites Connect the Serial Manager cable to the Serial port Figure 2 20 Connect the other end to the serial COM port on your PC workstation Figure 2 20 Connecting to a Management Terminal ...

Page 45: ...e is a 25 way D type female connector which can be configured to support one of the following V 11 X 21 for speeds up to 2 048 Mbps V 28 V 24 RS232 for speeds up to 19 2 Kbps V 35 V 36 for speeds up to 2 048 Mbps ISDN Connector Interface The ISDN interface is an RJ45 socket This allows connection to a 2B D basic rate ISDN service Built in NT 1 termination with 2B1Q interface EuroISDN 1TR 6 North A...

Page 46: ...and remote terminal management with TCP IP Telnet menu driven management interface for remote management Software upgrades enhancements and configurations downloadable from network attached terminal or PC SNMP MIB II with private extensions for management of unique features Protocol Support TCP IP routing or bridging Novell IPX routing or bridging Other bridging Bridge Characteristics 802 3 MAC la...

Page 47: ...Environmental Considerations A 3 Environmental Considerations Operating temperature 0 40 C 32 105 F Humidity 0 90 non condensing Power consumption 18 watts Weight 965g 2lb 1oz ...

Page 48: ...three types 25 pin male D type to 15 pin male D type 25 pin male D type to 25 pin male D type 25 pin male D type to 34 pin MRAC V 11 X 21 WAN Cable The WAN port can be configured to support V 11 signaling at data transfer rates up to 2 048 Mbps Note the following pinouts when buying or making up a suitable WAN cable Autosense pins must be connected in order for the cable to function correctly ...

Page 49: ...e The WAN port can be configured to support V 24 or V 28 signaling at data transfer rates up to 19 2 Kbps Note the following pinouts when buying or making up a suitable WAN cable Autosense pins must be connected in order for the cable to function correctly ...

Page 50: ...Cable The WAN port can be configured to support V 36 signaling at data transfer rates up to 2 048 Kbps Note the following pinouts when buying or making up a suitable WAN cable Autosense pins must be connected in order for the cable to function correctly ...

Page 51: ...he connecting cable may be one of two types 9 pin female D type to 9 pin male female D type 9 pin female D type to 25 pin male female D type The pin outs for these cables are illustrated below 9 pin Female D type to 9 pin Male Female D type Note the following pinouts when buying or making up a suitable 9 pin to 9 pin manager cable ...

Page 52: ...ION 9 pin Female D type to 25 pin Male Female D type Use a 9 pin female D type to 25 pin male female D type cable when connecting the manager port directly to a modem Note the following pinouts when buying or making up a suitable cable ...

Page 53: ...stics A 9 LAN Port Connecting Cable 10Base T The 10Base T Coax port terminates with an RJ45 connector which can be connected to the 10Base T port on another device The table below shows the pin outs for a straight through cable ...

Page 54: ...an 3C16744 Power adapter Australasia 3C16745 Power adapter South Africa 731 000036 9 pin D type plug to 9 pin D type socket gender changer Serial Management port cable 731 000024 9 pin D type plug to RJ45 plug with 3m of cable 3C409032 ISDN BRI cable 3C409000 25 pin to 25 pin D type plug with 3m of cable V 24 3C409001 25 pin D type plug to 34 way MRAC connector with 3m of cable V 35 3C409004 25 pi...

Page 55: ...ll Fixing Template A 11 Wall Fixing Template Use this template to drill the fixing holes for wall mounting the OfficeConnect Remote Refer to page 2 7 for details on wall mounting the OfficeConnect Remote ...

Page 56: ...A 12 APPENDIX A TECHNICAL INFORMATION ...

Page 57: ...3Com offers worldwide product support 24 hours a day 7 days a week through the following online systems World Wide Web site 3Com Bulletin Board Service 3ComBBS 3ComFacts automated fax service 3ComForum on CompuServe online service World Wide Web Site Access the latest networking information on 3Com Corporation s World Wide Web site by entering our URL into your Internet browser http www 3com com T...

Page 58: ...sing a digital modem for fast access up to 56 Kbps To access 3ComBBS using ISDN use the following number 408 654 2703 Country Data Rate Telephone Number Australia up to 14400 bps 61 2 9955 2073 Brazil up to 14400 bps 55 11 547 9666 France up to 14400 bps 33 1 6986 6954 Germany up to 28800 bps 4989 62732 188 Hong Kong up to 14400 bps 852 2537 5608 Italy fee required up to 14400 bps 39 2 27300680 Ja...

Page 59: ...ical articles about all 3Com products as well as a messaging section for peer support To use 3ComForum you need a CompuServe account 1 Log on to CompuServe 2 Type go threecom 3 Press Return to see the 3ComForum main menu Country Telephone Number Hong Kong 852 2537 5610 U K 44 1442 278279 U S A 1 408 727 7021 Country Telephone Number Country Telephone Number Australia 1800 678 515 Netherlands 06 02...

Page 60: ...r messages A list of system hardware and software including revision levels Details about recent configuration changes if applicable If you are unable to contact your network supplier see the following section on how to contact 3Com Support from 3Com If you are unable to receive support from your network supplier technical support contracts are available from 3Com Contact your local 3Com sales off...

Page 61: ...92 4476 65 538 9368 886 2 377 5850 662 231 8151 4 3Com Benelux B V Belgium Netherlands 32 2 725 0202 31 30 6029700 3Com Canada Calgary Montreal Ottawa Toronto Vancouver 403 265 3266 514 683 3266 613 566 7055 416 498 3266 604 434 3266 3Com European HQ 49 89 627320 3Com France 33 1 69 86 68 00 3Com GmbH Austria Czech Republic Slovak Republic Germany Central European HQ Hungary Poland Switzerland 43 ...

Page 62: ... 7841 7847 51 1 221 5399 58 2 953 8122 3Com Mediterraneo Italy Spain 39 2 253011 Milan 39 6 5279941 Rome 34 1 383 17 00 3Com Middle East 971 4 349049 3Com Nordic AB Denmark Finland Norway Sweden 45 39 27 85 00 358 0 435 420 67 47 22 18 40 03 46 8 632 56 00 3Com Russia 007 095 258 09 40 3Com Southern Africa 27 11 807 4397 3Com UK Ltd 44 131 220 8228 Edinburgh 44 161 873 7717 Manchester 44 162 889 7...

Page 63: ...t to 3Com without RMA numbers will be returned to the sender unopened at the sender s expense To obtain an RMA number call or fax 04 22 97 Country Telephone Number Fax Number U S A and Canada 1 800 876 3266 option 2 408 764 7120 Latin America 1 408 326 7801 408 764 7120 Europe South Africa and Middle East 44 1442 438125 44 1442 435822 Outside Europe U S A and Canada 1 408 326 7804 1 408 764 7120 ...

Page 64: ...B 8 APPENDIX B TECHNICAL SUPPORT ...

Page 65: ...checklist 1 3 conventions icons 2 text 2 crossover switch 1 7 D dimensions A 3 E Ethernet 10Base2 port 2 13 10BaseT port 2 11 ethernet 10BaseT port 1 8 F fax service See 3ComFacts I installation 2 1 10Base2 connections 2 13 10BaseT connections 2 11 ISDN connection 2 15 management terminal connection 2 18 power adapter 2 10 siting OfficeConnect Remote 2 2 voice port connection 2 17 wall mounting 2 ...

Page 66: ...chnical services B 1 P package contents 1 3 performance A 2 power adapter 3 2 10 power inlet 1 7 power LED 1 5 protocol support A 2 R rear panel 10BaseT port 1 8 ISDN port 1 8 power socket 1 7 reset button 1 7 serial port 1 7 voice port 1 8 WAN port 1 8 rear panel connections 1 7 reset button 1 7 returning products for repair B 7 RJ11 socket voice port 1 9 RJ45 socket 10BaseT port 1 8 ISDN port 1 ...

Page 67: ...voice connector interface A 2 voice LED 1 6 voice port 1 8 VT100 terminal connection 2 18 W wall mounting 2 7 WAN connection 1 8 port 1 8 WAN cables A 4 WAN connector interface A 1 WAN LED 1 6 warranty card 1 4 World Wide Web WWW B 1 ...

Page 68: ...4 INDEX ...

Page 69: ...ducts will work in combination with any hardware or applications software products provided by third parties that the operation of the software products will be uninterrupted or error free or that all defects in the software products will be corrected For any third party products listed in the 3Com software product documentation or specifications as being compatible 3Com will make reasonable effor...

Page 70: ...T OF OR IN CONNECTION WITH THE SALE INSTALLATION MAINTENANCE USE PERFORMANCE FAILURE OR INTERRUPTION OF ITS PRODUCTS EVEN IF 3COM OR ITS AUTHORIZED RESELLER HAS BEEN ADVISED OF THE POSSIBILITY OF SUCH DAMAGES AND LIMITS ITS LIABILITY TO REPAIR REPLACEMENT OR REFUND OF THE PURCHASE PRICE PAID AT THE OPTION OF 3COM THIS DISCLAIMER OF LIABILITY FOR DAMAGES WILL NOT BE AFFECTED IF ANY REMEDY PROVIDED ...

Page 71: ...ions Equipment Standards entitled Digital Apparatus ICES 003 These limits are designed to provide reasonable protection against harmful interference in a commercial installation This equipment generates uses and can radiate radio frequency energy and if not installed and used in accordance with the instructions may cause harmful interference to radio communications Operation of this equipment in a...

Page 72: ......

Reviews: