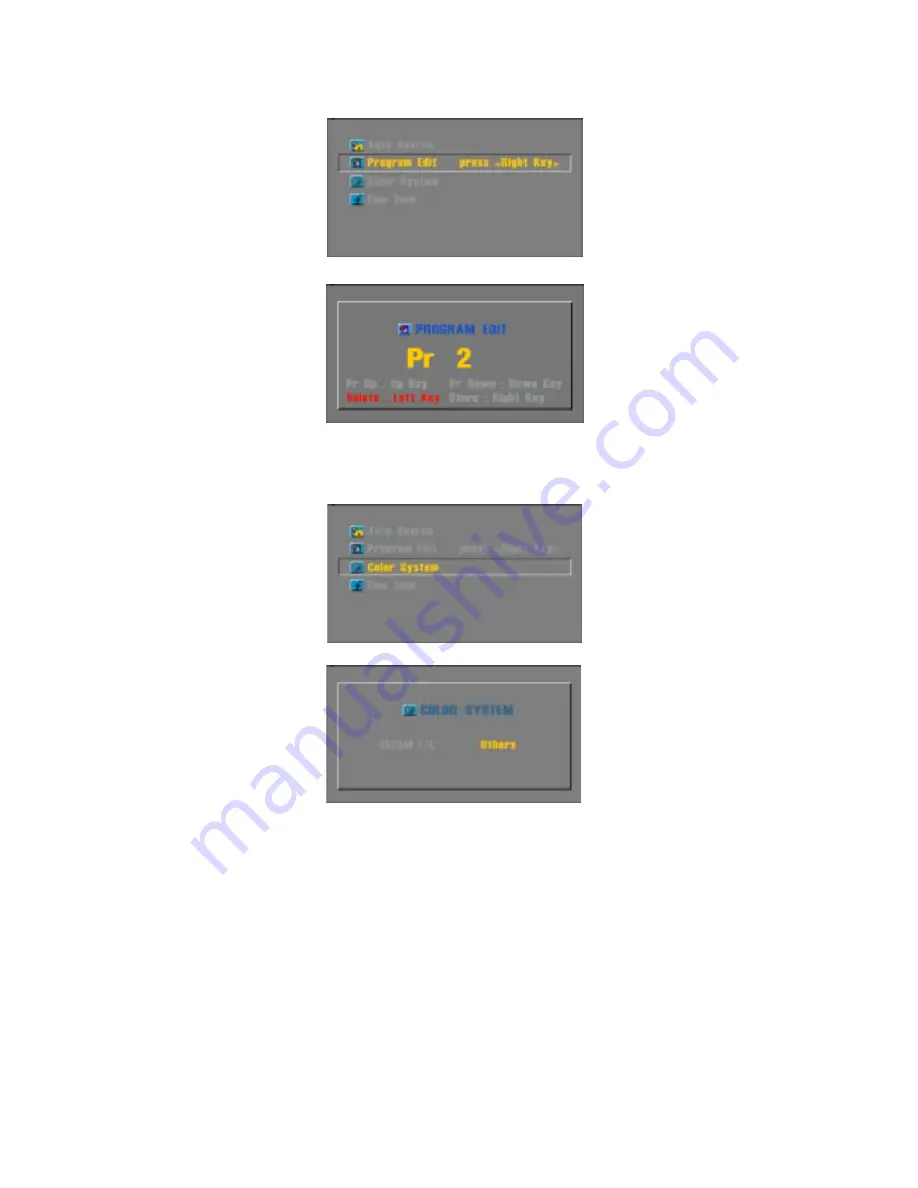
3B Technology LT27A02 User Manual Download Page 25

- PROGRAM EDIT

  After completing Auto Searching, use to delete the undesired of stored channels
  or input your favorite channels manually.
 1. Press [MENU], then OSD MENU appears.

 2. Select "TV SETUP" 
     using [UP/DOWN], then
     press  [MENU].
 3. Select "Program Edit",
     using [UP/DOWN]
     then press  [MENU]

 4. Use [UP/DOWN] to move to the intended 
     channel and pressing [RIGHT], then
     you can watch by that channel.
     Use [LEFT] to delete a channel

     To return previous menu, 
      press [EXIT].

- Control of COLOR SYSTEM
  "Auto Searching" allows to adjust to a suitable Color System(PAL/SECAM) for each country,
  but exceptionally in case of a wrong adoption, user can select manually.

 1. Press [MENU], then OSD MENU appears.

 2. Select "TV SETUP" 
     using [UP/DOWN], then
     press  [MENU].
 3. Select "Color System",
     using [UP/DOWN]
     then press  [MENU]

 4. Use [RIGHT/LEFT] to select
     "SECAM L/L'" for France,
     select "Others" for the other countries.

Summary of Contents for LT27A02

Page 1: ...TFT LCD Display USER S MANUAL ...

Page 2: ...ower cord c Connect the power cord to an AC mains In the event of thunderstorms or power cuts please pill out the mains plug of the AC DC adaptor and the aerial plug Do not allow anything to rest upon or roll over the power cord and do not place the set where the power cord is subject to damage Service other hazards If the unit does not operate properly unplug it and call your dealer Antenna Conne...

Page 3: ......

Page 4: ...oduct Specification Warnings 1 Supplied Accessories 2 Installation 2 1 Wall Installation 2 2 Desktop Installation 2 3 Installation Procedure 2 4 Installation Reference 3 Operation 3 1 OSD On Screen Display buttons on the casing 3 2 Use of OSD On Screen Display menu 3 2 1 Basic Instruction of OSD Menu 3 2 2 OSD basic form 3 2 3 Control of OSD menu at PC Input mode ...

Page 5: ...om the unit falling it should be mounted securely 1 Wall Installation Caution Do not install the unit on a weak wall surface like plaster etc it is not needed any bracket or installation accessory with the exception of nails or screws Distance of holes of back panel is 305mm a Drive nails or screws on the wall in the location you want to install the unit b Hang the unit on the nails or screws 2 De...

Page 6: ...uttons prior to entering main contents Front Buttons Volume buttons during OSD operation adjust certain sub menu or setting Channel buttons move a cursor on OSD during OSD operation move to previous menu from a present one or make the OSD disappear OSD menu appearance on screen or move to each sub menu Sensor for the Remote Control When power is on the light is green blue Power On Off ...

Page 7: ...tton to make a curser move to the item you want to adjust 3 Press MENU button while an icon is selected 4 Sub ITEM or adjusting Menu will appear If Sub item shows up repeat two or three times until you can see an adjusting Menu 5 At the state of adjusting Menu adjust the condition with RIGHT LEFT buttons 6 Press EXIT button then OSD menu or the present menu disappears from screen If you want to mo...

Page 8: ...order to convert to TV input move cursor to Television then press RIGHT button 3 There are also Analog PC PC Video S Video Scart Video one of which you can select to fit a input source Conversion from TV or VIDEO to PC input mode Press MENU button then the following menu will appear 1 Press UP DOWN and put the cursor on SOURCE then press MENU 2 In order to convert to PC input move cursor to Analog...

Page 9: ... OSD for analog PC input OSD for other sauce inputs At the beginning the cursor is fixed at PICTURE and the present resolution of PC Monitor appears at the bottom If you press LEFT RIGHT with no menu selected then volume will be adjusted Increase VOLUME with RIGHT Decrease VOLUME with LEFT Press EXIT button then menu disappears ...

Page 10: ...ESS take the following procedure 1 Press MENU then OSD MENU appears Select PICTURE then press MENU 2 Select Brightness using UP DOWN then press MENU 3 Adjust the desired Brightness using RIGHT LEFT 4 Press EXIT to move to previous MENU Follow the same procedure to control the CONTRAST PHASE and FREQUENCY ...

Page 11: ...harpness using UP DOWN then press MENU 3 Select the distinction you want by using RIGHT LEFT button lower number gets stronger distinction higher number gets smoother distinction Control of COLOR Use to adjust the density of color 1 Press MENU then OSD MENU appears Select PICTURE then press MENU 2 Select Color using UP DOWN then press MENU ...

Page 12: ...y of Green Blue take the same procedure as above Control of the position of entire screen Control of H POSITION Use to move the position of entire screen 1 Press MENU then OSD MENU appears Select SCREEN CONTROL then press MENU 2 Select H Position using UP DOWN then press MENU H Position for horizontal movement V Position for vertical movement ...

Page 13: ...ling magnification of the screen 1 Press MENU then OSD MENU appears Select SCREEN CONTROL then press MENU 2 Select Scaling using UP DOWN then press MENU 3 Select the function by using RIGHT LEFT FULL for entire screen Aspect 16 9 for wide vision One To One for fitting into a running program resolution ...

Page 14: ...t Zoom using UP DOWN then press MENU 3 Select the level with using RIGHT LEFT FREEZE FRAME Function Use to pause the favorite shot of pictures 1 Press MENU then OSD MENU appears Select SCREEN CONTROL then press MENU 2 Select Freeze Frame using UP DOWN then press MENU 3 Select the On Off with using RIGHT LEFT On Pause Off Relieve ...

Page 15: ...ystem Reset using UP DOWN then press MENU 4 Select RIGHT LEFT then factory defaulting will start Select EXIT before pressing RIGHT LEFT to return to previous menu OSD TIMEOUT Function Use to adjust the stand by time of OSD MENU while no command is conducted by buttons 1 Press MENU then OSD MENU appears 2 Select MISCELLANY using UP DOWN then press MENU 3 Select OSD Timeout using UP DOWN then press ...

Page 16: ...you like with using RIGHT LEFT On OSD Background gets more transparent Off OSD Background gets less transparent OSD POSITION Function This function is for adjusting the position of OSD MENU on screen 1 Press MENU then OSD MENU appears 2 Select MISCELLANY using UP DOWN then press MENU 3 Select OSD Position using UP DOWN then press MENU 4 Select the position as you like by using RIGHT LEFT From the ...

Page 17: ...ired PiP Size PiP Source PiP Position using UP DOWN then Select the desired Size Source Position using Left Right Using PIP Picture in Picture This function will work on Video S Video Television Scart signals as inputs to sub screen on main screen PC mode When watching PIP the main screen and the sub screen menu have differences in the quality of screen color ...

Page 18: ...ast Euro West Euro East Cyrillic West Cyrillic East Greek West Greek East Arabic West Arabic East Euro Left Right 3 Select Redetect language using UP DOWN the press menu 1 Press MENU then OSD MENU appears 2 Select MISCELLANY using UP DOWN the press MENU ...

Page 19: ... AUDIO SETUP using UP DOWN then press MENU 3 Select Balance using UP DOWN then press MENU 4 Adjust the balance of VOLUME using RIGHT LEFT L left speaker R right speaker Control of SURROUND 1 Press MENU then OSD MENU appears 2 Select AUDIO SETUP using UP DOWN then press MENU 3 Select Surround using UP DOWN then press MENU ...

Page 20: ...er s desire 1 Press MENU then OSD MENU appears 2 Select AUDIO SETUP using UP DOWN then press MENU 3 Select Equalizer using UP DOWN then press MENU 4 Adjust to adjust certain frequency using UP DOWN then press MENU 5 Adjust the value using RIGHT LEFT Follow the same procedure to control Equalizer 500Hz 1 5KHz 5KHz 10KHz ...

Page 21: ...isplay and picture quality automatically 1 Press MENU then OSD MENU appears 2 Select AUTO CONFIG using UP DOWN then press MENU 3 Select RIGHT LEFT then Start AUTO CONFIG before pressing RIGHT LEFT to escape to previous menu select EXIT ...

Page 22: ...sing UP DOWN then press MENU 4 Adjust the On Off of AUTO VOLUME using RIGHT LEFT Press EXIT to return to previous menu Control of Stereo Mono SAP According to the signal transmitted by broadcast station select among Stereo Mono SAP There is a possibility of noise or bad sound at the areas of receiving poor signals in that case select Mono 1 Press MENU then OSD MENU appears 2 Select AUDIO SETUP usi...

Page 23: ...f SOUND SYSTEM Use to fit each country s stereo system 1 Press MENU then OSD MENU appears 2 Select AUDIO SETUP using UP DOWN then press MENU 3 Select Sound System using UP DOWN then press MENU 4 Adjust to fit in user country s sound system using UP DOWN French L L for France s neighboring countries D K for East European ...

Page 24: ...WN then press MENU 3 Select Auto Search using UP DOWN then press MENU 4 Select AUTO SEARCHING by pressing RIGHT LEFT Press EXIT to return to previous menu 5 Automatically search store channels in memory While searching storing continues all buttons do not work 6 Completing the searching there appears FINISHED To escape press EXIT The program stored at CH 1 will appear on screen ...

Page 25: ...nd pressing RIGHT then you can watch by that channel Use LEFT to delete a channel To return previous menu press EXIT Control of COLOR SYSTEM Auto Searching allows to adjust to a suitable Color System PAL SECAM for each country but exceptionally in case of a wrong adoption user can select manually 1 Press MENU then OSD MENU appears 2 Select TV SETUP using UP DOWN then press MENU 3 Select Color Syst...

Page 26: ...n unsecured poor colored display or lined picture appears 1 Press MENU then OSD MENU appears 2 Select TV SETUP using UP DOWN then press MENU 3 Select Fine Tune using UP DOWN then press MENU 4 Use RIGHT LEFT to adjust 31 31 to optimize the picture ...

Page 27: ...ttons In case of channels with TEXT information pressing the Text button will convert TV mode to Text mode then Text information will appear At this time Menu buttons shall not work Only Teletext related buttons shall work UP DOWN buttons In TEXT Mode page nbr shall be Up Down DIGIT 0 9 buttons In TEXT Mode it is possible to move to the selected page directly MIX button In TEXT Mode the background...

Page 28: ... cancel the searching of pages or other working functions SIZE button In TEXT Mode it is used to enlarge the size of current page Press once 1 2 upper part enlarged Press twice 1 2 lower part enlarged Press three times ordinary screen converted R G Y C COLOR buttons In TEXT Mode there are four different colors at the bottom of the screen One of them can be chosen with these buttons ...

Page 29: ...Volume Surround Auto Config etc NTSC PAL SECAM NT4 43 1 0 0 2Vp p RCA RCA R L Text for EU only Teletext index Mix Size Hold Sub page Cancel Reveal Red Green Yellow Page Numeric 0 9 etc 3 5mm Jack 15 Pin D Sub 21 Pin Euro Scart for EU only IEC Type EU 21Pin Euro Scart for EU only 4 Pin Mini Din Scanning Frequency Horizontal Vertical TV Color System Tuner System OSD Direct Control Video Input Color ...

Page 30: ...gh voltage lines neon lights etc Increase the sound by pressing volume adjustment button Check if voice terminal of external input is connected properly Check if speaker cables are connected properly Select and check the other input If the sound still does not work and the other channels are the same after you have done as the above contact your dealer or an authorized service center Screen appear...

Page 31: ... in a particular installation If this equipment does cause harmful interference to radio or television reception which can be determined by turning the equipment off and on the user is encouraged to try to correct the interference by one or more of the following measures Reorient or relocate the receiving antenna Increase the separation between the equipment and receiver Connect the equipment into...

Reviews: