| 1" Metal Blinds Deluxe
4
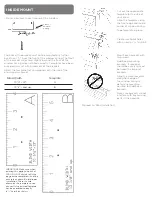
You will be using your blind with mounting brackets attached
to the headrail to mark the position of the brackets on your
wall or molding. To determine bracket placement, you will
need to make a small pencil mark on the back of the headrail
at either 2" or 2
3
/
4
" from the end of the headrail:
OUTSIDE MOUNT
Blind Width
Mark Headrail
10
1
/
2
" – 13"
2" from each end
13
1
/
8
" – and over
2
3
/
4
" from each end
• Center a bracket over
each pencil mark on the
headrail.
• Additional mounting
brackets, if required,
should be evenly spaced
between the two end
brackets.
• Make sure brackets do not
interfere with any moving
parts in the headrail.
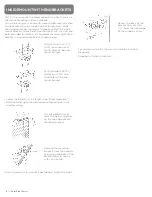
• Hold the blind up to the
desired mounting position
over the window. Once
the blind is level, mark the
wall or molding on either
side and the top edge of
each mounting bracket.
NOTE: If using extension
brackets, attach mounting
brackets to extension
brackets with nuts and
bolts before attaching
brackets to headrail.
• Mount each bracket
making sure all brackets
are installed level and in
line with each other.
• Remove the mounting
brackets from the headrail
by pushing the back of
the bracket forward and
up with your thumb.
• Mount each bracket
making sure all brackets
are installed level and in
line with each other.
NOTE: Blinds UNDER 60"
wide require two screws
per bracket. Screws should
be mounted diagonally
from one another. Blinds
OVER 60" wide require four
screws per bracket.
• Proceed to “Blind Installation”
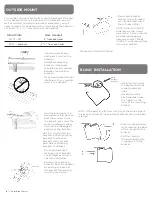
BLIND INSTALLATION
NOTE: If the bracket interferes with any of the working parts,
the incorrect holes of the end mount bracket may have been
selected.
• Push the headrail back
while rotating the back
of the rail up into the
bracket.
• Pull the headrail
forward slightly until
it engages into the
bracket.
• Hang the front lip of
the headrail onto the
mounting bracket
hook.
• Headrail must be
positioned between
the “teeth” on the
front of the mounting
bracket.
Note
Proper
Position


