background image

16

1.

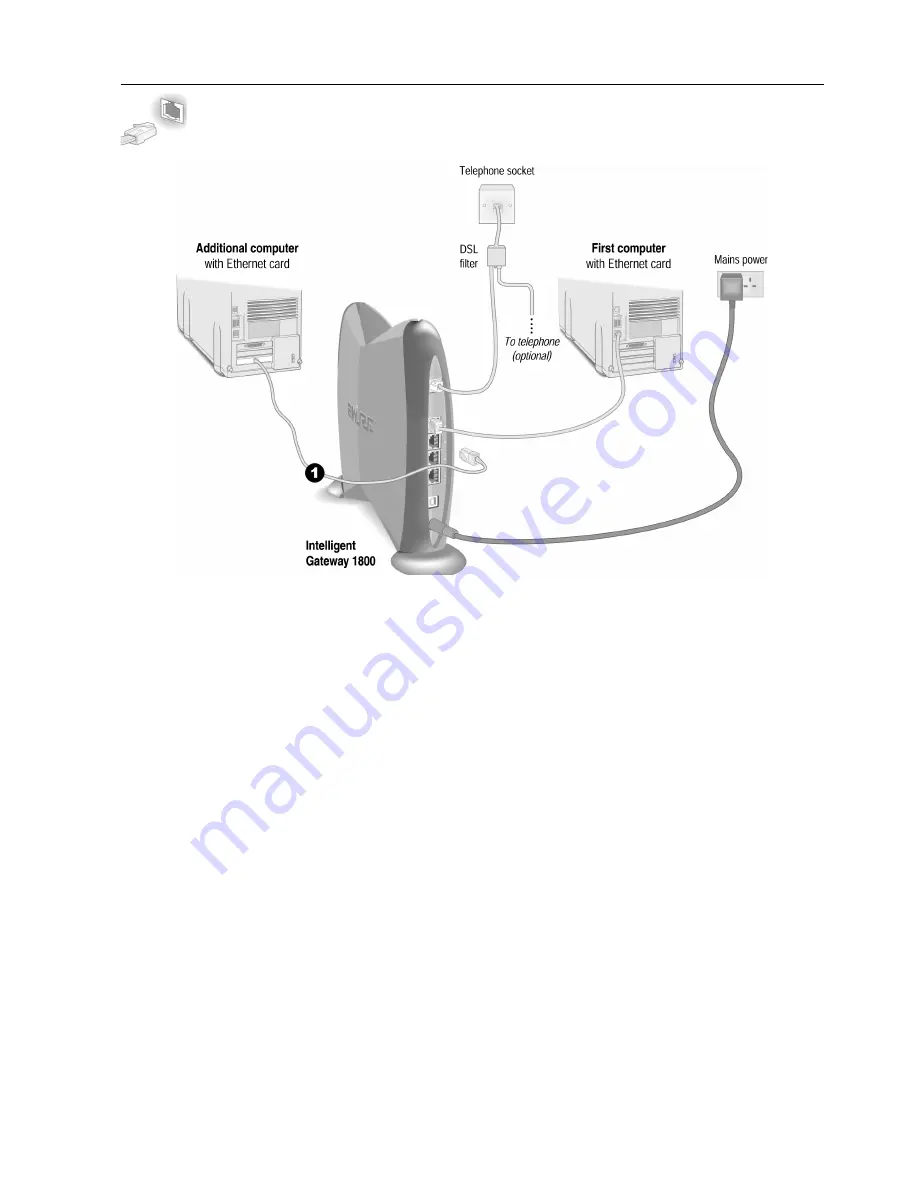
Connect an Ethernet cable from any available 

LOCAL ETHERNET

 port on the Intelligent Gateway to 

your computer’s Ethernet port.

Repeat Step 3 “Install the Intelligent Gateway Software” on page 12.

Ethernet Connection

Requires a computer with an Ethernet port

Summary of Contents for Intelligent Gateway 1800

Page 1: ......

Page 2: ...fice is at 81 Newgate Street London EC1A 7AJ registered in England No 180000 ___________________________________________________________________________________________________________________________ Owner s Record The serial number is located on the bottom of your Intelligent Gateway Record the serial number in the space provided here and refer to it when you call Customer Care Serial Number ___...

Page 3: ... ADSL Filter 5 Step 2 Connect Your First Computer to the Intelligent Gateway Choose a computer and connection type 6 Ethernet Connection 7 Check your connections 7 USB Connection 8 Install the Intelligent Gateway USB driver Windows PC 9 Install the Intelligent Gateway USB driver Macintosh 10 Check your connections 11 Step 3 Install the Intelligent Gateway Software BT Openworld Pay As You Go Dial U...

Page 4: ... connection information 26 Viewing connection details 27 DSL connection details 27 Internet connection details 28 Checking your connection speed 29 Monitoring your Internet connection 30 Using Broadband Link diagnostics 30 Viewing Broadband Link statistics 31 Modifying Broadband Link settings 32 Local Network 33 Viewing Local Network summary information 33 Editing advanced Local Network settings 3...

Page 5: ...hedule 61 Viewing a restriction schedule 62 Content Screening 63 Setting up Content Screening 64 Step 1 Block content categories for this screening group 65 Content categories 65 Step 2 Block and approve sites for this screening group 66 Adding sites 67 Removing sites 67 Allowing blocked sites 67 Blocking approved sites 67 Step 3 Assign computers to screening groups 67 Viewing Content Screening se...

Page 6: ... BROADBAND LINK indicator light is red 110 LOCAL NETWORK indicator light is not lit 110 Frequently Asked Questions Installation FAQs 111 Networking FAQs 114 Computer Configuration FAQs 115 PC Internet Explorer 6 0 115 PC Netscape 6 2 115 Macintosh Internet Explorer 5 115 Macintosh Netscape 4 7 115 Windows 95 98 98SE ME 116 Windows NT 2000 XP 116 Macintosh 8 6 to 9 x 116 Macintosh OS X 116 PC Inter...

Page 7: ... Ethernet is a technology that allows you to create a network using special wiring Category 5 cable such as the dark gray cable included with the Intelligent Gateway Many computers are shipped with a built in Ethernet adapter If you have a computer with an Ethernet adapter you can use Ethernet cable to connect the Ethernet connection socket on the computer to any available local Ethernet port on t...

Page 8: ...ection to keep your network safe Allows users to connect to the local network securely through the Internet anywhere in the world Provides a 4 port 10 100 Ethernet switch allowing users to create a larger faster networking environment Home Phoneline Networking HomePNA The Intelligent Gateway supports the Home Phoneline Networking Alliance protocol HomePNA technology lets you connect computers in d...

Page 9: ...ation near the power mains telephone socket and a computer If your office computer has Windows 98 ME 2000 or XP we recommend connecting it via Ethernet For two computers consider using USB and Ethernet If you have multiple computers requiring Ethernet you can use any of the available local Ethernet ports on the Intelligent Gateway to connect the computers to the Intelligent Gateway ...

Page 10: ... proceeding Second Check your computer s system and browser requirements Verify that your computers meet the following minimum requirements System Requirements Windows Windows 98 98SE Windows ME Windows NT 4 0 with Service Pack 6 Windows 2000 or Windows XP At least 32 MB of RAM At least one computer with CD ROM 5 MB of available hard disk space for Intelligent Gateway software Available Ethernet o...

Page 11: ...lephone and broadband services simultaneously Install one ADSL Filter for each telephony connection including such devices as answering machines fax machines point of sale terminals and PSTN dial up modems You must install an ADSL Filter for each telephone or telephony device that shares the same line as your ADSL modem To do so Disconnect your telephone other telephony equipment from the wall soc...

Page 12: ...the following methods to connect your first computer to the Intelligent Gateway Save and close all open programs before you begin connecting your Intelligent Gateway Connection Type Go to Ethernet Requires A computer with an Ethernet port Recommended for Primary computer in the same room as the Intelligent Gateway page 7 USB Requires A computer with an available USB port See the USB connection opt...

Page 13: ...DSL service provider If you have been using an external DSL modem disconnect it as you will no longer need it 5 Optional If you had a telephone connected to the telephone socket you can reconnect it to the PHONE port on the ADSL Filter Check your connections Power on your computer When your computer is fully powered up verify the POWER and LOCAL NETWORK indicator lights on the front of the Intelli...

Page 14: ...ded USB cable from the PC port on the Intelligent Gateway to the USB port on your computer The gray end fits into the Intelligent Gateway and the beige end goes to your PC 3 Connect the provided ADSL Filter to the telephone socket 4 Connect the provided telephone cable from the PHONE LINE port on the Intelligent Gateway to the ADSL MODEM port on the ADSL Filter This connects the internal DSL modem...

Page 15: ...mputer The following screens show the installation under Windows XP and may vary somewhat on Windows 98 Windows ME and Windows 2000 1 Power on your computer When the Found New Hardware Wizard window opens make sure that Install the software automatically Recommended is selected and click Next to continue 2 The driver installs 3 Click Finish to complete the installation ...

Page 16: ...r computer s CD ROM drive 3 Double click the 2Wire USB folder to install the driver 4 If you have set up an administrator name and password the Authenticate screen opens Enter your administrator name and password and click OK 5 Follow the on screen instructions When the driver installation is complete you will be prompted to restart your computer 6 After your computer restarts connect a USB cable ...

Page 17: ...the front of the Intelligent Gateway are green If they are not see Diagnosing connection problems on page 110 The BROADBAND LINK indicator light will not turn green until the Intelligent Gateway software has been installed and an Internet connection has been established Continue from here to Step 3 Install the Intelligent Gateway Software on page 12 8 Verify that Ethernet Adaptor en1 is selected i...

Page 18: ...connection which will allow you to connect to the Internet if broadband service is not available To use the dial up service your computer must be connected to your telephone line via a dial up modem and during set up you will be prompted to select which modem you want to use You can install the dial up connection on each PC that has a modem and that is connected to the network IMPORTANT When you c...

Page 19: ...start Starting the Setup Wizard manually on Windows PCs After one minute if the Setup Wizard does not run automatically follow these steps 1 Double click the My Computer icon located on the desktop 2 Double click the icon that corresponds to your CD ROM drive then double click Setup exe 3 Follow the onscreen instructions 4 After the software installation is complete your Intelligent Gateway is rea...

Page 20: ...is complete your Intelligent Gateway is ready to use ADSL service and the POWER LOCAL NETWORK and BROADBAND LINK LEDs should be green Note Refer to the Using the Intelligent Gateway Network chapter for information about the computers on your network Macintosh OS X 1 Click the Apple menu and select System Preference Network 2 From the Show dropdown select the method by which the Intelligent Gateway...

Page 21: ...d Connection Type Go to Ethernet Requires a computer with an Ethernet port Recommended for small office environments using Ethernet Category 5 wiring page 16 USB Requires a computer with an available USB port See the USB connection option for exceptions page 17 Home phoneline networking HomePNA Requires a computer with a HomePNA port or an external HomePNA adapter such as the PC Port page 18 Wirel...

Page 22: ...le from any available LOCAL ETHERNET port on the Intelligent Gateway to your computer s Ethernet port Repeat Step 3 Install the Intelligent Gateway Software on page 12 Ethernet Connection Requires a computer with an Ethernet port ...

Page 23: ...ay be added to the network using connection options such as Ethernet 1 Connect the USB cable from the PC port on the Intelligent Gateway to the USB port on your computer Before installing your Intelligent Gateway software on this computer you must install a USB driver Detailed instructions for installing USB drivers begins on page 8 Repeat Step 3 Install the Intelligent Gateway Software on page 12...

Page 24: ...mputer Windows recognizes the PC Port and automatically launches the Add New Hardware Wizard Select Specify the location of the driver Advanced and click Next to continue Insert the PC Port CD and wait for the CD to start up Select Removable Media Floppy CD ROM and click Next to continue Windows is now ready to load the network driver Click Next to continue Click Finish Windows may take several mi...

Page 25: ... recognizes the PC Port and automatically launches the Add New Hardware Wizard Select Specify the location of the driver Advanced and click Next to continue Insert the PC Port CD and wait for the CD to start up Select Removable Media Floppy CD ROM and click Next to continue Windows is now ready to load the network driver Click Next to continue Click Finish Windows may take several minutes to compl...

Page 26: ...mber and the wireless encryption key 3 Set the network type to Infrastructure Refer to your wireless adapter documentation for instructions on editing the adapter s network profile Your wireless adapter should be configured to operate with an access point or residential gateway This mode of operation is typically enabled by setting network type to Infrastructure Wireless Connection Requires a comp...

Page 27: ...e encryption key Once you have enabled security on your wireless adapter you need to enter the unique security key for your Intelligent Gateway To do this set the network encryption type to hexadecimal and enter your 10 digit wireless encryption key found on the bottom of your Intelligent Gateway For Macintosh computers the encryption key must be prefixed with a Note To maximize your wireless netw...

Page 28: ... assign permissions to other users on the network and access links to the most commonly used features of your Intelligent Gateway After you have connected your computers to your network and installed the Intelligent Gateway software enter http home in the address bar of your browser The Intelligent Gateway user interface opens ...

Page 29: ...he Details page displays information about your system s hardware and software configuration and provides links to detailed system level access and information Viewing your summary The Summary page provides general information and links to your system s most commonly used features This page consists of the Network at a Glance panel to the left and a list of subsections to the right These subsectio...

Page 30: ...ssword 1 Check the Enable checkbox 2 In the Enter New Password field enter your password 3 In the Confirm New Password field re enter your password 4 Optional In the Enter Your Hint field enter a hint 5 Click the SAVE button To disable password protection deselect the Enable checkbox and click SAVE Changing a password To change your Intelligent Gateway system password 1 In the Enter Current Passwo...

Page 31: ... button Viewing your system details The System Details page provides the following information about your system Model The Intelligent Gateway model number for example 1800 Serial Number The Intelligent Gateway serial number Hardware Version The Intelligent Gateway hardware version Software Version The software version the Intelligent Gateway is currently running Enhanced Services The enhanced ser...

Page 32: ...l Viewing connection information The Connection Information box shows basic system configuration information Router Address The broadband IP address assigned by your service provider to your system so that it can communicate on the Internet The address is either Static permanently assigned and manually entered or Dynamic automatically assigned and configured depending on the service type to which ...

Page 33: ... connection from the Internet to your network Data transfer speeds are measured in kilobits per second kbps Upstream Rate The speed at which data goes over your broadband connection from your network to the Internet Data transfer speeds are measured in kilobits per second kbps Channel This setting is determined by BT Openworld s DSLAM equipment Current Noise Margin Indicates how much the noise on ...

Page 34: ... provided to you by BT Openworld and entered by you during system installation Subnet Mask The subnet mask is part of the Internet Address settings and is used in conjunction with your Internet Address If you receive your Internet Address settings automatically the subnet mask has been set for you If you manually set your Internet Address static IP this is the information that was provided to you ...

Page 35: ... and may be left blank If you receive your Internet Address settings automatically the subnet mask has been set for you If you manually set your Internet Address static IP this is the information that was provided to you by BT Openworld and entered by you during system installation Maximum Transmission Unit MTU Shows the maximum size allowed on packets that are sent to and from your network to BT ...

Page 36: ...on due to many factors including traffic to the Web site or the speed of the Web servers at the site you are visiting Note The Speed Meter requires that your browser support Java 2 Using Broadband Link diagnostics The Broadband Link Diagnostics page displays an itemized list of your broadband connection s current status DSL Synchronization G DMT ATM Signal PVC and IP Connection and DNS Communicati...

Page 37: ...nnection The Transmit and Receive Data panel shows the total number of data bytes and IP packets either transmitted or received and the total number of IP errors transmitted and received since the last reset The Data Errors panel shows accumulated data errors from when your system is started until a reset Accumulated errors do not necessarily indicate a problem with your broadband service or your ...

Page 38: ...settings The Advanced Settings page allows advanced users to manually configure their DSL and Internet connection settings You should only modify the connection settings if you are very familiar with DSL and networking technology ...

Page 39: ...em Ethernet USB HomePNA or Wireless Name The name that was defined for your computer during the System Setup or when your computer was set up However there are two instances where the device name will not appear If a computer has been manually configured with a static IP address the IP address is displayed instead of the computer s name Similarly if a device does not have a name but still obtains ...

Page 40: ...to play an Internet game on that computer View Internet Access Control Click this link to access the Internet Access Restriction Settings page which displays the Internet Access Restrictions Schedule currently set for this computer View Content Screening Click this link to access the Content Screenings Settings page which displays the Content Screening settings for this computer View device detail...

Page 41: ...oadband network and does not require any special routing Computers that are assigned Bridge Network IP addresses operate without the use of Network Address Translation NAT This feature is typically used in conjunction with broadband service that provides a range of IP addresses Once enabled the bridge network IP addresses can be assigned to local computers Display Settings If the Show Inactive Dev...

Page 42: ... secure connection that allows remote users and telecommuters to connect to the corporate LAN using the public Internet The Intelligent Gateway supports VPN clients such as Nortel Cisco Checkpoint and Microsoft IPSec and PPTP Ensure that your company is using VPN software that is compatible with the Intelligent Gateway If you cannot transfer data while using your VPN check with your corporate IT m...

Page 43: ...37 1 Open the Intelligent Gateway home page 2 Click the Local Network tab ...

Page 44: ... the corresponding radio button 5 Click the SAVE button You must release and renew the IP address on your computer for the change to take effect Maintaining restoring the VPN connection If your VPN client regularly loses its connection you can increase the time before the computer requires a new IP address by following these steps ...

Page 45: ...39 1 Open the Intelligent Gateway home page 2 Click the Local Network tab ...

Page 46: ...th your computer Firewall The Intelligent Gateway incorporates a professional grade firewall to help deter outside hackers from accessing your local network The Firewall pages provide access to your system security settings and allow you to configure your firewall Viewing your firewall summary The Summary page provides summary information and links to the most commonly used security related featur...

Page 47: ...work The Current Settings will be displayed as Custom if any applications have been associated with computers on your network The summary displays an access list showing the computers Devices on your network and the names of the Allowed Applications for each computer Click VIEW DETAILS to access the Firewall Details page which shows a list of all the devices that have applications configured in th...

Page 48: ...ess a page where you can map an application to a computer that will allow traffic through the firewall The Firewall Monitor panel provides a summary of recent attacks blocked by your firewall Click VIEW DETAILS to access the main Firewall Monitor page which displays more detailed information about recent firewall attacks information about your firewall rule database and your attack alert settings ...

Page 49: ...s it To do so 1 From the Select a computer pull down menu select the computer 2 Select the Allow individual application s radio button 3 Select an application profile 4 Click the ADD button 5 Click the DONE button Note The applications can be sorted by category To choose a category click the oval next to the category name Click ALL to see a list of all the application profiles To stop an applicati...

Page 50: ...r a name for the application profile We recommend that you use the name of the application such as ICIMI Messenger or Redwing Game Server 3 In the Protocol field click the TCP or UDP radio button If both protocols are required you must create a definition for each 4 In the Port or Range field enter the port or port range used by the application 5 In the Protocol Timeout seconds field enter the amo...

Page 51: ...the DMZplus computer appears to Internet users as though it is directly connected to the Internet it is still protected by your system firewall All traffic is inspected by the firewall s Stateful Packet Inspection engine and all known hacker attacks continue to be blocked Because all filtered traffic is forwarded to the designated computer DMZplus mode should be used with caution In most situation...

Page 52: ... Monitoring the firewall The Firewall Monitor enhanced service extends the professional grade firewall capabilities of your system by continuously assessing threats to your local network The Firewall Monitor enhanced service allows you to Automatically download updates to your firewall software to protect against new threats Receive on screen or email notification to alert you of network attacks R...

Page 53: ...e Internet You must click SAVE for the changes to take effect Note Allowing inbound traffic does not mean that the firewall automatically allows this type of traffic to pass through the firewall to the network Even if a particular protocol application type is allowed via the Advanced Configuration settings the firewall still checks and blocks all unsolicited traffic from the Internet unless the fi...

Page 54: ...rvice you can Automatically download updates to your firewall software to protect against new threats Receive on screen notification to alert you of network attacks Review details about attacks blocked and the source of the attacks Setting up Firewall Monitor attack alerts The Attack Alerts area of the Monitor Your Firewall page shows you the current criteria for posting an alert and how you will ...

Page 55: ...e where you can customize these settings for your firewall The Monitor Your Firewall page contains four areas Top Attackers Attacks Blocked Firewall Rule Database Attack Alerts Configuring editing attack alerts To configure the Attack Alerts criteria click EDIT SETTINGS ...

Page 56: ...ent Gateway home page you must set up notification rules You can configure up to three notification rules that will cause a notification message to appear on the Intelligent Gateway home page The following screen shows the default rules Each rule contains the following parameters Number of Attacks Select the quantity of attacks that have to occur before the notification is sent Choices include 1 5...

Page 57: ...ay home page you can be notified via email when one of your attack threshold rules has been exceeded To receive an email notification when any of the Notification Rule conditions have been met check the Email Notification Enable checkbox You must also enter your Outgoing SMTP Email Server Name and the email address that will receive the alerts To test the email information click TEST You are promp...

Page 58: ...ation if your network firewall is attacked meeting the criteria set notice of the attack is provided on the Intelligent Gateway home page in the Firewall area Click the VIEW NOW button to display the Monitor Your Firewall page and view attacks made to your network firewall ...

Page 59: ...t represent a modest level of intent by the attacker to disable your network Low risk attacks Indicates blocked attacks that represent no serious threat to the network Typically these are probing attacks used by hackers to determine those networks on which a more serious attack will be conducted When you are finished viewing the log click DONE Reporting attacks Due to level of hacker activity on t...

Page 60: ... owner or service provider of the IP address or domain from which the attack originated to notify them of Internet abuse You can determine the owner information by performing a reverse lookup on the IP address that is displayed in the Firewall Monitor log For your convenience you can use lookup tools on the World Wide Web to determine the owner of the displayed IP address such as the free tool loc...

Page 61: ...irewall Rule Database area of the Monitor Your Firewall page shows you the current firewall rules version running on your Intelligent Gateway It also shows you when the rules were last updated To display the firewall rule database update log click VIEW LOG The upgrade log displays the following information about new downloaded rules Date and time Version When you are finished viewing the log click...

Page 62: ...rewall rules Updated firewall rules are automatically downloaded to your Intelligent Gateway after you purchase the Firewall Monitor service The Firewall Monitor application typically checks for new updates every 24 hours ...

Page 63: ... set for any new computers added to the network so if an employee brings a home computer into the office the restrictions are automatically in place Internet Access Restriction Internet Access Restriction allows you to Set up employee profiles to block Internet usage based on day of week and time of day Create Internet usage schedules for each computer in your business Control the use of certain a...

Page 64: ...ur Intelligent Gateway home page in the Access Controls area To begin configuring the Internet Access Restriction feature click SET UP NOW The Set Up Internet Access Restriction page opens Read the Introduction for a summary of Internet Access Restriction features and configuration setup sequence ...

Page 65: ...all Internet applications or block access to specific types of applications such as Instant Messaging or Web browsing Note To secure your Intelligent Gateway settings be sure to set a system password The Edit Settings page is protected by the system password If you have set a system password for your Intelligent Gateway you are prompted to enter the password before you can edit the settings To add...

Page 66: ...pplication category After restricting Internet access you can permit certain application categories to be accessible either all the time or according to a schedule that you configure Internet Access categories Internet Access categories are predefined groups of Internet applications that can be used to provide flexibility and ease in defining Internet access for computers on your local network You...

Page 67: ... right of the screen to ensure that your changes have been saved Permitting applications only during a specific schedule To permit a specific application category according to a schedule follow these steps 1 With Internet Access Restriction enabled click the ALLOW checkbox for the application category that you wish to enable 2 Select a specific day weekdays or weekends from the dropdown menu 3 Spe...

Page 68: ...puter to your local network it automatically acquires the default access configuration you have specified To view the schedule for a different category click the oval bullet next to the category The page is automatically updated and a summary of the schedule for the category is displayed Each category has one of three designations All Allowed No restrictions exist for this category of applications...

Page 69: ...cified computer the Web site address is checked against an online database of harmful and questionable Web site addresses If the requested Web site falls into a category that is restricted and that category is indicated to be screened access to the site is denied and a message is sent to the browser window on the computer informing the user that access for that Web site is blocked In addition to W...

Page 70: ...64 Setting up Content Screening To configure Content Screening click the SET UP NOW button on the right side of your Intelligent Gateway home page in the Access Controls area ...

Page 71: ...with graphics text or audio that fall within the definition of the categories shown below are considered sufficient to place the source site in that category Internet sites that contain information or software programs designed to hack into filtering software are added to the database in all categories Note BT Openworld has used what we believe to be reasonable means to identify and categorize Web...

Page 72: ...ory you want to block Computers in this screening group will not have access to the specified content of the selected categories Click NEXT to save your category choices and proceed to the second step Click DONE to return to the home page Step 2 Block and approve sites for this screening group After selecting the categories of content to be blocked the Site List Settings page opens This page allow...

Page 73: ...roved Web sites you have entered and proceed to the third step Click DONE to return to the home page Step 3 Assign computers to screening groups After setting up the content categories and sites that are blocked and approved for a screening group you can assign computers to that screening group To set up computer assignments use the Settings area of the Assign Computers to Screening Groups page To...

Page 74: ...ww abc com is in the content screening database to be blocked for violent content Violent content is blocked in screening Group 1 Each time an employee from this group tries to access www abc com an entry is added to the log Similarly if a certain application type such as instant messaging or chat is restricted through the use of the Internet Access Restriction application and someone attempts to ...

Page 75: ...69 3 Click LOG to view the Access Controls log To clear the log click the CLEAR LOG button located in the corners of the right side of the page ...

Page 76: ...tworking is being added to an existing network especially where network login is required please check with your network administrator consultant before making any changes Windows 95 98 98 SE operating systems Adding PCs to your network After you have set up your network you now need to add each PC to the network 1 Right click Network Neighborhood and select Properties ...

Page 77: ...es screen opens Select Client for Microsoft Networks and then click the Properties button 3 Ensure that the Logon validation fields are empty and that the Logon and restore network connections radio button is selected Click OK ...

Page 78: ...ame field enter a name for your computer In the Workgroup field enter a workgroup name Do NOT click OK 5 Click the Access Control tab In the Control access to shared resources using field click the Share level access control radio button Do NOT click OK ...

Page 79: ... selected in the pull down Click the File and Print Sharing button 7 Check the I want to be able to give others access to my files checkbox and click OK 8 File and print sharing will now appear in your network components Click OK for Windows to update your settings 9 Restart your PC when prompted ...

Page 80: ...Entire Network 3 In Entire Network your network name should appear as an icon Double click the icon 4 The PCs on your network will be displayed as shown in the screen capture When file sharing is set up you will be able to browse the available content of these PCs Note If you have just added a new PC to the network you may need to select View Refresh before this will be shown as part of the networ...

Page 81: ...hared Name field enter a share name or accept the default In the Access Type field click the radio button next to your access preference Read Only Full or Depends on Password In the Password field enter a password if you wish to limit user access or leave the Password field blank for no password required Click Apply and then OK to exit 3 Your chosen drive or folder will now have the sharing hand s...

Page 82: ...laces icon to open the My Network Places window 2 Double click Home Networking Wizard 3 When the Wizard opens click Next to continue 4 Select the Yes this computer uses the following radio button then select the A direct connection to my ISP using the following device radio button Click Next ...

Page 83: ...ect the Use the Workgroup name radio button and enter the name of your workgroup all PCs on your network must have the same workgroup name Click Next to continue 6 Leave the Share files and printers screen blank and click Next 7 Select the No do not create a network disk radio button and Next to continue ...

Page 84: ...your network setup 9 Restart your PC when prompted 1 To check that your are connected to the other PCs on your network double click the My Network Places icon 2 Double click Entire Network 3 An icon will be displayed with your network name Double click this icon ...

Page 85: ...an browse the available content of these PCs Note If you have just added a new PC to the network you may need to select View Refresh before this will be shown as part of the network 1 Right click My Network Places and click Properties 2 In the Configuration tab click the File and Print Sharing button ...

Page 86: ...tton and click OK 4 File and printer sharing will now appear in your network components list Click OK and restart the PC when prompted 5 When your PC has restarted open My Computer and locate the drive or folder you wish to share Right click this drive folder and click Sharing ...

Page 87: ...le share name or accept the default In the Access Type field click the radio button next to your access preference Read Only Full or Depends on Password In the Password field enter a password if you wish to limit user access or leave the Password field blank for no password required Click Apply and then OK to exit Your drive folder will now be shared and display the Shared hand symbol 1 To check t...

Page 88: ...owing instructions describe how to remove default sharing permissions and customize your permissions 3 Double click Microsoft Windows Network 4 An icon should be present with your network name Double click the icon 5 The PCs that are in your network will be displayed When file sharing is set up you will be able to browse the available content of these PCs ...

Page 89: ...ol right click that drive and click Sharing 2 In the Sharing tab select the Not Shared radio button and click Apply Click OK to exit 3 You can now add the other computers you wish to share to your User Group From the Start menu select Programs Administrative Tools User Manager ...

Page 90: ...u can use the same password with which the PC logs on to the network Alternatively you can leave the Password field blank so that no password is required to access folders If you set up a password you can set different account options by checking the User Must Change Password at Next Logon User Cannot Change Password or Password Never Expires checkboxes After your choices are entered click OK 6 Yo...

Page 91: ...e Name field enter a Share Name or accept the default Click the Permissions button 8 In the Access Through Share Permissions screen click the Add button The Add Users and Groups window opens 9 For each user that you wish to add find the user s PC on the network if it is not present click Show Users Click the user icon and then click the Add button ...

Page 92: ...to assign the type of access you wish each user to have for example Full Control or Read Only When all users appear in the Add Names window click OK 11 Click OK to exit Share Permissions 1 Before you add PCs to your network you must first ensure that networking is enabled Right click My Network Places and click Properties ...

Page 93: ... Make New Connection and follow the on screen instructions 3 When you double click the Local Area Connection icon the Local Area Connection Status screen opens 4 After networking is enabled you can change your Workgroup name to that of your new network To do so right click My Computer and click Properties ...

Page 94: ...r a name for the computer In the Workgroup field enter a name for the workgroup and click OK 7 The Network Identification welcome screen opens Click OK then close the Network Identification screen and restart your PC when prompted 1 To verify that your are connected to the other PCs on your network double click the My Network Places icon ...

Page 95: ...89 2 Double click Entire Network 3 Click the entire contents link 4 Double click the Microsoft Windows Network icon ...

Page 96: ... your network will be displayed When file sharing is enabled you will be able to browse the available content of these PCs 1 In Windows 2000 before you can share files with other users you must add the other PCs to your User Group To do so from the Start menu select Settings Control Panels ...

Page 97: ...User name field enter the name of the computer you wish to add The name must be identical to the name that the PC uses in its network properties In the Password field enter a password recommended The password should be identical to the one with which the PC logs in to Windows Click the Password never expires checkbox Click the Create button to set up the new user Repeat these steps for each user y...

Page 98: ...all users you can now specify sharing on your chosen drive or folder To do so locate your drive or folder right click it and click Sharing 8 The Local Disk Properties screen opens Select the Sharing tab In the Share name field enter a suitable name for the drive or folder or accept the default one and then click the Permissions button ...

Page 99: ... Repeat this for each PC with which you wish to share the folder and then click the OK button 11 The users will now appear in the Permissions for window Click each user icon and assign their access rights in the Permissions field Full Control Change or Read When you have updated access rights for all users click the Apply button and then OK to exit Your drive folder will now be shared and display ...

Page 100: ...and click Properties 2 The Network window opens In the Configuration tab click the File and Print Sharing button 3 The File and Print Sharing window opens Click the I want to be able to allow others to print to my printer s checkbox and click OK 4 Click OK on the Network Properties screen and restart you PC when prompted ...

Page 101: ...nd click Sharing 7 In the Sharing tab click the Shared As radio button In the Share Name field enter a share name for the printer In the Password field enter an access password optional Click the Apply button and then OK to exit In your Printer folder the printer will now have the shared hand symbol and will be available to everyone on your network ...

Page 102: ...st add this printer to the printer settings of each PC before they can print to it From the Start menu select Settings Printers 2 The Printers window opens Double click the Add Printer icon to start the Add Printer Wizard 3 Click Next to continue 4 Click the Network printer radio button and click Next ...

Page 103: ...e button to locate the networked printer 6 Locate the PC to which the printer is attached Click the printer icon then click OK 7 The network path now displays in the Network path or queue name field Click Next to continue ...

Page 104: ...nd insert your printer disk 9 If you were required to use your printer disk you will be prompted to enter the location of the printer files usually the drive letter for whichever drive you are using Select the path from the Copy manufacturer s files from pull down menu and click OK 10 In the Printer name field enter a name for your printer and click Finish 11 You will be prompted to print a test p...

Page 105: ...ould start printing within less than 60 seconds If your test page prints successfully click Yes If it does not print successfully click No to open a troubleshooting tool 13 If your printer has been set up correctly it will now appear in your Printers folder 1 Right click the My Network Places icon and click Properties ...

Page 106: ...and Print Sharing button 3 Click the I want to be able to allow other to print on my printer s checkbox and click OK 4 In the main Network Properties window click OK and restart your PC when prompted 5 When your PC has restarted from the Start menu select Settings Printers ...

Page 107: ...aring tab click the Shared As radio button In the Share Name field enter a suitable name for the printer In the Password field enter a password optional and click the Apply button Click OK to exit In your Printer folder the printer will now have the shared hand symbol and will be available to everyone on your network 1 From the Start menu select Settings Printers ...

Page 108: ...dow opens Double click the Add Printer icon to open the Add Printer Wizard 3 Click Next to continue 4 Click the Network printer radio button and click Next to continue 5 Click the Browse button to locate your network printer ...

Page 109: ...er to select it and click OK 7 The network path for your printer is now displayed in the Network path or queue name field Click Next to continue 8 If the following screen appears click the Keep existing driver recommended radio button Click Next to continue ...

Page 110: ...e prompted to print a test page To print a test page click the Yes recommended radio button and click Finish 11 The following confirmation screen opens Your test page should start printing within less than 60 seconds If your test page prints successfully click Yes If it does not print successfully click No to open a troubleshooting tool 12 If the Terms and Conditions screen opens click the Accept ...

Page 111: ...indows NT Print sharing as host 13 The printer will now appear in your Printer folder 1 From the Start menu select Settings Printers 2 In the Printers folder locate the printer you wish to share right click it and click Sharing ...

Page 112: ...er To install drivers for other users on different operating systems you can select these in the Alternate Drivers scroll list Click OK The printer will now have the shared hand symbol and will be available to everyone on your network 1 From the Start menu select Settings Printers 2 In the Printer folder double click the Add Printer icon to open the Add Printer Wizard ...

Page 113: ...for the printer are not already installed the following message may display Click OK 6 The next screen prompts you to select the make and model of your printer In the Manufacturers scroll list select your printer by make In the Printers scroll list select your printer by model then click Next If your printer is not displayed then click the Have Disk button and insert the CD ROM that came with your...

Page 114: ...OK 8 If you want Windows based programs to use this printer as the default click the Yes radio button Click Next to continue 9 The last screen confirms that the printer has been successfully installed Click Finish to exit 10 The printer will now appear in your Printer folder ...

Page 115: ...ally connected to your broadband service Blinking orange The Intelligent Gateway is attempting to establish a physical broadband connection Solid red The Intelligent Gateway has not detected a broadband signal Solid orange The Intelligent Gateway has established a physical broadband connection but was not able to successfully connect to your Internet Service Provider or has not yet been configured...

Page 116: ...Gateway Note If the POWER indicator light is red signifying a system error or does not light after performing the steps above contact BT Openworld Customer Care BROADBAND LINK indicator light is red If the BROADBAND LINK indicator light is red the Intelligent Gateway has not established a connection to your DSL service provider 1 Verify that a telephone cord is plugged into the PHONE LINE port on ...

Page 117: ...erface How is the first computer connected How the first computer is connected may determine how the second computer can be connected or if other equipment is necessary Use the following table to view the possibilities and restrictions for connecting a second computer Select the type of connection that the first computer is using in the column on the left and follow the row across to the right to ...

Page 118: ...ded that you locate computers in your wireless network no farther than 50 feet from the Intelligent Gateway How do I connect my second computer using the existing phone lines To connect a computer to your Intelligent Gateway network using the existing telephone line you must have a HomePNA network adapter installed on the computer and access to a telephone wall socket whose telephone number is the...

Page 119: ... the case you will need an Ethernet hub switch To connect an Ethernet hub switch connect an Ethernet cable from the LOCAL NETWORK Ethernet port on the back of your Intelligent Gateway to any port on your Ethernet hub switch The Intelligent Gateway auto senses the connection type so there is no need to worry about using a special cable or connecting it to a special port on the Ethernet hub switch T...

Page 120: ...55 255 0 0 or you can configure your own subnet Is the Intelligent Gateway compatible with other Internet sharing software No If you have Internet Connection Sharing ICS software running on your network you should disable it before installing your Intelligent Gateway ICS and Intelligent Gateway will conflict with each if they are both run at the same time Does the Intelligent Gateway work with Lin...

Page 121: ... address is 172 16 0 1 Following is detailed information for specific browsers PC Internet Explorer 6 0 1 From the menu bar select Tools Internet Options 2 Select the General tab 3 Enter the address in the Home page box PC Netscape 6 2 1 From the menu bar select Edit Preferences 2 Select Navigator in the menu on the left side 3 Enter the address in the Home page box Macintosh Internet Explorer 5 1...

Page 122: ...n change the name of your computer by following the instructions listed below for your specific operating system Windows 95 98 98SE ME 1 Right click the Network Neighborhood icon on your desktop and select Properties 2 Select the Identification tab Windows NT 2000 XP 1 Right click the My Computer icon on your desktop and select Properties 2 Select the Network Identification tab 3 Click the Propert...

Page 123: ...Right click the Microsoft Outlook desktop icon and select Properties 2 Click Add and select the Manually configure information services radio button Click Next 3 Leave the default Profile Name and click Next ...

Page 124: ...s previously been configured the preceding steps will be skipped In this case the first step will be to click the Add button and then select Internet E mail 6 In the Mail Account field enter the name you want displayed for the email account In the E mail address field enter the email address of the account you are setting up If you are setting up your BT ...

Page 125: ...addresses If you are setting up a BT Openworld mail account enter mail btconnect com Note If you are using an alternate mail provider in the Incoming mail POP3 field enter the address provided by them The Outgoing mail SMTP address will remain mail btconnect com 8 In the Account name and Password fields enter the account name and password supplied to you by BT Openworld Note If you are using an al...

Page 126: ... radio button Click OK Depending on the current set up of Microsoft Outlook you may need to add a personal folder so Microsoft Outlook knows where to store mail If Microsoft Outlook has previously been configured this may not be necessary To add a personal folder follow these steps ...

Page 127: ...21 1 Right click the Microsoft Outlook desktop icon Select Properties 2 In the MS Exchange Settings Properties window click Add 3 In the Add Service to Profile window select Personal Folders and click OK ...

Page 128: ...122 4 In the File name field enter a name for the folder 5 Click OK 6 Click OK to conclude set up ...

Page 129: ... Changing your cookie settings may have privacy and security implications Make sure you understand these implications before changing your cookie settings Following is detailed information for specific browsers PC Internet Explorer 6 0 1 From the menu bar select Tools Internet Options 2 Select the Privacy tab 3 Click the Advanced button PC Netscape 6 2 1 From the menu bar select Edit Preferences 2...

Page 130: ...ally configure a static IP address for any device on your Intelligent Gateway network The first 32 addresses 1 to 32 in the address range are allocated to static IP addresses The next 218 addresses 33 to 250 are allocated to the Intelligent Gateway s DHCP server to deliver to dynamic clients The last 4 addresses are reserved 251 to 254 Following are the settings for the three network IP range opti...

Page 131: ...e network connection problems disable all network adapters except the one connected to the Intelligent Gateway network Configuration and Management FAQs How do I remove the inactive computers from the Intelligent Gateway user interface The Intelligent Gateway user interface will display them as inactive for two days after computers or network devices have been removed from your Intelligent Gateway...

Page 132: ...ed This is the default setting Does the firewall included with Windows XP conflict with the Intelligent Gateway The Windows XP software firewall Internet Connection Firewall or ICF can be enabled on each network card connected to your computer Enabling ICF has no effect on the Intelligent Gateway installation process However if ICF is active on the network interface connected to the Intelligent Ga...

Page 133: ... on and connected to the Internet at all times for other computers in the network to have access Running ICS consumes valuable resources on the connection sharing computer and any interruption in its operating system or networking software will cause all computers on the network to lose Internet access Using ICS requires the use of several different network adapters on the central computer one for...

Page 134: ...ernet The Intelligent Gateway s firewall automatically allows traffic from the Intelligent Gateway network to the Internet Can I use Windows Messenger on a computer that is behind the Intelligent Gateway At this time only the instant messaging function of Windows Messenger is supported for those computers that are part of an Intelligent Gateway network Advanced functions such as audio video whiteb...

Page 135: ...sly varying signal or wave Telephone transmission and or switching that is not digital ANSI See American National Standards Institute Applet Small computer programs that can be downloaded quickly and used by computers with a Java capable browser ASCII See American Standard Code for Information Interchange Asymmetric Digital Subscriber Line ADSL A group of DSL technologies that are asymmetric there...

Page 136: ... of a specific frequency which is modulated to transmit information Carrierless Amplitude Phase CAP A type of quadrature amplitude modulation used for some types of DSL that stores pieces of a modulated message signal in memory and then reassembles the parts in the modulated wave Category 5 Also known as CAT5 A category of cabling that is used for local area networks with voice and data needs Cent...

Page 137: ... available frequency range into 256 sub channels or tones and which is used for some types of DSL DMT See Discrete Multi Tone Modulation DNS See Domain Name System Domain Name System DNS The protocol used for assigning text addresses such as www bt com for specific computers and computer accounts on the Internet DSLAM See Digital Subscriber Line Access Multiplexer Dynamic Host Configuration Protoc...

Page 138: ...the Macintosh computer use a GUI GUI See Graphical User Interface H Hertz See Frequency Home Networking Connecting the different electronic devices in a household by way of a local area network LAN Home Phoneline Networking Alliance An association of companies who are working on a standard for home phoneline networking HomePNA technology allows plug and play networking through the use of existing ...

Page 139: ...standards for telecommunication and radio communication equipment International Telecommunication Union Telecommunication Standardization Sector ITU T The branch of the ITU that is responsible for telecommunication standardization Internet Engineering Task Force IETF The standards organization that standardizes most Internet communication protocols including Internet protocol IP and hypertext tran...

Page 140: ...onsists of a light amplifying medium placed between two mirrors Light not perfectly aligned with the mirrors escapes out the sides but light perfectly aligned will be amplified One mirror is made partially transparent The result is an amplified beam of light that emerges through the partially transparent mirror Last Mile See Local Loop Local Area Network LAN A network connecting a number of comput...

Page 141: ... Multicast The transmission of information over the Internet to two or more users at the same time Multiplexing Transmitting multiple signals over a single communications line or computer channel The two common multiplexing techniques are frequency division multiplexing which separates signals by modulating the data onto different carrier frequencies and time division multiplexing which separates ...

Page 142: ...lows a message to be broken into small packets of data that are sent separately by a source to the destination The packets may travel different paths and arrive at different times with the destination sites reassembling them into the original message Packet switching is used in most computer networks because it allows a very large amount of information to be transmitted through a limited bandwidth...

Page 143: ...k PSTN The worldwide communications network that carries phone calls and data R Radio Frequency RF Electromagnetic carrier waves upon which audio video or data signals can be superimposed for transmission RADSL See Rate Adaptive Asymmetric Digital Subscriber Line Rate adaptive Digital Subscriber Line RADSL A variation of DSL that uses carrierless amplitude phase modulation divides the available fr...

Page 144: ...is based on TCP See Transmission Control Protocol Internet Protocol TCP IP See Transmission Control Protocol Internet Protocol Telephone Exchange A telephone company facility that handles the switching of telephone calls on the public switched telephone network PSTN for a small regional area Terabyte 1 000 000 000 000 bytes or 1 000 gigabytes See Byte Time Division Multiplexing TDM A digital data ...

Page 145: ...gital Subscriber Line Very High Bit rate Digital Subscriber Line VDSL A type of asymmetric DSL that delivers from 13 to 52 Megabits per second downstream bandwidth and 1 5 to 2 3 Megabits per second upstream Video on Demand VOD A pay per view television service in which a viewer can order a program from a menu and have it delivered instantly to the television set typically with the ability to paus...

Page 146: ... CDMA CD based Ethernet networks 802 11 A family of IEEE specifications for 1 and 2 Megabits per second Mbps wireless Local Area Networks LANs 802 11b An IEEE specification for 5 5 or 11 Megabits per second Mbps wireless Local Area Networks LANs ...

Page 147: ...connection to the public telephone network and compatible switchboards This equipment complies with the essential requirements for the Radio Equipment and Telecommunications Terminal Equipment Directive 1999 5 EC The Declaration of Conformance for the Intelligent Gateway is published on the following web site http www 2wire com about declaration UK ...

Page 148: ...5100 000148 000 Rev B ...

Reviews: