2GIG
®
EDGE Security & Smart Home System
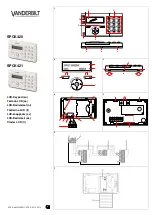
2GIG-EDG-RK | EDGE Remote Keypad
Proprietary & Confidential
Copyright © 2021 Nortek Security & Control LLC
Introduction
The Remote Keypad (2GIG-EDG-RK) is a wall-mounted, full-color, touch screen interface that
provides all of the same easy-to-use keypad functions available on the Control Panel. It is
designed for indoor use only and gives users the ability to arm and disarm the system, see the
status of sensor zones, and control Smart Home devices.
Choose the Location for the 2GIG EDGE Remote Keypad’s Backplate
Before mounting the backplate, choose a location. Work with the end user to determine the best
location. Always choose an indoor location protected from temperature extremes.
Recommended Tools and Equipment
To install the system, these tools and equipment are recommended:
➣
2-Conductor Power Wire (if connecting power supply to the panel’s terminal block)
➣
Drywall Saw (or equivalent)
➣
Screwdrivers
➣
Staple Gun
➣
Wire Stripper
Choose the Wall Location
To choose a wall location:
➣
Always choose a location that is above ground and centrally located. Do NOT install
the Panel below ground level, because wireless range may be impaired.
➣
Do NOT connect the Panel to a light switch-controlled outlet.
➣
Avoid choosing a location that can be easily viewed from doors or windows.
➣
Avoid choosing a location that is within reach of small children.
➣
Avoid choosing a location in direct sunlight.
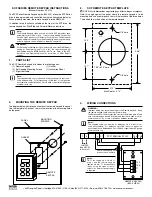
1. Align Backplate for Hole
Locations
Remove the backplate from the panel by backing
out the top and bottom screws until you feel
resistance.
Once removed, create mounting holes and cut a
slot in the dry wall for the AC power cord.
2. Mount the Backplate to a Wall
Use the four (4) wall anchors and screws
(supplied).
NOTE: The
Wall Anchor is the wall tamper and
MUST be anchored to work.
Power (Terminal)
Battery Backup Terminal
Power (Barrell)
LEVEL
NOT LEVEL
Wall Tamper
Illustration displays both types of power connection:
Install the 2 - conductor power wires
or
Barrel Connector
Back Plate
Attached to Wall
Secure with
Fastener
STANDARD
DECORA
Barrel Connector
The Barrel connector is an alternate
method for connecting the AC power
supply to the Panel.
WARNING!!
Do NOT plug the power
supply into the outlet at this time.
5. Connect Backup Battery
Align pins, then carefully insert the
battery cable.
NOTE: Back
up Battery must be
connected before AC Power is
connected to the keypad.
6. Hang the EDGE Remote Keypad
Place the backplate over the upper lip on the
back of the chassis, and flip the Remote Keypad
downward and push until it clicks into place.
Secure the back plate by tightening the bottom
screw.
7. Install Retaining Wall Bracket and Connect the AC Power Supply
For compliance with ANSI/NFPA 70: National Electric Code in the United States, you must
install the power supply retaining bracket (not required in Canada).
3. Attach Hanger for Wiring
(optional)
Attach the panel’s third-hand hanging strap to
the hook at the bottom of the backplate for easy
access during wiring.
Edge Panel (upside down)
Back Plate
Hanger
4. Connect Power
Terminal Block Wires
(DC + and DC -)
Locate a wall outlet for the plug-in
power supply, but do NOT connect the
power supply to the outlet at this time.
IMPORTANT:
Never connect the plug-in
power supply to a switch-controlled
outlet. Do not over-tighten the terminal
block’s contact screws.
OR