background image

-3-

1 2

3 4 5 6

ON

1 2

3

4 5 6

ON

1 2

3

4

5 6

ON

1 2

3 4

5

6

ON

Bit

DIP1~DIP2

DIP switches configuration


for

 first DT-QSW 

DIP3

DIP4

DIP5

DIP6

Bit State

Description

1 2

3 4

5

6

ON

When set to OFF, it means that the third camera unavailable

When set to ON, it means that the third camera available

When set to OFF, it means that the fourth camera unavailable

When set to ON, it means that the fourth camera available

1 2

3 4 5 6

ON

1 2

3 4 5 6

ON

1 2

3 4 5 6

ON

DIP switches configuration for

 second DT-QS

W


DIP switches configuration


for

 third DT-QSW  

DIP switches configuration for

 fourth DT-QSW  

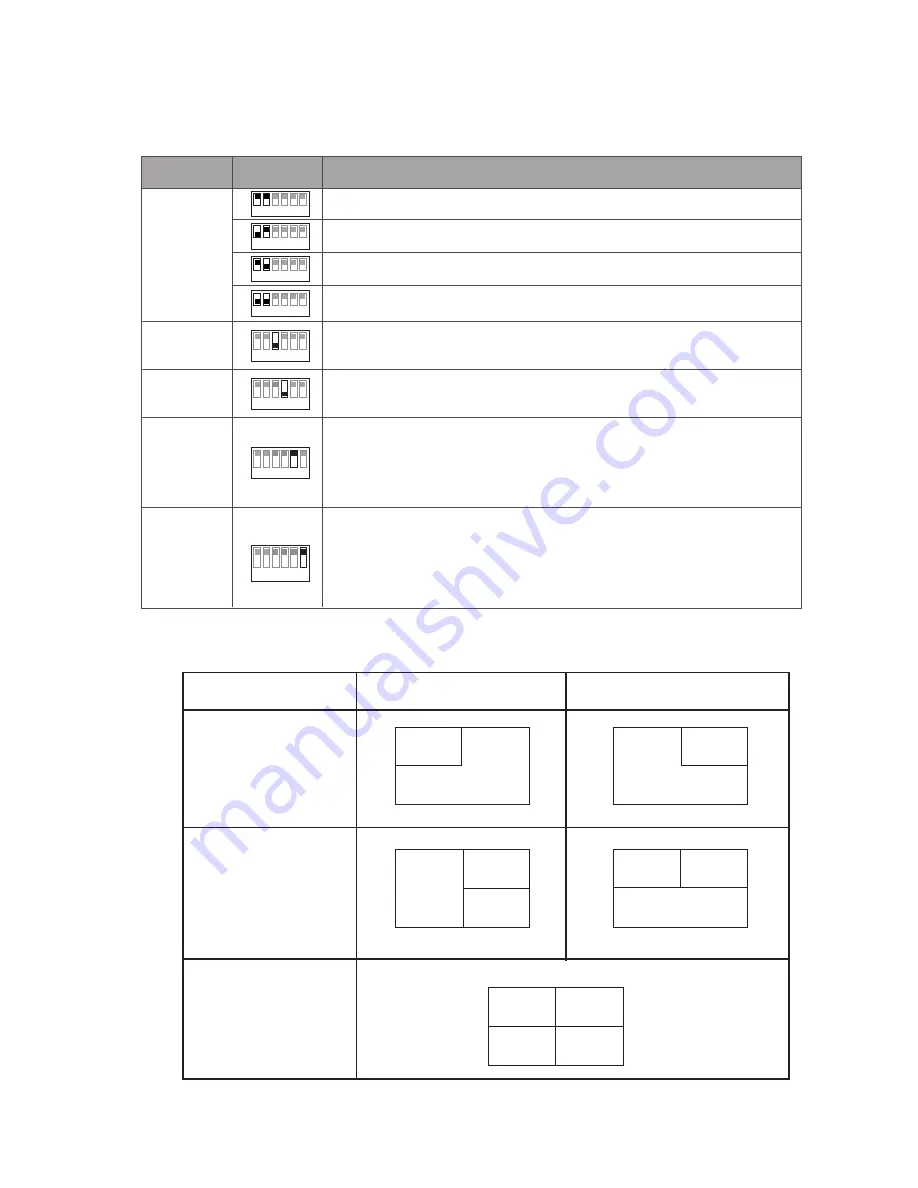
When set to OFF, it means that the system select video split display mode A

for details, see section #

 NOTE below

Allways

 OFF

When set to ON, it means that the system select video split display mode B,for 

details, see section #

 NOTE below

DIP switches

#

NOTE: 

Two cameras: 

Mode A 

Mode B 

CAM2


CAM1


CAM2


CAM1


Three cameras: 

CAM2


CAM1


CAM3


CAM1


CAM3


CAM2


Four cameras: 

CAM2


CAM4


CAM1


CAM3


Summary of Contents for DT-QSW

Page 1: ...arefully before using the product you purchased and keep it for future use We reserve the right to modify specification in this manual at any time without notice 2 Wire System Power In Use Camera Interface Model QSW CAM 1 4 CAM1 CAM2 CAM3 CAM4 User Manual ...

Page 2: ...ks as quad splitter with Aura and Alecto monitors Works with Avro and Leda monitors but not in a quad mode Each CCTV camera connected will be accessable via individual icon Maximum 1 x DT QSW Interface with maximum 4 x CCTV cameras for video monitors model Avro and Leda Maximum 4 x DT QSW Interfaces with maximum 16 x CCTV cameras for video monitors model Aura and Alecto 1 About DT QSW CCTV Interfa...

Page 3: ...dicator flashes when quad video output BUTTONS used for testing mainly 1 Press CAM1 button in monitoring state the system will mandatory output the video of CAMERA 1 2 Press CAM2 button in monitoring state the system will mandatory output the video of CAMERA 2 3 Press CAM3 button in monitoring state the system will mandatory output the video of CAMERA 3 4 Press CAM4 button in monitoring state the ...

Page 4: ...at the fourth camera available 1 2 3 4 5 6 ON 1 2 3 4 5 6 ON 1 2 3 4 5 6 ON DIP switches configuration for second DT QSW DIP switches configuration for third DT QSW DIP switches configuration for fourth DT QSW When set to OFF it means that the system select video split display mode A for details see section NOTE below Allways OFF When set to ON it means that the system select video split display m...

Page 5: ... 4 3 Unit Mounting Din rail Din rail Mounting Buckle Step1 Mount din rail onto the wall with screws Step2 Pull down the mounting buckle and hang the unit on the din rail ...

Page 6: ... 5 RF CARD BUS IM BUS DS PC6 AC BUS OUT BUS IN QSW 1 Camera 2 Camera 4 Camera 3 Camera 1 2 3 4 5 6 N O 4 Wiring Diagram 4 1 Single Door Station and single QSW application ...

Page 7: ... application RF CARD BUS IM BUS DS PC6 AC BUS OUT BUS IN QSW DBC 4A A B C D RF CARD Device Address 1 Device Address 0 QSW a b 1 Camera 2 Camera 4 Camera 3 Camera 5 Camera 6 Camera 8 Camera 7 Camera 1 2 3 4 5 6 ON BUS OUT BUS IN 1 2 3 4 5 6 ON ...

Page 8: ...ng Temperature 150 C 550 C Wiring 2 wire no polarity Dimensions H90 W72 D60mm The design and specifications can be changed without notice to the user Right to interpret and copyright of this manual are preserved www intelligenthomeonline com ...

Reviews: