2E G3422B User Manual Download Page 28

– 28 –

UA

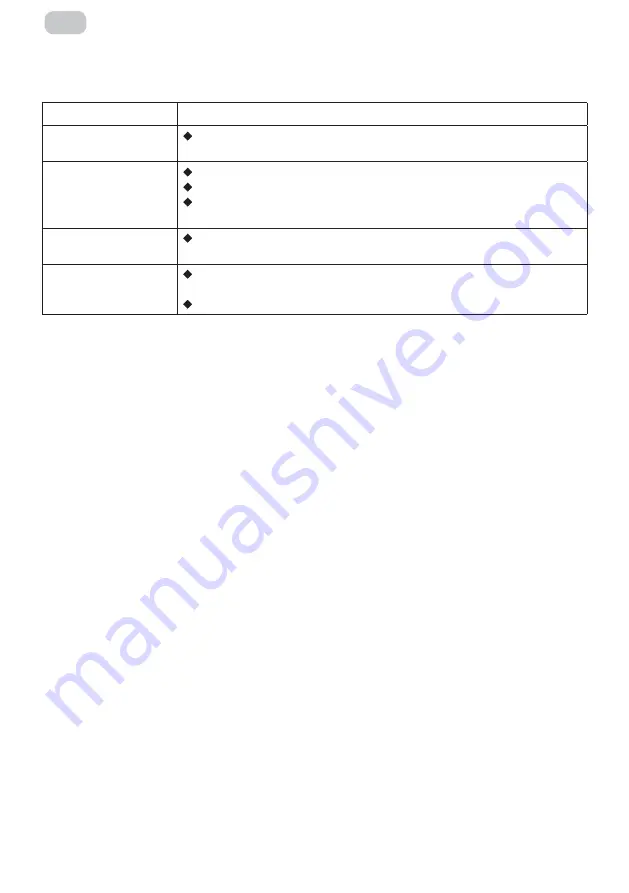
Усунення основних несправностей

Проблема

Вирішення

Пристрій  
не вмикається

 Переконайтеся, що обидва кінці кабелю живлення належним чином під-

ключені до розетки, а сама настінна розетка працює та є справною.

На екрані з’явилося  
попередження 
про відсутність  
вхідного сигналу

 Перевірте, чи  лінія вхідного сигналу підключена правильно.
 Перевірте, чи увімкнено живлення відповідної периферії.
 Переконайтесь, що вибране джерело введення відповідає каналу вхідно-

го сигналу.

Колір або якість  
зображення погані

 Переконайтесь, що всі налаштування відео та зображення, такі як яс-

кравість, контраст, колір тощо відповідають належним значенням.

На екрані з’явилося  
попереджувальне  
повідомлення

 Переконайтесь, що лінія вхідного сигналу правильно під’єднана та 

справна.

 Оберіть правильне джерело вхідного сигналу.

 Додаткова інформація

Дата виробництва зашифрована в серійному номері у форматі 

ERC2E***YYYYMMDD*******

де: 

YYYYMMDD 

– рік, місяць і день виробництва.

Summary of Contents for G3422B

Page 1: ...LCD MONITOR G3422B User Manual Read this manual carefully before use www 2egaming com...

Page 2: ...ONS Components and auxiliary equipment INSTALLATION Installation of base Installation of mount FUNCTIONS Description of connection sockets Power indicator Description of buttons OSD MENU Menu descript...

Page 3: ...of the product Exclamation point within an equilateral triangle is intended to alert the user to the presence of important operating and maintenance instructions in the literature accompanying the pr...

Page 4: ...based solvents as it will lead to product damage to the panel and cabinet 8 Do not place the monitor on an unstable surface 9 Do not place the power cord or other cables across a walkway in case it is...

Page 5: ...check for following items to be included in this display package Monitor x 1 Screws x 3 Stand stem x 1 Mount hexagon irons x 4 DP signal cable x 1 Base x 1 Power adapter x 1 User manual x 1 Power ada...

Page 6: ...stand stem with the supplied screws 5 Fix the whole assembled stand into the monitor and check carefully to make sure it is fastened 6 Hold onto the stand stem and stand the monitor up on a flat level...

Page 7: ...esire 4 During padlocking of the monitor do not pinch the screen with the hands to avoid damaging the screen Install the mount to the mount stud by referring to the user manual of the mount purchased...

Page 8: ...e is detected Make sure your computer It is turned on and all video cables are fully plugged in and or connected HDMI interface Use the HDMI cable to connect the HDMI IN interface of the product to th...

Page 9: ...9 EN Button Function Menu Press to display OSD menu and enter sub menus Down Press to move down in menus Up Press to move up in menus Exit Press to exit OSD menu Power Press to turn monitor on off...

Page 10: ...the figure Specifications of the OSD menu may change with improvements of functions without prior notice The screen display OSD menu can be used to adjust settings of the monitor and is shown on the s...

Page 11: ...esired function and press used t e H to enter the sub menu Press or to scroll through sub menus and press used t e key to select and confirm the desired function Pres or to select one option and press...

Page 12: ...Middle Low Super Resoultion Off High Middle Low Dynamic Luminous Control MPRT On Off Display Aspect Ratio Wide Screen 4 3 1 1 Auto LedMode Normal Off Flicker Audio Mute On Off Volume Adjustment Bar Ra...

Page 13: ...terfaces 2xHDMI 2 0 2xDP 1 4 Audio out Built in speakers Yes Screen tilt 5 15 Height adjustment 100mm Screen rotation 15 2 HDR support HDR400 External power adapter parameters 100 240 V 50 60 Hz 2 0 A...

Page 14: ...ls is turned on Check that the Input option tnat has been selected matches with the input signal Image colour or quality deteriarates Check that all the video settings are adjusted appropriately such...

Page 15: ...15 UA 16 16 16 17 18 18 19 19 20 21 21 21 21 23 23 25 27 28 28 45...

Page 16: ...UA...

Page 17: ...UA 1 2 3 4 5 10 6 7 8 9 10 11 12 13 14...

Page 18: ...18 UA 1 x3 1 x4 DP 1 1 1 1 Power adapter 7 m m...

Page 19: ...19 UA 1 2 3 4 5 6 Press the button to remove the stand plate Fix the stand plate into the stand stem with the supplied 6...

Page 20: ...20 UA 1 2 3 4 75x75 2 Mount hexagon irons Mount Not included...

Page 21: ...21 UA 1 2 3 4 5 6 HDMI interface HDMI HDMI HDMI HDMI DVI HDMI DVI DVI...

Page 22: ...22 UA 1 2 3...

Page 23: ...23 UA used t he 1 2 used t he...

Page 24: ...24 UA 3 used t e used t e H used t he 4 ss to...

Page 25: ...A 1 2 3 DP1 1 4 DP2 1 4 HDMI1 2 0 HDMI2 2 0 0 100 90 0 100 50 0 100 50 DCR 1 8 2 0 2 2 2 4 2 6 FPS RTS 0 100 0 0 100 50 0 100 50 0 100 50 MPRT 4 3 1 1 0 100 50 HDMI1 HDMI2 DP1 DP2 2 DP1 DP2 HDMI1 HDMI...

Page 26: ...26 UA English 0 100 50 0 100 50 0 100 20 5 100 20 90 180 270 DP DP1 1 DP1 2 DP1 4 FreeSync Adaptive Sync HDR...

Page 27: ...A 21 9 178 178 16 7M 8 bit 3440x1440 165 1 MPRT 350 2 3000 1 2x HDMI 2 0 2x DP 1 4 1x Audio out 5 15 100 15 2 48W HDR HDR400 100 240 50 60 2 80 0 5 VESA 75x75 907x182x486 7 72 10 32 Adaptive Sync Low...

Page 28: ...28 UA ERC2E YYYYMMDD YYYYMMDD...

Page 29: ...29 RU OSD 30 30 30 31 32 32 33 34 35 35 35 35 37 37 39 41 42 42 46...

Page 30: ...30 RU...

Page 31: ...31 RU 1 2 3 4 5 10 6 7 8 9 10 11 12 13 14...

Page 32: ...32 RU 1 x 3 1 x 4 DP signal cable 1 1 1 Power adapter 7 m m...

Page 33: ...33 RU 1 2 3 4 5 11 5 6 6 5 11 5 11...

Page 34: ...34 RU 1 2 3 4 75x75 2 Mount hexagon irons Mount Not included...

Page 35: ...35 RU 1 2 3 4 5 6 HDMI interface HDMI HDMI HDMI HDMI DVI HDMI DVI DVI...

Page 36: ...36 RU 1 2 3...

Page 37: ...37 RU used t e H 1 2 used t he...

Page 38: ...38 RU 3 used t e used t he used t he 4 ss to...

Page 39: ...DP2 1 4 HDMI1 2 0 HDMI2 2 0 0 100 90 0 100 49 0 100 50 DCR 1 8 2 0 2 2 2 4 2 6 FPS RTS 0 100 0 0 100 50 0 100 50 0 100 50 MPRT 4 3 1 1 LED Mode 0 100 50 HDMI1 HDMI2 DP1 DP2 PIP PBP 2Win 2 DP1 DP2 HDM...

Page 40: ...40 RU English 0 100 50 0 100 50 0 100 20 5 100 20 90 180 270 DP DP1 1 DP1 2 DP1 4 Adaptive Sync HDR...

Page 41: ...178 178 16 7M 8 bit 3440x1440 165 1 MPRT 350 2 3000 1 1xHDMI 2 0 1xHDMI 2 0 DP 1 4 DP 1 4 Audio out 5 15 100 15 2 HDR HDR400 100 240 50 60 2 80 0 5 VESA 75x75 907x182x486 7 72 kg 10 32 kg Adaptive Sy...

Page 42: ...42 RU ERC2E YYYYMMDD YYYYMMDD...

Page 43: ...___ __________________________________________________ __________________________________________________ __________________________________________________ ___________________________________________...

Page 44: ...t warranty service is cancelled from the in the following cases use for other purposes and not for consumer purposes mechanical damage damage caused by the ingress of objects substances liquids insect...

Page 45: ...45 UA 2E 1 2 24 3 4 5 6 7 12 __________________________________________________________________ 18 04073 0 800 300 345 044 230 34 84 390 55 12 www erc ua service...

Page 46: ...998 90 808 35 43 YURD SERVICE MMC 75 79 994 12 480 33 01 994 50 417 34 34 994 55 417 34 34 www yurd az Prof IT Alba Iulia 75 Moldova Chi in u 069341114 service prof it md www prof it md Givi Kvichidz...

Page 47: ...ler stamp Date of the application Date of completion Cause of damage Coupon 3 Seller stamp Date of the application Date of completion Cause of damage Product information Product Model Serial number Se...

Page 48: ......

Reviews: