background image

24

EN

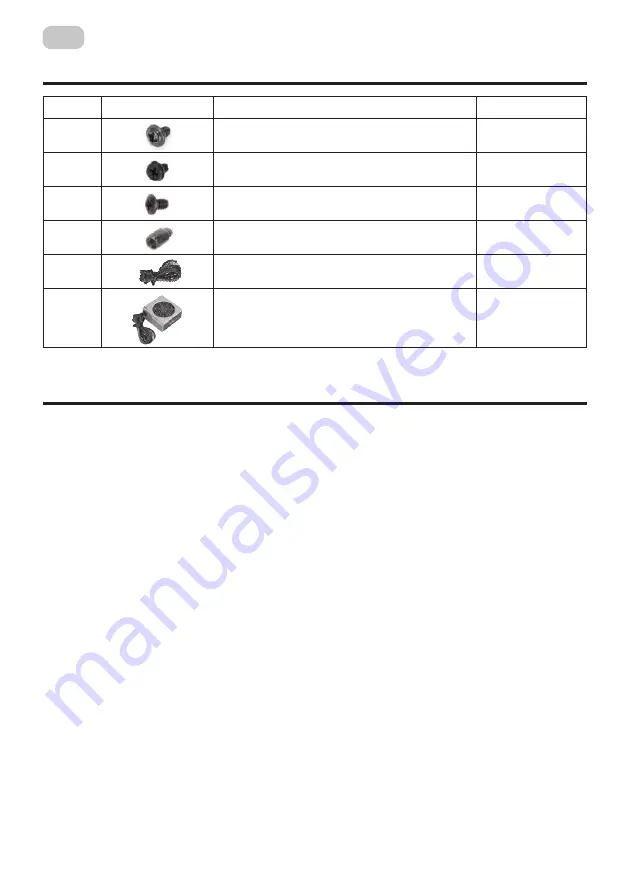
COMPLETE SET

POWER SUPPLY INSTALLATION AND CONNECTION 

Before you begin installation and start using the power supply, we propose to study current 
manual.

Step A:

 Removing the power supply which was installed if necessary:

If you are building a new system, go to step B.
1.  Disconnect the AC power cord from the wall outlet or UPS, as well as from the existing 

power supply.

2.  Disconnect all cables that connect power to the graphics card, motherboard, and other 

peripherals.

3.  Following the instructions for the system unit, remove the power supply.
4.  Go to step B.

Step B:

 Power supply installation:

1.  Make sure that the AC cable of the power supply is not connected.
2.  Following the instructions of the computer case operation guide, install the power supply 

unit and fix it with screws from assembling kit.

3.  Connect the 24-pin power cable. The general 24-pin power cable is equipped with a 

removable 4-pin connector, which ensures compatibility with both 24-pin and 20-pin 
connectors on the motherboard. 
a. If the motherboard has a 24-pin connector, you can directly connect the 24-pin power 
cable from the power supply to it. 
b. If the motherboard has a 20-pin connector, divide 4-pin cable from the 24-pin connector 
and then connect the 20-pin cable to the motherboard without connecting the 4-pin 
connector.

4.  Connect 8-pin + 12V cable. 

a. If the motherboard is equipped with an 8-pin + 12V connector, connect the cable with the 
8-pin connector directly to the motherboard. 

Name of item

Quantity, pcs

1

ВMB & SSD 2,5’’ screws.

10

2

Hex Screws (to fix PSU).

5

3

HDD 3,5’’ screws.

4

4

Copper Cylinder (for MB).

6

5

Power cable

1

6

Power supply

1

5(b)

пылевой фильтр

;

5(b) dust filter;

5(c

) место для вентиляторов.

5(c) place for case fans.

6

Боковая панель(левая): закаленное стекло

.

Side panel (left): tempered glass.

7

Боковая панель(правая

).

Side panel (right).

*

Внешний вид и комплектация товара могут быть дополнены или изменены с целью его 

усовершенствования или улучшения качества товара.

*

Зовнішній вигляд та комплектація виробу може бути доповнені чи змінені, з метою його 

вдосконалення чи поліпшення якості товару.

* Appearance and equipment of item can be supplemented or modified for the purpose of the 

improvement or for improvement of product quality. 

КОМПЛЕКТАЦИЯ

КОМПЛЕКТАЦІЯ

COMPLETE SET

Кріплення для 

MB /

Крепления для

MB / MB screws

Ступінчаті гвинти для кріплення 

HDD /

Ступенчатые винты для крепления

HDD / HDD step screws

Противібраційна прокладка / Антивибрационная прокладка / 

Anti-vibration pad*8, 

Гвинти для кріплення 

HDD

/ Винты для крепления 

HDD / HDD screws

Шестигранні гвинти / Шестигранные винты /

Hex Screws

Мідний циліндр / Медный цилиндр / 

Copper Cylinder

Мідний стовп / Медный столб / 

Copper Pillar

Стяжки / Стяжки / 

Cable tie

Назва

Кількість, шт.

1

10

2

8

3

8

4

8

5

6

6

4

7

1

8


5

УСТАНОВКА КОМПОНЕНТОВ СИСТЕМЫ

ВСТАНОВЛЕННЯ КОМПОНЕНТІВ СИСТЕМИ

SYSTEM COMPONENTS INSTALLATION


1.

Демонтаж панелей

/ Демонтаж панелей

Remove of panels. 


2

8

3

8

4

8

5

6

6

4

7

1

8


5

УСТАНОВКА КОМПОНЕНТОВ СИСТЕМЫ

ВСТАНОВЛЕННЯ КОМПОНЕНТІВ СИСТЕМИ

SYSTEM COMPONENTS INSTALLATION


1.

Демонтаж панелей

/ Демонтаж панелей

Remove of panels. 


2

8

3

8

4

8

5

6

6

4

7

1

8


5

УСТАНОВКА КОМПОНЕНТОВ СИСТЕМЫ

ВСТАНОВЛЕННЯ КОМПОНЕНТІВ СИСТЕМИ

SYSTEM COMPONENTS INSTALLATION


1.

Демонтаж панелей

/ Демонтаж панелей

Remove of panels. 


Summary of Contents for 2E-TMX04

Page 1: ...RU UA EN COMPUTER CASE OPERATION GUIDE 2E TMX04...

Page 2: ...TMX04 Mini Tower 0 4 Micro ATX Mini ITX 244 x 244 5 25 2 5 2 3 3 5 2 1 4 120 1x 80 1x 80 MOLEX 2xUSB 2 0 HD AUDIO MIC Power Reset LED HDD LED 400W VGA 220 CPU 145 170 x 355 x 275 190 x 355 x 310 2 5...

Page 3: ...3 UA 1 2 3 4 5 120 6 80 7 2xUSB 2 0 HD AUDIO MIC Power Reset LED HDD LED 2 5 3 6 4 1 7...

Page 4: ...6 5 1 6 1 Copper Cylinder Copper Pillar Cable tie 1 10 2 8 3 8 4 8 5 6 6 4 7 1 8 5 SYSTEM COMPONENTS INSTALLATION 1 Remove of panels 3 8 4 8 5 6 6 4 7 1 8 5 SYSTEM COMPONENTS INSTALLATION 1 Remove of...

Page 5: ...5 UA 4 8 4 12V a 8 12V 8 b 4 4 8 4 5 PCI Express SATA a CD ROM DVD ROM b SATA SATA c PCI Express PCI Express d 4 e 6 ON I 10 40 C 40 70 C 20 85 5 95 1 230 50 10 40 C 3 5...

Page 6: ...0 SATA x1 310 10 SATA x1 250 10 4 pin Molex 310 10 4 pin Molex 150 10 AC 230V 50Hz 3 3V 5V 12V1 12V1 12V 5Vsb 14A 20A 11A 13A 0 5A 2 5A 124 275 19 400 150 86 140 P1 2 3 SATA 4 SATA 5 4 6 SATA P1 2 3 S...

Page 7: ...7 UA 1 2 2 2 3 1 2 3 4 1 3...

Page 8: ...8 UA VGA 1 2 1 2 3 SSD 2 5 1 SSD 2 SSD 3 SSD SSD SSD SSD...

Page 9: ...9 UA HDD 3 5 1 HDD 2 HDD 3 HDD 1 2 1x80 MOLEX B A B C D F G Power Button Reset Button HDD LED POWER LED USB 2 0 Headphone Jack HDD HDD A B...

Page 10: ...10 UA 1 2 3 4 5 6 7 8 9 10 11 12 13 14 15 16...

Page 11: ...11 UA 1 2 5 40 60 3 40 60 60 4 5 6 7...

Page 12: ...ini Tower 0 4 244 x 244 Micro ATX Mini ITX 244 x 244 5 25 2 5 2 3 3 5 2 1 4 120 1x 80 1x 80 MOLEX 2xUSB 2 0 HD AUDIO MIC Power Reset LED HDD LED 400W VGA 220 CPU 145 x x 170 x 355 x 275 x x 190 x 355...

Page 13: ...13 RU 1 2 3 4 5 120 6 80 7 2xUSB 2 0 HD AUDIO MIC Power Reset LED HDD LED 2 5 3 6 4 7 1...

Page 14: ...HDD 3 5 4 4 6 5 1 6 1 Copper Cylinder Copper Pillar Cable tie 1 10 2 8 3 8 4 8 5 6 6 4 7 1 8 5 SYSTEM COMPONENTS INSTALLATION 1 Remove of panels 3 8 4 8 5 6 6 4 7 1 8 5 SYSTEM COMPONENTS INSTALLATION...

Page 15: ...15 RU 4 8 4 5 PCI Express SATA a CD ROM DVD ROM b SATA SATA c PCI Express PCI Express d 4 e 6 ON I 10 40 C 40 70 C 20 85 5 95 1 230 50 10 40 C 3 5 1 2...

Page 16: ...SATA x1 310 10 SATA x1 250 10 4 pin Molex 310 10 4 pin Molex 150 10 AC 230V 50Hz 3 3V 5V 12V1 12V1 12V 5Vsb 14A 20A 11A 13A 0 5A 2 5A 124 275 19 400 150 86 140 P1 2 3 SATA 4 SATA 5 4 6 SATA P1 2 3 SA...

Page 17: ...17 RU 1 2 2 2 3 1 2 3 4 1 3...

Page 18: ...18 RU VGA 1 2 1 2 3 SSD 2 5 1 SSD 2 SSD 3 SSD SSD SSD SSD...

Page 19: ...19 RU HDD 3 5 1 HDD 2 HDD 3 HDD 1 2 1 80 B A B C D F G Power Button Reset Button HDD LED Power LED USB 2 0 Headphone Jack HDD HDD A B...

Page 20: ...20 RU 1 2 3 4 5 6 7 8 9 10 11 12 13 14 15 16...

Page 21: ...21 RU 1 2 5 40 60 3 40 60 60 4 5 5 40 60 6 7...

Page 22: ...tional fans mm Front panel Side panel 120 Rear panel 80 Top panel Radiators mm Front panel Side panel Rear panel Top panel Included fans mm Front panel Side panel Rear panel 1x 80 MOLEX Top panel Fan...

Page 23: ...ovement of product quality 1 Front panel plastic 2 Side panel Perforated metal 3 Place for the location of the power supply 4 Rear panel expansion slots 5 120mm fans place 6 80mm fan built into the re...

Page 24: ...l 24 pin power cable is equipped with a removable 4 pin connector which ensures compatibility with both 24 pin and 20 pin connectors on the motherboard a If the motherboard has a 24 pin connector you...

Page 25: ...g The device has protection class 1 protective earth is directly connected to the metal case When installing make sure that the power supply is installed correctly The power supply unit is intended fo...

Page 26: ...cable length 310 10 mm SATA x1 connector cable length 250 10 mm 4 pin Molex cable length 310 10 mm 4 pin Molex cable length 150 10 mm Input voltage frequency AC 230V 50Hz DC output 3 3V 5V 12V1 12V1...

Page 27: ...ssary to unscrew the screws and carefully remove the panel 3 The front panel is fixed from the inside with plastic fasteners clips When pressed they are released from the holes In order to dismantle t...

Page 28: ...Insert fix VGA to proper position Power supply installation 1 PSU Space at the top of chassis 2 Insert PSU 3 Fix with hex screw from rear plate SSD installation 2 5 bay 1 Determine the location of th...

Page 29: ...the HDD in proper location 3 Secure HDD with screws Fan Installation 1 Fan installation place on side panel 2 1x80mm fan are installed in the case on the rear panel B I O Ports buttons indicators A B...

Page 30: ...electric current is applied to the power supply It is forbidden to open the power supply housing or carry out repairs of the power supply yourself It does not contain user service able components 9 T...

Page 31: ...humidity not more than 60 The air in the transportation room must not contain acid and other vapors that adversely affect the materials of the products 4 If components are already were installed in ca...

Page 32: ...2 1 2 3 4 5 6 12 ___________________________________________________________________ 18 04073 0 800 300 345 044 230 34 84 390 55 12 www erc ua service...

Page 33: ...2 1 2 3 4 5 6 12 ______________________________________________________________...

Page 34: ...ms determined by applicable law 4 The product is withdrawn from the warranty in case of violation by the consumer of the operating rules set forth in the instruction manual 5 The product is removed fr...

Page 35: ...eller stamp Date of application Date of completion Cause of damage Coupon 3 Seller stamp Date of application Date of completion Cause of damage Product information Product Model Serial number Seller I...

Reviews: