background image


6


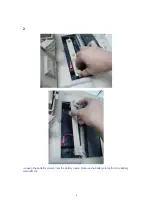
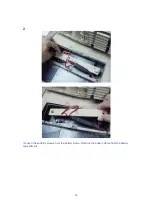
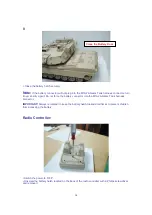
 Loosen the butterfly screws from the battery clamp. Remove the battery clamp from the battery 

compartment. 


Summary of Contents for The Ultimate Soldier M1A2 Abrams Tank

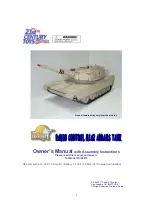
Page 1: ...and save it For Model RC09075 Use only with a 12 Volt 7 0 Amp Hr Battery 12 Volt 2 0 Amp Hr Charger all included 2 Table of Contents Product features may vary from the pictures above 2003 21st Century Toys Inc San Leandro CA 94577 USA All Right Reserved Printed in China ...

Page 2: ...eginning on page 5 for detailed instructions Read this manual carefully for important safety information and operating instructions before using your M1A2 Abrams Tank Please keep this manual for future reference as it contains important information This M1A2 Abrams Tank is designed for use on hard surfaces on generally level terrain and by children 8 years of age and up To prevent damaging the mot...

Page 3: ...olyte Dropping the battery could result in serious injury Never allow children to charge the battery Battery charging must be done by adults only A child could be injured by the electricity involved in charging the battery Never lift or carry the battery by the wires or connector This can damage the battery and possibly cause a fire resulting in serious injury Lift and carry the battery by the cas...

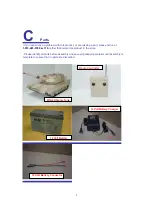
Page 4: ...0 483 5700 ext 19 rather than return this product to the store Please identify all parts before assembly and save all packaging material until assembly is complete to ensure that no parts are discarded M1A2 Abrams Tank Radio Controller 12 Volt Battery Charger 12 Volt Battery 12 Volt Battery Connector ...

Page 5: ...tery until you have replaced the worn or damaged part CAUTION Use the charger in dry locations only Important Notes Your new battery must be charged for at least 18 hours before you use it in your M1A2 Abrams Tank for the first time We recommend that you start charging your battery before beginning assembly of your new M1A2 Abrams Tank The battery must be upright while charging The charger is not ...

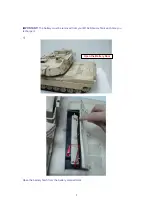
Page 6: ...5 IMPORTANT The battery must be removed from your M1A2 Abrams Tank each time you recharge it 1 Open the battery hatch from the battery compartment Open the Battery Door ...

Page 7: ...6 2 Loosen the butterfly screws from the battery clamp Remove the battery clamp from the battery compartment ...

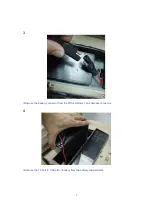
Page 8: ...7 3 Remove the battery connector from the M1A2 Abrams Tank harness connector 4 Remove the 12 Volt 7 0 Amp Hr battery from the battery compartment ...

Page 9: ...s Never charge the battery longer than 30 hours Recharge the battery for at least 14 hours after each use of your vehicle Do not charge the battery longer than 30 hours Once the battery is charged disconnect the charger connector from the battery connector Unplug the charger from the wall outlet The battery is now charged and is ready to be installed in your M1A2 Abrams Tank Please see Battery Ins...

Page 10: ...ast 18 hours using the enclosed 12 Volt charger before operating your M1A2 Abrams Tank for the first time Charge the battery for at least 14 hours after each use of the M1A2 Abrams Tank Never charge the battery longer than 30 hours Failure to follow these instructions may damage your battery and will void your warranty 1 Switch the power to OFF Open the battery hatch from the battery compartment ...

Page 11: ...10 2 Loosen the butterfly screws from the battery clamp Remove the battery clamp from the battery compartment ...

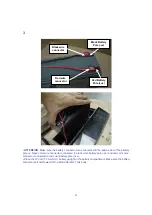
Page 12: ...nnected to black color battery pole ve and red color wire connector connected to red color battery pole ve Place the 12 Volt 7 0 Amp Hr battery upright in the battery compartment Make sure the battery connector extends toward of the M1A2 Abrams Tank body Black wire connector Black Battery Pole ve Red Battery Pole ve Red wire connector ...

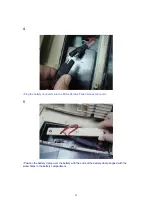
Page 13: ...Plug the battery connector into the M1A2 Abrams Tank harness connector 5 Position the battery clamp over the battery with the ends of the battery clamp aligned with the screw holes in the battery compartment ...

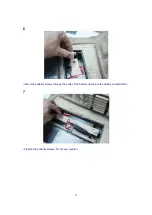
Page 14: ...13 6 Insert the butterfly screws through the ends of the battery clamp into the battery compartment 7 Tighten the butterfly screws Do not over tighten ...

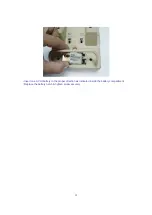
Page 15: ...rce the battery connector into the M1A2 Abrams Tank harness connector IMPORTANT Always remember to keep the battery hatch locked at all times to prevent children from accessing the battery Radio Controller Switch the power to OFF Unscrew the battery hatch located on the back of the radio controller with a Philips screwdriver and remove it Close the Battery Door ...

Page 16: ...15 Insert one 9 Volt battery in the proper direction as indicated inside the battery compartment Replace the battery hatch tighten screw securely ...

Page 17: ... leakage and corrosion can damage the vehicle Do not store the battery on a surface which could be damaged by the acid contained inside the battery Take precautions to protect the surface on which you store the battery Do not store the battery in temperatures above 75 F or below 10 F Prevent the battery from moving freely inside the battery compartment Always use the battery clamp to secure the ba...

Page 18: ...lar use Avoid operating the M1A2 Abrams Tank in wet or snowy conditions Water or moisture in the motors or electrical switches can cause them to corrode and could cause switch or motor failure Avoid operating the M1A2 Abrams Tank on sand loose dirt or gravel Sand loose dirt or gravel in the motors or electrical switches can cause them to jam and could cause switch or motor failure The M1A2 Abrams ...

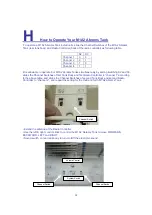
Page 19: ...2 and S3 slides the Channel Switches of first Tank Body and first Radio Controller to channel 1 according to the above table and slides the Channel Switches of second Tank Body and second Radio Controller to channel 2 and repeat the setting for the third and forth M1A2 Abrams Tank Extend the antenna of the Radio Controller Use the left right control sticks to control the M1A2 Abrams Tank to move F...

Page 20: ...ith missile firing sound effect recoil motion Push the MACHINE GUN FIRING buttons to generated machine gun firing sound effect After approximately 45 minutes your M1A2 Abrams Tank will begin to lose its power Simply follow the steps outlined in the Battery Charging section to recharge your M1A2 Abrams Tank Turret Turning Right Turret Turning Left Missile Firing Machine Gun Firing ...

Page 21: ...rated by radio waves It is possible the unit may not perform properly due to interference from nearby devices such as a cordless phone hair dryer walkie talkie or others radio controlled toys Avoid sand and snow when operating your M1A2 Abrams Tank Always select a safe place to play Never drive your M1A2 Abrams Tank on streets Keep fingers hair and loose clothing away from the track and wheels whi...

Page 22: ...into wall Undercharged battery Make sure power flow to the wall outlet is ON Charger is not working There is no sure way to tell if your charger is working unless you have a volt meter Loose wire or loose connector Check all wires and connectors Make sure the battery connector is tightly plugged into the M1A2 Abrams Tank harness connector and that there are no loose wires around the motor Dead bat...

Page 23: ...s after each use Never charge the battery longer than 30 hours Check all connectors Make sure the battery connector is tightly plugged into the charger connector and that the charger is plugged into wall Undercharged battery Make sure power flow to the wall outlet is ON Battery need charging After approximately 45 minutes of constant use the battery needs charging Battery is old and will not accep...

Page 24: ...perly n Replace the old 9 V battery with new 9 V alkaline battery for Radio Controller n Replace the old 12 V Sealed Lead Acid Rechargeable battery with new 12 V Sealed Lead Acid Rechargeable battery for M1A2 Abrams Tank n Move the Radio Controller closer to your M1A2 Abrams Tank to determine the best communication between the Radio Controller and the M1A2 Abrams Tank The operating range is approx...

Page 25: ...turning the equipment off and on the user is encouraged to try to correct the interference by one or more of the following measures Reorient or relocate the receiving antenna Increase the separation between the equipment and receiver Connect the equipment into an outlet on a circuit different from that to which the receiver is connected Consult the dealer or an experienced radio TV technician for ...

Page 26: ...ilure to follow these instructions will permanently damage your battery Please refer to the Battery Care Section in this manual for more information DO NOT Return your M1A2 Abrams Tank to the Store If you are missing parts or need assistance please call us toll free Ultimate Solider Consumer Relations 1 510 483 5700 ext 19 9 AM 5 PM EST Monday through Friday 21 st Century Toys Inc San Leandro CA 9...

Reviews: