background image

EN

DE

FR

ES

JP

IT

EN

DE

FR

ES

JP

IT

03

02

USE

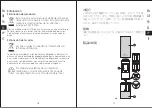
1. Firmly hold the lower section of the grinding chamber 


and turn the top 

 in a counterclockwise direction (see 

Figure A). A ‘click’ sound will be heard.

2. Pull the top 

 off the grinding chamber 

.

3. Pull the motor 

 carefully off the grinding chamber 

.

4. Insert 6 new AAA 1.5V batteries (not included). Insert 

using the correct polarity.

5. Fill up the grinding chamber 

 with peppercorns and 

coarse salt. Fill the grinding chamber 

① 

up 75% for best 

results. 

6. Put the motor back on the grinding chamber. Please 

make sure the contacts of 

 and 

 face each other. 

7. Put the top 

 back on the grinding chamber 

.

8. Firmly hold the grinding chamber 

 and turn the top 

 in a clockwise direction. A ‘click’ sound will be heard.

9. Turn the adjustable screw 

 clockwise for finer 

grinding, and counterclockwise for coarser grinding. 

10. Press and hold the 'On' buttons 

 to activate salt 

and/or pepper grinding. 

NOTE

Make grinding more coarse if you find the mill stops 
grinding when the adjustment screw 

 is at too fine a 

level. If the mill still doesn't grind then the grinder may 
also be blocked. In this case, open the adjustable screw to 
the coarsest level and shake the mill back and forth until it 
starts grinding again.

SPECIFICATION

Power supply: 6 x AAA batteries
Battery type: 1.5 V AAA (LR6, Mignon)

6

7

2

Figure B

Figure C

1

Coarser

Summary of Contents for SIMPLETASTE 710EU-0002

Page 1: ...enungsanleitung Manuel d instructions Manual de instrucciones 取扱説明書 Manuale di istruzioni ELECTRIC PEPPER SALT MILL 1byone Products Inc 1230 E Belmont Street Ontario CA 91761 Customer Service 1 909 391 3888 www 1byonebros com ...

Page 2: ...n manual contains important information about safety usage and disposal Use the product as described and keep this manual for future use The Electric Salt and Pepper Mill is intended for peppercorns and coarse salt FEATURES APPLIANCE DESCRIPTION INTRODUCTION 2 3 4 5 Figure A 1 AAA A A A AAA AAA A A A AAA ...

Page 3: ... face each other 7 Put the top back on the grinding chamber 8 Firmly hold the grinding chamber and turn the top in a clockwise direction A click sound will be heard 9 Turn the adjustable screw clockwise for finer grinding and counterclockwise for coarser grinding 10 Press and hold the On buttons to activate salt and or pepper grinding NOTE Make grinding more coarse if you find the mill stops grind...

Page 4: ... approved disposal company or your municipal waste facility Please observe currently applicable regulations Please contact your waste disposal center if you need any further information DISPOSAL The appliance s packaging is made from environmentally friendly material and can be disposed of at your local recycling plant Disposal of batteries Used batteries may not be disposed of in household waste ...

Page 5: ...gegenüberliegen 7 Setzen Sie die Oberseite wieder auf die Mahlkammer 8 Halten Sie die Mahlkammer fest und drehen Sie das Gerät im Uhrzeigersinn wieder zu 9 Drehen Sie die Schraube im Uhrzeigersinn um das gemahlene feiner zu mahlen oder entgegen des Uhrzeigersinns um größere Stücke zu mahlen 10 Drücken und halten Sie den ON Knopf um das Mahlwerk zu aktivieren Notiz Wenn das Mahlwerk nicht wirklich ...

Page 6: ...012 19 EU Entsorgen Sie das Gerät über einen zugelassenen Entsorgungsbetrieb oder über Ihre kommunale Entsorgungseinrichtung Beachten Sie die aktuell geltenden Vorschriften Setzen Sie sich im Zweifelsfall mit Ihrer Entsorgungseinrichtung in Verbindung Entsorgung Die Verpackung besteht aus umweltfreundlichen Materialien die Sie über die örtlichen Recyclingstellen entsorgen können Batterien Akkus en...

Page 7: ...8 Tenir fermement la chambre de broyage et tourner le couvercle dans le sens des aiguilles d une montre Vous entendrez ensuite un son de type clic 9 Tourner la vis adjustable dans le sens des aiguilles d une montre pour un broyage de meilleure qualité et dans le sens inverse des aiguilles d une montre pour le broyage de gros sel 10 Presser et maintenir le bouton enfoncé pour activer le broyage du ...

Page 8: ... à la directive européenne 2012 19 EU Eliminez l appareil par l intermédiaire d une entreprise de traitement des déchets autorisée ou via le service de recyclage de votre commune Respectez la réglementation en vigueur En cas de doute veuillez contacter votre centre de recyclage Mise au rebut L emballage est réalisé à l aide de matériaux écologiques qu il est possible de confier aux centres de recy...

Page 9: ... la parte superior otra vez en la cámara de molido 8 Sujete firmemente la cámara de molido y gire la parte superior hacia la derecha Se escuchará un click 9 Gire el tornillo de ajuste en sentido horario para una molienda más fina y en sentido antihorario para una más gruesa 10 Presione y mantenga los botones de encendido para activar la molienda de sal y o pimienta NOTA Haga una molienda más grues...

Page 10: ...actuales en desecho de productos Contacte con el centro municipal de desechos si tiene cualquier duda Eliminación El embalaje está fabricado con material respetuoso con el medio ambiente y puede ser desechado en su centro de reciclaje local Eliminación de las pilas Las pilas usadas no pueden ser desechadas en la basura doméstica Todos los consumidores están legalmente obligados a desechar las pila...

Page 11: ...ご注意ください ベスト約本体の75 でよいです 6 電池入りの部分 を本体に付けてください 7 上蓋 を本体にセッ トしてください 8 セラミックミルの本体 と上蓋 をしっかり握ってください 上蓋 を時計回りに回し カチャー の音が聞こえたら 蓋を 嵌ります 9 本体の下部分に粒度調節ボタン があります ボタンを時計 まわりに回すと 細挽く ことができます ボタンを反時計回り に回すと 粗挽く ことができます 10 スイッチボタン を押すと 結晶塩又はコショウを挽きます ご注意 粒度調節ボタン を一番細挽く までまわすと セラミックミルは 停止になります その時 粒度調節ボタン を少々粗挽く までま わしてください セラミックミルは未だ動かない場合は 本体は 詰まった可能性がございますので 粒度調節ボタン を一番粗 挽く までまわしてください 又 セラミックミルを正常になるまで 繰り返し動...

Page 12: ... DEL PRODOTTO INTRODUZIONE USO 1 Tenere fermamente la parte inferiore del macinino e ruotare la parte superiore in senso antiorario come in Figura A Si sentirà un click 2 Tirare fuori la parte superiore dal contenitore del macinino 3 Con attenzione estrarre il motorino dal macinino 4 Inserire 6 batterie nuove AAA da 1 5V non incluse Inserirle rispettando la corretta polarità 5 Riempire il contenit...

Page 13: ...non ricomincia a macinare SPECIFICHE TECNICHE Alimentazione 6 x batterie AAA Tipo di batteria 1 5V AAA LR6 Mignon ministilo Smaltimento dell elettrodomestico Non gettare mai l elettrodomestico tra i normali rifiuti domestici Lo smaltimento di questo prodotto è regolato dalla direttiva europea 2012 19 EU Per lo smaltimento dell elettrodomestico contattare un agenzia di smaltimento specializzata o i...

Page 14: ...00pm PST Email ushelp 1byonebros com CA To ensure speedy handling of your issue please email us for assistance Email cahelp 1byonebros com UK To ensure speedy handling of your issue please call or email us for assistance Phone 44 158 241 2681 Mon Fri 9 00am 6 00pm UTC Email ukhelp 1byonebros com DE Für eine zügige Bearbeitung ihres Problems melden Sie sich bei uns wie folgt Email euhelp 1byonebros...

Reviews: