10x Genomics Visium CytAssist Quick Reference Download Page 5

10xgenomics.com

Quick Reference Cards  |  

CG000543  |  Rev A

5

Visium CytAssist

Step 3: Readiness Test

The Readiness Test calibrates the imaging parameters and 
verifies that all systems are working optimally.  
No reagents are used. Wear gloves. 

a. 

During first-time setup, follow onscreen 

instruction to launch the Readiness Test  

(~40 min).

To initiate a Readiness Test at any other time, navigate 
through the menu to System > Alternate Modes > 
Readiness Test.
OR press the blue Run Start Button on the touchscreen 
to initiate a run. Enter the Readiness Test serial number 
(located on the Calibration Slide label).

b. 

Locate two blank slides and the 

Visium 

CytAssist Calibration Slide

 in the Instrument 

Accessory Kit. Clean with compressed air.

c. 

Enter the serial number on the calibration 

slide (using a different serial number could 

result in poor calibration).

d. 

Open Lid. 

e. 

Follow onscreen instruction to load slides. 

f. 

Press the blue play button to start the test.

g. 

A successful Readiness Test marks the end 

of setup. 

Follow onscreen instruction in the 

event of a failed or incomplete test.

h. 

Upon test completion, follow onscreen 

instruction to unload slides. 

i. 

Store the Calibration Slide away from sun-

light and extreme temperature, in the 

original packaging bag. Retain for future use.

j. 

Wipe down the Tissue Slide Stage and 

the Visium Slide Stage with ethanol and 

laboratory wipes. Use compressed air to dry & 

remove debris as needed.

k. 

Close lid. Wipe down the base and lid of the 

instrument.

For optimal performance, tests are 

recommended during first-time use, after any 

update, and after moving the instrument.
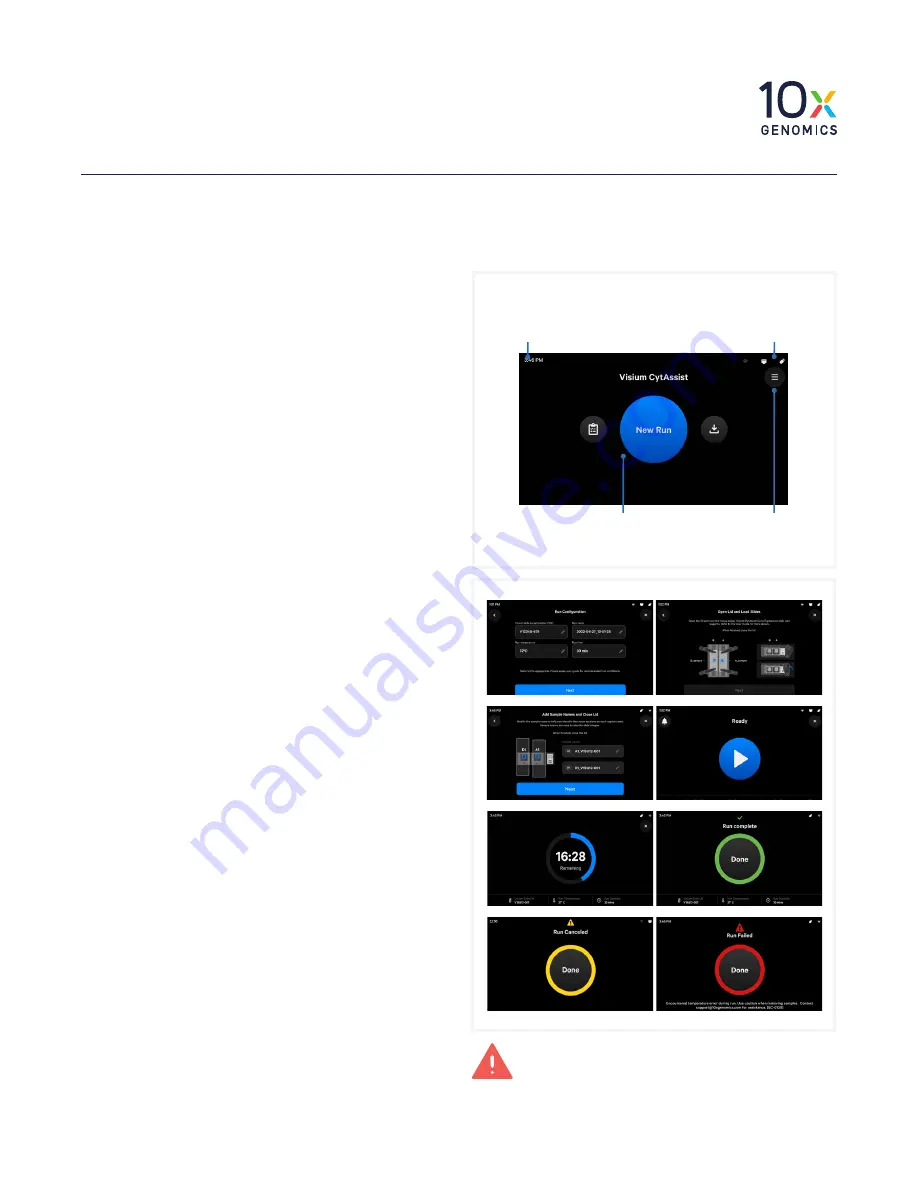
Operation Screens 

After the Readiness Test, the instrument is ready for use. 
Representative instrument operation screens are shown below. 

Clock

Set up during first time use. 

Access through the menu 

option > System/Date & Time

Run Start Button

Click to begin

Status Icons

Displays successfully-connected 

devices & network status. 

Menu Options  

Press icon to navigate 

to that menu option

The instrument requires a 

~20 min 

cool down

 between runs.

Summary of Contents for Visium CytAssist

Page 1: ...ist for Instrument Operation For use with Visium CytAssist Accessory Kit 12 Month Warranty PN 1000441 Visium CytAssist Instrument Accessory Kit PN 1000433 Visium CytAssist Accessory Kit 24 Month Warranty PN 1000442 Visium CytAssist Instrument Accessory Kit PN 1000433 ...

Page 2: ... 10x Genomics products may be covered by one or more of the patents as indicated at www 10xgenomics com patents All products and services described herein are intended FOR RESEARCH USE ONLY and NOT FOR USE IN DIAGNOSTIC PROCEDURES The use of 10x Genomics products in practicing the methods set forth herein has not been validated by 10x Genomics and such non validated use is NOT COVERED BY 10X GENOM...

Page 3: ...tain all packaging materials in the event that the instrument needs to be moved d Remove Shipping Bolt from the back of the instrument Retain for future use e Openthelid Carefullyremovetapefromthe fourTissueSlideClipsandtheVisiumSlideLock f Remove glass protective films from the alignment windows on both stages Close lid clicking sound indicates closure g Within Instrument Accessory Kit locate the...

Page 4: ... a networked device login to your 10x Genomics account at register 10xgenomics com and register the instrument Enter the serial number instrument ID Read and accept the legal agreement d Update the firmware Internet connection After registration the instrument will automatically search for the latest firmware update Confirm data transmission settings for automatic upload download No Internet conne...

Page 5: ...ue play button to start the test g A successful Readiness Test marks the end of setup Follow onscreen instruction in the event of a failed or incomplete test h Upon test completion follow onscreen instruction to unload slides i Store the Calibration Slide away from sun light and extreme temperature in the original packaging bag Retain for future use j Wipe down the Tissue Slide Stage and the Visiu...

Page 6: ...Assist Slide serial number Custom run name temperature and time 37 C for 30 min is recommended for most applications Sample names the 6 5 mm capture areas are designated A1 and D1 The 11 mm capture areas are designated A and B c Open the lid d Follow onscreen instruction and load the blank slides and Calibration Slide onto the instrument See Load Slides section for details e Load reagents to each ...

Page 7: ...m Visium CytAssist Training Slide Visium CytAssist Calibration Slide Load Tissue Slides onto Visium Slide Stage a Inspect the Visium Slide Stage for dust debris b Open the Visium Slide Lock by using one finger to pivot c Line up the slide with the label face up and oriented to the right d Fit the slide within the raised grooves on the left top and bottom e Secure the slide by pivoting the Visium S...

Page 8: ...s the blue Run Start Button on the touchscreen Enter the serial number located on the Visium CytAssist Calibration Slide label b Locate two blank slides and the Visium CytAssist Calibration Slide in the accessory kit Clean with compressed air c Follow onscreen instruction to load the blank slides and calibration slide onto the instrument d Press the blue play button to start the test e Upon test c...

Reviews: