background image


When to maintain the O-ring seal   


Remove the O-ring periodically for inspection. It is not necessary to remove, clean and re-install the 

O-ring after every dive provided the O-rings are not become contaminated. As a rule of thumbs set up the 

camera and housing before a day

s diving. If the housing is required to be opened between dives for 

changing memory card or re-charging batteries, make sure the outside of the housing is thoroughly 

toweled dry before opening up. After removing the lid and servicing the camera, replace the lid straight 

away, rather than leaving it lying around. Before replacing the lid, check the o-rings and make sure that 

no contamination such as dust, hair, salt, sand etc. has fallen onto the O-ring or O-ring recess, as a 

precaution we recommend to inspect the O-ring every time the lid is opened and to carry out the 

maintenance only if necessary.     


Procedure   


How to open the housing:   


•  

Place the lid on a firm non-slip level surface.


•  

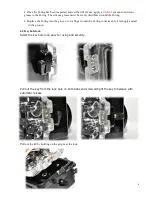
The O-ring can be extracted using an O-ring extractor tool 

(make sure the tool as no sharp edges).    Alternatively use 
the flats of the thumbs to gently stretch the O-ring on two 
faces thus making a small loop protruding a few mm. The 
loop can then be grasped between finger and thumb, to pull 
the O-ring over the lip.


•  

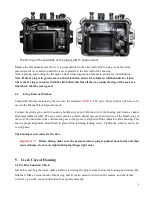
Clean the O-ring recess (the square groove 

where the O-ring sits) with a cotton bud.   


•  

Inspect the O-ring all the way round its 

surface for damage such as 

cuts tears

 or 

contamination. This should be done visually 
and also by feeling the surface texture 
between finger and thumb. 


•  

IF THE O-RING IS DAMAGED OR 

SUSPECTED OF BEING DAMAGED, DISCARD

 IT IMMEDIATELY

A spare O-ring is 

supplied with your housing, or a replacement O-ring can be ordered from 10 BAR. If the O-ring is 

contaminated or suspected of being contaminated, clean it with a cotton cloth that is free of all 

chemicals or contamination. After cleaning inspect the O-ring again.


Summary of Contents for G11

Page 1: ...rchangeable ports for conversion lens The acrylic back cover allows taking pictures and checking on the camera much easier For closure the double o rings and key hole lock design provide ease of use and added security Now you can use small cameras with the feel and function of professional housings 2 Specifications Test Pressure Housings individually tested to 10 Bar 90 m 300 ft Recommended workin...

Page 2: ... and extension adaptor optional Housing for 580EXII Flash optional 3 Function Controls 3 1 Buttons Parts 1 EXPOSURE COMPENSATION DIAL 2 BULKHEAD 3 MODE DIAL 4 ISO SPEED DIAL 5 ZOOM 6 SHUTTER 7 POWER ON OFF 8 SHORTCUT PRINT SHARE 9 PLAYBACK 10 AE LOCK FE LOCK MICROPHONE BUTTON METERING LIGHT JUMP BUTTON AF FRAME SELECTOR SINGLE IMAGE ERASE BUTTON 11 FUNCTION SET 12 4 WAY BUTTON 13 CONTROL DIAL 14 D...

Page 3: ... press down to activate the function 9 PLAYBACK press to activate 10 AE LOCK FE LOCK MICROPHONE BUTTON METERING LIGHT JUMP BUTTON AF FRAME SELECTOR SINGLE IMAGE ERASE BUTTON rotate until the white dot is over the required button and press to activate 11 FUNCTION SET rotate until the white dot align and press 12 4 Way BUTTON rotate until the white dot align and press when not in use rotate the whit...

Page 4: ...g range The O ring seal is the main barrier between the water outside and the air space within the camera It is an effective barrier only if the seal is properly maintained The O ring seal should be inspected before every dive The following information is provided for your guidance in using and maintaining the O ring seal 4 2 Maintaining the O ring Seal If the main body to lid O rings are not inst...

Page 5: ...enance only if necessary Procedure How to open the housing Place the lid on a firm non slip level surface The O ring can be extracted using an O ring extractor tool make sure the tool as no sharp edges Alternatively use the flats of the thumbs to gently stretch the O ring on two faces thus making a small loop protruding a few mm The loop can then be grasped between finger and thumb to pull the O r...

Page 6: ... round the O ring Replace the O ring into the groove run a finger round the O ring to make sure it is snugly seated in the groove 4 4 Key hole lock Select the key hole lock easy for using and security Pull out the key from the lock hole on both sides and screwed tight the key to balance with automatic release Pull out the lid by holding on the grip near the lock ...

Page 7: ... into the body along the guide rail Make sure the camera body reach the limit and test the function of the on of button on the body of the housing Slide the hot shoe plug into the hot shoe Note If you find that the buttons do not align properly with the controls please check again the camera is properly seated to the limit of the guide rail Slide the camera into the body along the rubber packing M...

Page 8: ...e mode Connect the strobe sync cord to housing s bulkhead sync port On the side of the housing port notice a simple alignment indicator dot The sync cord contains a small channel groove between two of the female pins of the cord You must insert the cord into the port so the groove is aligned with the indicator of the housing This assures proper alignment Hold firmly in place while fastening lockin...

Page 9: ...standing strength stiffness hardness and toughness While Acrylic for its crystal clear transparency and high gloss surface Both of them have good resistance to weathering although long term exposure to sunlight should be avoided Normal operating temperature range is 3 C to 36 C Storage temperature 10 C to 50 C It is good practice to rinse off your housing with fresh water after every dive Avoid to...

Page 10: ...used inside or used together with the housing In the event of the housing flooding within the period of warranty 10BAR will repair or replace the housing Please note that disassembly of the housing will invalidate warranty Please fill in the information below and return a copy to 10Bar Underwater Housing at the address below to validate the warranty Copy to be retained by user Housing Type Date of...

Reviews: