

NetX
Getting Started Guide
More information
You can find more information about NetX and iPronto in iPronto Online Help at
http://www.pronto.philips.com/products/ipronto/help
or via the iPronto Portal in layout 8 on your iPronto.
You can also consult the FAQ section on
http://www.pronto.philips.com
for more information.
FAQ
Can I restore the factory default settings of the NetX?
Yes. Press and hold the Configuration button on the NetX for more than 5 seconds.
My NetX has switched to its default settings. Why?
When you press the Configuration button on the NetX for more than 5 seconds, its settings are reset.
You have to reconfigure the NetX.
The NetX has left Configuration Mode. Why?
When you have not started configuring within 10 minutes after pressing the Configuration button on the
NetX, the NetX automatically switches back to Use Mode. Press the Configuration button to enter
Configuration Mode again.
What do the different colors of the NetX LED mean?
Red.
The NetX is powered, but not (properly) configured.
Orange.
The NetX is configured.
Green.
The NetX is sending out IR signals.
Blinking slowly.
The NetX is in Configuration Mode.
Blinking fast.
The NetX will start rebooting in a few moments.
My iPronto does not detect the NetX. What can I do?
During the configuration, your iPronto and the NetX communicate directly with each other. Move the
iPronto closer to the NetX.
iProntoEdit does not autodetect the NetX. Why not?
iProntoEdit can only autodetect the NetX when they are connected to the same wireless network. If they
are not on the same wireless network, you have to manually fill in the NetX name in iProntoEdit.
I cannot find the exact location of the A/V device’s receiving eye.
Check the manual of the A/V device. The receiving eye is behind a dark plastic window on the front of the
A/V device. When still in doubt, contact your supplier or the manufacturer.
The dual IR emitters are no longer adhesive. What can I do?
Replace the adhesive with a piece of transparent two-sided tape.
Hereby, Philips Remote Control Systems declares that this
network extender is in compliance with the essential
requirements and other relevant provisions of Directive
1999/5/EC.
Declaration of Conformity (DoC) can be found at
http://www.pronto.philips.com/products/DoC.
FCC STATEMENT
This equipment has been tested and complies with the
specifications for a Class B digital device, pursuant to Part
15 of the FCC Rules. These limits are designed to provide
reasonable protection against harmful interference in a
residential installation.
This equipment generates, uses, and can radiate radio
frequency energy and, if not installed and used according to
the instructions, may cause harmful interference to radio
communications. However, there is no guarantee that
interference will not occur in a particular installation. If this
equipment does cause harmful interference to radio or
television reception, which is found by turning the
equipment off and on, the user is encouraged to try to
correct the interference by one or more of the following
measures:
• Reorient or relocate the receiving antenna
• Increase the separation between the equipment or
devices
• Connect the equipment to an outlet other than the
receiver's
• Consult a dealer or an experienced radio/TV technician
for assistance
FCC CAUTION:
Any changes or modifications not
expressly approved by the party responsible for compliance
could void the user's authority to operate this equipment.
This device complies with Part 15 of the FCC Rules.
Operation is subject to the following two conditions:
(1) This device may not cause harmful interference, and
(2) This device must accept any interference received,
including interference that may cause undesired operation.
Placing the NetX
Positioning the NetX in the Wireless 802.11b Network
Situation C:
Your A/V devices are inside a
closet
, a rack or another piece
of furniture and you want to
control them with your iPronto.
Situation A:
Your devices are
in line
of sight
but too far away
from iPronto for optimal
control.
Situations A, B and C can be combined. If you want to
control A/V devices in different locations, you should
place a NetX in each location. You can control all NetXs
with one or more iProntos.
It is advised not to place the NetX inside or
near a metal closet as the signals can be
disturbed by metal objects.
Situation B:
You have A/V devices spread
over
multiple rooms
and you
want to control them with
iPronto from another room.
Controlling your A/V and Home Control Devices with the NetX
It is useful to place the NetX only after you have configured it, because it may be
difficult to reach the Configuration button otherwise.
Using the IR Blaster
• Aim the
IR blaster
(dark plastic window on the front of the NetX) at your
A/V devices.
Make sure there are no objects between the NetX and the receiving eyes
of the A/V devices, so that the IR signals can reach the receiving eyes.
Using the Dual IR Emitters
You can use the dual IR emitters as an alternative for the IR blaster. The IR emitters
can control A/V devices the IR blaster cannot reach, for instance when there is limited
space around the receiving eyes of the A/V devices, e.g. in a small closet.
It is possible to reflect the IR signals of the IR blaster against a flat surface
such as a wall or a closet door.
Minimum distance:
approx. 4 inches (10 cm)
Maximum distance:
approx. 16 feet (5 m)
1. Attach the
emitter
directly to the
receiving eye
of your
A/V device.
-or-
Attach the emitter to a surface above, below or in
front of the receiving eye of your A/V device.
2. Plug the other end of the dual IR emitter into
the
socket
on the back of the NetX.
Before you install the NetX, you should decide which situation applies to your needs.
1
2
Angle: approx. 90°
A
B
C
Warning
Note
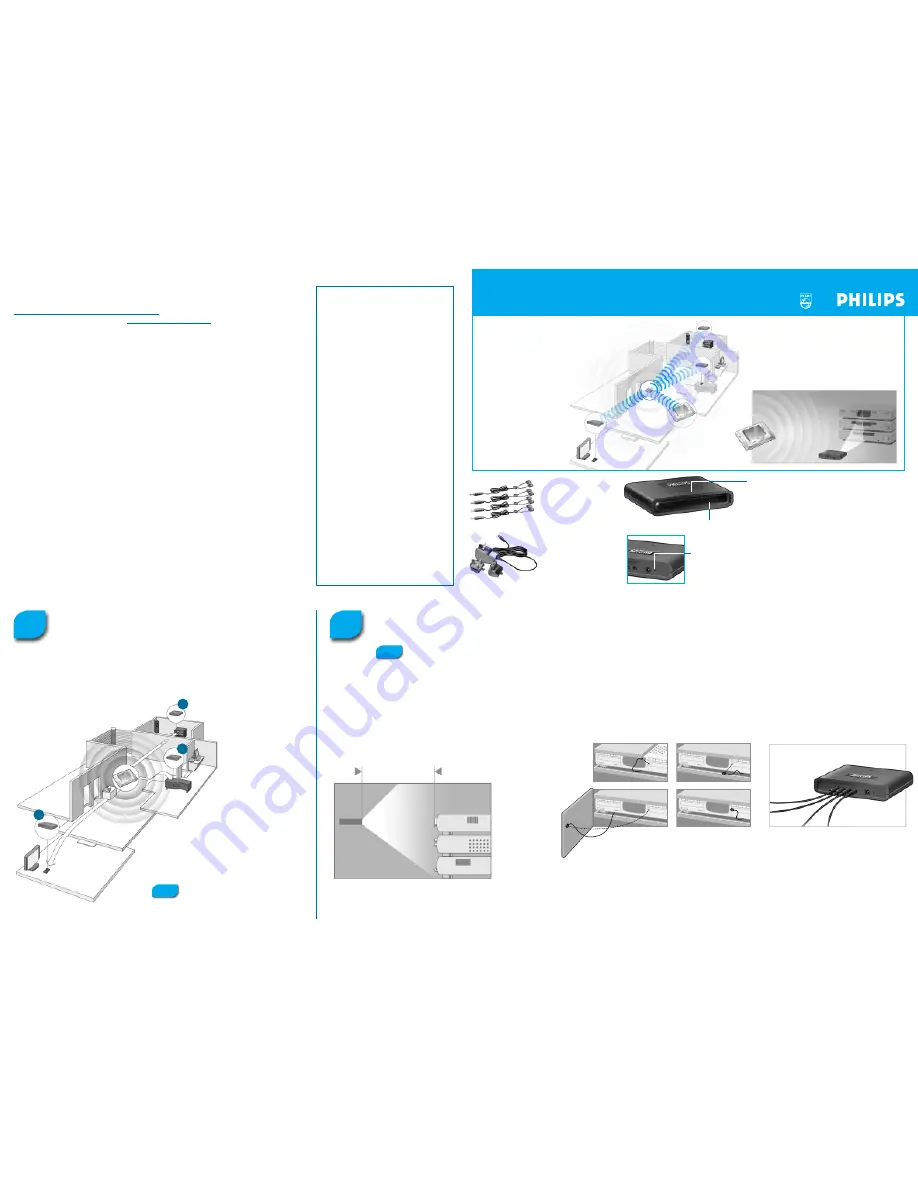
The
NetX
is a part of the
Philips Connected Planet solution
and extends the control of iPronto
beyond the line of sight and
into multiple rooms.
Via the NetX your iPronto
can control your A/V and
Home Control devices
from virtually any location
in your home.
The NetX receives signals sent out by
iPronto
via your WiFi 802.11b wireless
home network and converts them into
infrared (IR) signals
. These IR signals are
then sent out to your IR controlled A/V
and home control devices.
Dual IR Emitters
By attaching the dual IR
emitters on your A/V
devices you can extend
the range of the NetX for
places difficult to reach.
Universal power supply
(100-240 Volt) with inter-
national power adapters.
The
IR Blaster
sends out IR codes in all directions. Just make sure the
A/V devices you want to operate with the NetX are in its range.
The
LED
indicates whether the NetX has no network
connection (red), whether the NetX has network
connection (orange) or whether the NetX is sending
out IR signals (green).
Press this
Configuration button
with a pointy object to bring the NetX into
Configuration Mode. On iPronto you enter the settings to configure your
NetX. Pressing the Configuration button for more than 5 seconds resets the
NetX’s factory defaults.


