background image

ENGLISH

User Guide

CR820

MFL67846801 (1.0)

www.lg.com

Summary of Contents for CR820

Page 1: ...ENGLISH User Guide CR820 MFL67846801 1 0 www lg com ...

Page 2: ......

Page 3: ...CR820 User Guide ENGLISH ...

Page 4: ...upplied Accessories 3 Precautions 4 Before Using this Terminal 8 Setting Up 34 Connecting to the Internet 45 Settings 46 Overseas Use 80 Troubleshooting 82 Guidelines for safe and efficient use 96 Contents ...

Page 5: ...erminal including the warranty CR820 INSTRUCTION MANUAL Back Cover Data cable Travel Adapter Battery Pack IMEI Label SSID CR820_EF31C1E0 Security Key B83A3F60 351876050000001 351876050000001 Supplied Accessories ...

Page 6: ... to completely discharge the battery before recharging Unlike other battery systems there is no memory effect that could compromise the battery s performance Use only LG batteries and chargers LG chargers are designed to maximise the battery life Do not disassemble or short circuit the battery Keep the metal contacts of the battery clean ...

Page 7: ...ave the battery in hot or cold places as this may deteriorate battery performance There is risk of explosion if the battery is replaced with an incorrect type Dispose of used batteries according to the manufacturer s instructions Please recycle when possible Do not dispose as household waste If you need to replace the battery take it to the nearest authorised LG Electronics service point or dealer...

Page 8: ...lace with an ambient temperature between 0 C and 45 C Do not charge the battery pack in the following areas In areas of excessive humidity dust or vibration Near land line phones TVs or radios It is normal for the adapters to become warm while using or charging the terminal You can continue to use it Use the DC adapter only when the car engine is running Otherwise the car battery may be exhausted ...

Page 9: ...IC portion of the Micro USIM clean Clean the Micro USIM with a soft dry cloth Lens cleaning cloth Be sure to keep a separate note of the information registered to this terminal Claro assumes no responsibility for the loss of any of your data Visit service center to return the expended Micro USIM for the environmental purpose Do not scratch touch carelessly or short circuit the IC portion Data loss...

Page 10: ... wireless LAN function and network communication function are off When the display has gone off press the Power button to lighten the display then press the Wi Fi button WPS button Hold down the button for over 2 seconds to connect the other wireless LAN device to the wireless LAN of this terminal using WPS function Unavailable when WEP is set When the display has gone off press the Power button t...

Page 11: ...under the battery pack External connector This connects to AC Adapter or microUSB Connection Cable NOTE When this terminal is put on the metal objects such as a steel desk or table the performance of the antenna is affected and the communication speed may become lower ...

Page 12: ...ese states press the power button to display the icons Levels of radio wave reception Strong Weak Types of networks available during connection LTE 3G HSDPA HSUPA W CDMA Internet connection is unavailable when an icon shows not connected appears on the display of this terminal Activating global roaming ...

Page 13: ... is almost exhausted Charge the battery Wireless LAN function ON It disappears when wireless LAN function is OFF Number of connecting terminals to wireless LAN Network data usage The amount of data communication is displayed Data communication in overseas is not be added to this amount Also the amount of data communication within the international roaming area is not displayed ...

Page 14: ...ndicators The display shows the charging state of battery pack wireless LAN states name of the connecting network etc Examples are shown below Charging Activating WPS function Battery is exhausted Activating Wi Fi Disconnecting Wi Fi ...

Page 15: ...or details on handling the Micro USIM refer to the Micro USIM manual Only the Micro USIM can be used in this terminal Inserting the Micro USIM When inserting the Micro USIM hold this terminal with both hands Turn the power off and remove the battery pack before attaching the Micro USIM 1 With the IC chip side down insert a Micro USIM under the Micro USIM slot guide in the direction of arrow ...

Page 16: ...slot guide Notch IC gold Removing the Micro USIM When removing the Micro USIM hold this terminal with both hands Turn the power off and remove the battery pack before removing the Micro USIM 1 Slide the Micro USIM in the direction of arrow to remove ...

Page 17: ...ro USIM in the reverse direction may cause malfunction Inserting or removing the Micro USIM with an excessive force Security Codes A Micro USIM has PIN1 Personal Identification Number code The PIN1 code is a 4 to 8 digit security code to be entered every time this terminal is turned on for user verification to prevent any unauthorized use by others ...

Page 18: ... the Micro USIM not to verify the PIN1 code in advance Changing PIN1 Code You can change the PIN1 code to any number To prevent any unauthorized use by third parties change it to your original number If you improperly enter the PIN1 code for 3 times in a row further entry is locked automatically PIN1 Lock so be sure to keep a separate note of the numbers you set Changing the Security Code Modify P...

Page 19: ...ly enter the unblocking PIN code for 10 times in a row the Micro USIM locks automatically Caution Do not set PIN1 code to numbers that can be easily guessed such as birth date part of your phone number numbers from address or room number 1111 1234 etc Also make a note of your PIN1 code and keep it well Keep your PIN1 code away from being known by other people Claro assumes no responsibility for th...

Page 20: ...w PIN1 code Incorrect entry 10 times in a row Contact a service center Attaching and Detaching the Battery Pack Use the Battery Pack for this terminal NOTE Always turn off this terminal before removing the battery pack If the battery pack is removed while the power is on this terminal may not work correctly Attaching the Battery Pack When attaching the battery pack hold this terminal with both han...

Page 21: ...erminal and pull up in the direction of arrow while pressing in the direction of arrow to remove the back cover Back cover Groove Do not remove the back cover as described below Do not remove the back cover by inserting a fingernail into a part other than the groove ...

Page 22: ...ack cover 1 Align the metal contacts of both the battery pack and this terminal attach the battery pack in the direction and then push it down in the direction Fit the depressions of the battery pack into the projections of this terminal Projections ...

Page 23: ...b to close it firmly Detaching the Battery Pack When attaching the battery pack hold this terminal with both hands 1 Insert a fingernail into the groove at the bottom of this terminal and pull up in the direction of arrow while pressing in the direction of arrow to remove the back cover ...

Page 24: ...22 Before Using this Terminal Back cover Groove 2 Put your fingertip at the concave part of this terminal press in the direction lift it in the direction and then remove it in the direction Projections ...

Page 25: ...le time decreases every time the battery pack is recharged When the usable time after each recharging shortens by approximately half compared to a new battery pack it is recommended that the battery pack be replaced with a new one as soon as possible The battery pack may swell as the battery life is near its end depending on the battery pack condition but it is not a malfunction ...

Page 26: ...k with the AC or DC adapter make sure that the battery pack is inserted into this terminal Plug or unplug the connector slowly and securely avoiding excessive force If you start charging the fully drained battery pack this terminal may not be turned on for a while If you make communication while charging the inside of this terminal may become hot and charging may stop In this case end the function...

Page 27: ...oved the power does not correctly turn on or the battery is not correctly charged In that case remove the battery pack and all cables from this terminal and reconnect them Approximate battery pack usage charging time The usage time may vary depending on the operating environment and the battery pack deterioration Continuous communication time LTE Approx 4 hours 3G HSDPA HSUPA W CDMA Approx 5 hours...

Page 28: ...tion time is the approximate usage time when you can normally send and receive radio waves Continuous stand by time is approximate usage time when moving with normal radio wave reception level Communication time or operating time may be reduced by half depending on the battery level set functions operating environment such as ambient temperature or radio wave reception level poor or weak radio wav...

Page 29: ... values The estimated charging time is the duration of time to charge a fully drained battery pack with this terminal turned off The charging time becomes longer with this terminal turned on Turning Power On Off Turning Power On 1 When this terminal is turned off hold down the power button for over 2 seconds ...

Page 30: ...t a speed of up to 100Mbps for receiving data and up to 50Mbps for sending data by connecting up to 10 Wi Fi devices compatible with wireless LAN function Communication speed is theoretical values when sending and receiving data which does not show the actual ones The actual communication speed depends on communication environment and network congestion Network Wireless LAN CR820 PC game console e...

Page 31: ... wireless LAN access point NOTE Note that high communication fees are charged when performing communications with large amount of data such as browsing websites with many graphics or downloading data Data communication may take more time or become difficult to connect depending on the network congestion For customers who use a large amount of data communication it may have difficulties in sending ...

Page 32: ...e This terminal does not support Remote Wakeup This terminal does not support FAX communication Usage Notes User authentication to access networks The ID and password will be provided by the network administrator of your ISP or the access point For details contact your provider or access point network administrator Internet connection is unavailable when Not connected icon appears on the display o...

Page 33: ...ffic is heavy at the base station or if radio waves are weak This terminal must be in service area The access point corresponds to the data communication Attaching and Detaching this Terminal to from a PC Attach this terminal to a PC to charge this terminal with microUSB Connection Cable Attaching to a PC USB connector microUSB connector with the inscribed B side up ...

Page 34: ...appears by zero install function only for Windows version Follow the onscreen instructions to install the driver The driver is necessary only when updating software After installation the shortcut of Connection Manager is created on the desktop screen Depending on the OS settings Auto start screen may appear When the screen appears select LGERouter_ ModemDriver and choose Setup Language either Eng...

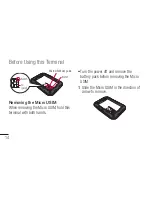
Page 35: ...33 Detaching from a PC Remove microUSB Connection Cable ...

Page 36: ... other settings according to your environment Operating Environments Use this terminal under the following operating environments Item Requirement PC Main Unit PC AT compatible computer and Mac More than 800 600 dots for display resolution and High Color 16 bits are recommended OS 1 Windows XP SP3 Windows Vista SP2 Windows 7 SP1 Mac OS X 10 6 8 10 7 3 3 Setting Up ...

Page 37: ...aro does not guarantee the operation under the environment of OS which is upgraded added or modified 2 Required memory or available hard disk space may vary depending on the system environment of a PC 3 This is only for Mac with Intel CPU NOTE The software may not work depending on your operating system environment and type of device Claro does not guarantee any inquiry or operation other than the...

Page 38: ...is not necessary For setting procedures see Registering the Access Point Settings Profile NOTE To change this terminal s setting connect this terminal to a PC change the setting and then connect the other wireless LAN terminal You can change this terminal s setting with the console other than a PC which is equipped with a browser However some menus and some browser types may be unavailable ...

Page 39: ...o DS PSP WPS compatible wireless LAN terminal NOTE Make one of these settings when you connect this terminal to each terminal for the first time Once you have set the terminal connects to it automatically only by turning power on To connect to a wireless LAN without WPS function entering SSID and Security key WPA WPA2 shared key set to this terminal is required Confirm it in advance This terminal ...

Page 40: ...rea Check SSID and Security key WPA WPA2 shared key on the included Wireless LAN Initialization Sticker Also SSID and Security key WPA WPA2 shared key is printed on the sticker inside of this terminal Remove the battery pack to see it SECURITY KEY Connecting to Windows PC The setting procedure when security mode of this terminal is set to WPA2 PSK AES is described here ...

Page 41: ... Network and sharing center Network and sharing center window appears 4 Click Connect to a network 5 Click the item which shows SSID Default CR820_XXXXXXXX set to this terminal and click Connect 6 In Security key or pass phrase enter Security key WPA WPA2 shared key set to this terminal and click OK Click Connect for Windows Vista 7 Select Save this network and Start this connection automatically ...

Page 42: ...tion of a PC 3 Click Start Control panel Network and Internet Network connection 4 Double click Wireless network connection Wireless network connection window appears 5 Click the item which shows SSID Default CR820_XXXXXXXX set to this terminal and click Connect 6 In Network key and Confirmation of Network key enter Security key WPA WPA2 shared key set to this terminal and click Connect ...

Page 43: ...ed to your wireless LAN terminal you need to select WPS PIN in WPS type and set the specified PIN code to WPS PIN in advance When the security mode of this terminal is set to WEP WPS function is not available When SSID Broadcast is Disable the WPS function is not activated When WPS type is Push button 1 Hold down the power button of this terminal for over 2 seconds This terminal turns on and the w...

Page 44: ...depending on the terminal 4 Press the WPS button of this terminal for over 2 seconds 5 Follow the onscreen instructions of the target terminal to on The operation varies depending on the terminal When WPS type is WPS PIN 1 Hold down the power button of this terminal for over 2 seconds This terminal turns on and the wireless LAN function turns on 2 Start the web browser on PC which is connected wit...

Page 45: ...etting page and click Apply When WPS OK is displayed you could access to WPS Making Other Settings You can change the settings of this terminal according to your environment by starting Web browser on the PC connected via wireless LAN and displaying the setting page of this terminal You can change this terminal s setting with the console other than a PC which is equipped with a browser However som...

Page 46: ...ings of LAN Setting Network You can change the settings of access point and Micro USIM Setting Security Functions You can set the firewall function of this terminal Managing the system You can use management functions of this terminal such as saving the settings confirmation of firmware version etc ...

Page 47: ...al For details on the setting method refer to Registering the Access Point Settings Profile Up to 10 profiles can be registered When connecting this terminal to Claro this setting is not necessary Connecting to the Internet You can use the Internet by turning on this terminal to connect automatically to the access point set to the Profile Check if your wireless LAN terminal is connected to the Int...

Page 48: ...ther than a PC which is equipped with a browser However some menus and some browser types may be unavailable The setting page of this terminal supports the following Web browsers Windows Microsoft Internet Explorer 6 7 8 9 Firefox Google Chrome Opera Mac OS X Safari 5 0 Depending on the browser some screens and items may not be displayed Enable cookies on your browser save and accept 1 Hold down t...

Page 49: ...lick the shortcut of MOBILE ROUTER CR820 on the desktop screen or start a Web browser and enter http 192 168 2 1 in the address entry field then press Enter key Login screen appears 192 168 2 1 is the default setting of the private IP address of this terminal When the setting has been changed enter the private IP address you set 4 Enter Admin in Username field enter the log in password default 123...

Page 50: ...een appears enter PIN1 code in PIN1 code field and then click Apply For details on PIN1 code see Security Codes Click OK when a message of PIN1 unlock appears Status screen appears If there is latest version a message from web page is displayed on Status screen For updating procedure see Updating Software ...

Page 51: ...e Changing Login Password Modify password The Setting Page Screen Top menu Click a menu item to switch the setting page You can select the following items STATUS WLAN NETWORK SECURITY SYSTEM The submenu appears for some items and you can switch the setting screen Logout Click to log out from the setting page ...

Page 52: ...lected from the menu items appear Click to edit the setting Click to refresh the information on the Status screen Confirming Connection Setting Conditions of this Terminal 1 Click STATUS in the top menu Status screen appears Click Refresh to refresh the information ...

Page 53: ...minals via wireless LAN is displayed Wi Fi auto off The setting status of the Wi Fi auto off function is displayed WPS The operating status of the WPS function is displayed USIM card Phone number of Micro USIM is displayed Network data usage The current amount of data communication is displayed Data communication in overseas is not be added to this amount When the Micro USIM is not inserted the it...

Page 54: ...of Wireless LAN 1 In the top menu click WLAN 2 In the submenu click Basic Setting 3 On the setting screen set the required items SSID Default CR820_XXXXXXXX Set the network name SSID of the wireless LAN You can enter up to 32 letters with one byte alphanumeric hyphen and _ under bar Country Default CHILE Select a country name where this terminal is used This field specifies the range of Wlan ...

Page 55: ... is set to WPA PSK or WPA2 PSK and TKIP is selected Only 802 11n or 802 11b g n cannot be selected SSID Broadcast Default Enable Select whether to display SSID on the wireless LAN terminal Enable SSID is displayed Disable SSID is not displayed Privacy separator Default Disable Select whether to prohibit communication between wireless LAN terminals Enable Communication is prohibited Disable Communi...

Page 56: ...ble Select whether to set the wireless LAN function to off automatically and power saving mode when no client connection is made in a certain period Enable The wireless LAN function is set to off Disable The wireless LAN function is not set to off When Enable is set Wi Fi off time min Default 10 When Enable is set to Wi Fi auto off select the time minutes to set automatically to off ...

Page 57: ...g Setting Security Mode of Wireless LAN 1 In the top menu click WLAN 2 In the submenu click Security 3 On the setting screen set the required items Security mode Default WPA WPA2 PSK mixed Select the security mode of wireless LAN Open WEP WPA PSK ...

Page 58: ...ters with one byte alphanumeric For 5 letter or 13 letter key use a key with one byte alphanumeric 0 9 a z A Z For 10 letter or 26 letter key use hexadecimal numbers 0 9 A F Only the specified number of WEP key in Current WEP key is judged for letter type to enter Current WEP key Default 1 Select the number of WEP key to use For Wireless LAN terminal which cannot specify the index of WEP key iPod ...

Page 59: ... 0 9 A F Limitation of clients Default 10 The number of terminals which can be connected is displayed When WPA2 PSK is set Encryption type Default AES Select an encryption type AES TKIP WPA2 shared key Default XXXXXXXX Enter Security key of WPA2 You can enter 8 64 letters with one byte alphanumeric For 64 letter key use hexadecimal numbers 0 9 A F Limitation of clients Default 10 The number of ter...

Page 60: ...For 64 letter key use hexadecimal numbers 0 9 A F Limitation of clients Default 10 The number of terminals which can be connected is displayed 4 Click Apply to save the setting Setting WPS Function NOTE WPS Function cannot be used when WEP is set for Security 1 In the top menu click WLAN 2 In the submenu click WPS 3 On the setting screen set the required items ...

Page 61: ...t activated if you press Apply button Push button When you use the WPS button or connect with WPS type after clicking Apply button WPS PIN When you connect by entering the PIN code 8 digit number for WPS WPS PIN Enter the specified PIN code 4 Click Apply to save the selected WPS setting The saved WPS setting is valid even after restarting of this terminal Setting MAC Address Filter 1 In the top me...

Page 62: ...ecified MAC address Deny Prohibits the connection to this terminal with the specified MAC address When Allow or Deny is set Mac addresses entry field appears Enter the specified terminal s MAC address You can specify up to 10 MAC addresses 4 Click Apply to save the setting Setting DHCP Function 1 In the top menu click WLAN 2 In the submenu click DHCP 3 On the setting screen set the required items ...

Page 63: ...on is used Disable DHCP function is not used When Enable is set Start IP address Default 192 168 2 2 Set the minimum IP address assigned to this terminal End IP address Default 192 168 2 99 Set the maximum IP address assigned to this terminal Primary DNS Default 192 168 2 1 Set IP address of primary DNS server Secondary DNS Default 0 0 0 0 Set IP address of secondary DNS server 4 Click Apply to sa...

Page 64: ...ed terminal s information appears Click Refresh to refresh the information 4 To disconnect click in the Disconnect field Setting UPnP Function To use the application using the UPnP function set to Enable the UPnP function 1 In the top menu click WLAN 2 In the submenu click UPnP 3 On the setting screen set the required items ...

Page 65: ...pply to save the setting Setting Network Setting Network mode Function 1 In the top menu click NETWORK 2 In the submenu click Network mode 3 On the setting screen set the required items Band Default Auto Auto Connect the LTE network or the 3G network automatically LTE only Connect the LTE network only 3G only Connect the 3G network only ...

Page 66: ...ETWORK 2 In the submenu click Searching network 3 On the setting screen set the required items Mode Default Auto Select whether to specify the network Auto The network to connect is automatically selected Manual Select when you specify the network Click Apply to search the available network and register it to Operators ...

Page 67: ... Settings Register edit or delete the access point settings You can register up to 10 access points By default the setting for Claro is registered and you cannot delete it When using Claro the following setting is not necessary 1 In the top menu click NETWORK 2 In the submenu click Profile 3 To register a new access point click Add New ...

Page 68: ...t clarochile Enter an access point name You can enter up to 15 letters with one byte alphanumeric APN Default bam clarochile cl Enter APN You can enter up to 99 letters with one byte alphanumeric hyphen at mark period and _ under bar Username Default None Enter the user name specified by the provider You can enter up to 64 letters with one byte alphanumeric hyphen at mark period and _ under bar Pa...

Page 69: ...new access point click Save 6 Click Apply to save the setting Protecting the Terminal with the Security Code When this function is set network communication is locked and entering the security code PIN1 code is required when logging in to the setting page 1 In the top menu click NETWORK 2 In the submenu click PIN1 lock 3 On the setting screen set the required items ...

Page 70: ... lock is canceled When Enable is set PIN1 code to disable Enter PIN1 code set to the Micro USIM card When Disable is set PIN1 code to enable Enter PIN1 code set to the Micro USIM card 4 Click Apply 5 When Enabled is set hold down the power button for over 2 seconds to turn the power off and then turn on again ...

Page 71: ...ter the new PIN1 code in the New PIN1 code field 3 In Confirm PIN1 code field enter the same PIN1 code as New PIN1 code for confirmation 4 Click Apply Changing the Security Code You can change the security code PIN1 code Changing security code PIN1 code is available only when PIN1 lock is set to Enabled 1 In the top menu click NETWORK 2 In the submenu click Modify PIN1 code 3 On the setting screen...

Page 72: ...N1 code for confirmation 4 Click Apply PIN1 code is changed Displaying Network data usage The amount of data communication is displayed Data communication in overseas is not be added to this amount Also the amount of data communication in the international roaming area is not displayed 1 In the top menu click NETWORK 2 In the submenu click Network data usage ...

Page 73: ...llowing cases When the Micro USIM is replaced Maximum data size Default Disable Select from KB MB and GB and enter the valid value Valid value Positive integer from 1 to 1024 Not available Negative number 0 decimal point and anything other than the valid value Even if maximum data size is set data communication will not stop when data usage is over the maximum data size It is only for your referen...

Page 74: ...ication is not displayed on the display of this terminal 4 Click Apply to save the setting Setting Security Functions Using Firewall Function Unauthorized access via the Internet can be blocked by using the Firewall function Also you can set IP filter 1 In the top menu click SECURITY 2 In the submenu click Firewall 3 On the setting screen set the required items ...

Page 75: ...ion IP address Direction Default Source Specify the direction of communication to interrupt Source Interrupt the access from the specified IP address Destination Interrupt the access to the specified IP address IP address filter list List of registered IP filter appears Delete registered IP filter 4 Click Apply Discarding WAN Ping You can discard the Ping request to access from WAN to prevent answ...

Page 76: ...g blocking Default Disable Set whether to activate the WAN Ping blocking function Enable Activate the WAN Ping blocking function Disable Deactivate the WAN Ping blocking function 4 Click Apply Managing the System Changing Log in Password You can change the log in password of the setting page You can enter only a 4 digit number as a password ...

Page 77: ...On the setting screen set the required items Current password Enter the current password New password Enter the new password Confirm password Enter the same password as New password for confirmation 4 Click Apply The message Password is changed successfully appears 5 Click OK ...

Page 78: ... setting data can be restored in this terminal 1 In the top menu click SYSTEM 2 In the submenu click Backup Restore 3 In the setting screen make the following procedures Backup to file Click Backup specify the file name Default webcm_config cfg and save the current setting Depending on the browser the file name cannot be specified ...

Page 79: ...nt of data communication which is displayed on the display cannot be reset For resetting the amount of data communication see Displaying Network data usage You can also reset the settings by pressing the buttons on this terminal 1 In the top menu click SYSTEM 2 In the submenu click Reset 3 Click Reset 4 Click OK Log out from the setting page and the communication is disconnected ...

Page 80: ...Default ON ON Check the update file automatically OFF Check the update file manually When ON is set The confirmation message for software update appears each time you log in To make the message not to appear set to OFF When OFF is set Click Check now to check if you have any update files and a message appears when a new file exists For update procedure see Updating Software 4 When you have changed...

Page 81: ...79 Displaying the Inquiries 1 In the top menu click SYSTEM 2 In the submenu click Help The information of the inquiry website phone number and the URL of Instruction Manual PDF appears ...

Page 82: ...ator at your current location manually Manual setting is possible only for using overseas You can make settings related to network by logging in to the setting page 1 Log in to the setting page For details see Logging in to MOBILE ROUTER CR820 2 Click NETWORK in the top menu 3 Click Searching network in submenu and set each items ...

Page 83: ...cally selected Manual Select to specify the network Click Apply to search the available access point and register it to Operators 4 Click Apply to save the setting contents 5 Click Logout NOTE While using overseas Some communication services may not be available depending on the overseas carrier or network ...

Page 84: ...ptom Check Cannot charge Check the following Check if the battery pack is inserted correctly Check if the adapter s power plug is inserted to the outlet correctly Check if AC Adapter is connected to this terminal correctly Check if AC Adapter connector is connected to microUSB Connection Cable correctly Check if the PC turns on when using microUSB Connection Cable Troubleshooting ...

Page 85: ...g Check if this terminal is left for a long time under the state out of the service area When it is out of service area more powers is consumed to search available radio waves The usage time provided by the battery pack varies by the operation environment and battery pack s deterioration The battery pack is a consumable part Each time it is charged the usage time with each charging reduces Even in...

Page 86: ...cloth or cotton swab The Micro USIM is not recognized Check if the Micro USIM is inserted in the correct direction This terminal is not recognized Symptom Check This terminal is not recognized by the PC connected with microUSB Connection Cable Check if this terminal is correctly connected to the PC with microUSB Connection Cable Remove microUSB Connection Cable from the PC restart the PC and recon...

Page 87: ... and function Uninstall or modify program window appears Select LG Router Driver and click Uninstall Click OK Click OK Symptom Check This terminal is not recognized by the PC connected with microUSB Connection Cable For Windows Vista Click Start Settings Control panel Program Program and function Uninstall or modify program window appears Select LG Router Driver and click Uninstall Click Continue ...

Page 88: ...ncel optimization of W TCP function Recommended has selected and click Complete Problems with wireless LAN Symptom Check Cannot connect the wireless LAN terminal Check if the wireless LAN functions of this terminal and the wireless LAN terminal are turned on Check if the correct Security key is set to the wireless LAN terminal If you forget the Security key set to this terminal see Setting Securit...

Page 89: ...minal and Properties Security tab Set following Security Type no authentication Encryption Type WEP Network Security Key WEP key of this terminal whose number is selected in Key index Symptom Check Cannot connect the wireless LAN terminal Example Security mode is WEP For Mac OS 10 7 Apple menu System Preferences Network Select Wi Fi on the left screen Edit network on Network Enter any name in Unti...

Page 90: ...om WPS is specified check if WPS PIN is selected in WPS function settings of this terminal and the correct PIN code is set Communication problems Symptom Check Communications are not possible Check if signals are received in the service area If a security code is set to the Micro USIM log in to the setting page and enter PIN1 code Check the settings of this terminal and the APN registration Depend...

Page 91: ...own the Wi Fi button for more than 2 seconds to turn on the Wi Fi function Top menu of MOBILE ROUTER CR820 Click NETWORK Profile confirm that the settings are correct Overseas use problems Symptom Check Cannot perform communication overseas when out of service area is displayed Change the network settings or the setting of overseas communication operator Set Searching network to Manual Confirm Pro...

Page 92: ...erminal Symptom Check Internet connection speed decreased suddenly Speed may be decreased in unsteady areas such as LTE W CDMA HSDPA HSUPA service environment Move it to another place and connect again To perform communication with Windows XP the optimization of PC communication setting is necessary Connect this terminal and a PC with USB Extension Cable and install the driver Confirm that W TCP U...

Page 93: ...ed is not correct An incorrect PIN1 code is entered Click OK and enter the correct PIN1 code Error Messages Description PIN1 code is blocked PIN1 code is locked because PIN1 code has been improperly entered 3 times in a row Click OK enter unblocking PIN code in PUK code and new PIN1 code in New PIN1 code and Confirm PIN1 code Click Apply The PUK code you entered is not correct An incorrect unblock...

Page 94: ...s provided with every terminal Make sure that you receive it Store the warranty in a safe place after you read it and verified that it contains the Shop name date you purchased the product If the written warranty does not contain the necessary information contact the shop where you purchased the product The warranty is valid for a period of one year from the date of purchase This product and all a...

Page 95: ...es However the displayed Network data usage will not be reset For the details about resetting Network data usage see Displaying Network data usage 1 Press both the WPS button and Wi Fi button at the same time for approximate 15 seconds RESET appears on this terminal s screen and the terminal is reset ...

Page 96: ...62mm Approx 12 6 thick part 12 9 mm Weight Approx 83 5g with battery pack installed Continuous communication time LTE Approx 4 hours 3G HSDPA HSUPA W CDMA Approx 5 hours Display LTE Approx 160 hours 3G HSDPA HSUPA W CDMA Approx 320 hours Charging time AC Adapter Approx 200minutes USB Approx 270minutes ...

Page 97: ...Communication method WAN LTE HSDPA HSUPA W CDMA Wireless LAN IEEE802 11b g n Communication speed Packet communication Up to 100Mbps for receiving data Up to 50Mbps for sending data Battery pack Model name Battery Pack Battery type Lithiumion battery Nominal voltage 3 8V Nominal capacity 1 700mAh ...

Page 98: ...ions that cannot maintain at least 0 5 cm approximately 0 2 inches from your body Also when using the USB extension cable place the USB modem away from your body or any other transmitter of the laptop or PC This USB modem has been tested for compliance with FCC IC RF exposure limits in the laptop computers configurations with horizontal and vertical USB slots and can be used in laptop computers wi...

Page 99: ...ressly approved by the manufacturer could void the user s authority to operate the equipment FCC Part 15 Class B Compliance This device and its accessories comply with part15 of FCC rules Operation is subject to the following two conditions 1 This device and its accessories may not cause harmful interference 2 This device and its accessories must accept any interference received including interfer...

Page 100: ...frequency energy and if not installed and used in accordance with the instructions may cause harmful interference to radio communications However there is no guarantee that interference will not occur in a particular installation If you experience interference with reception e g television determine if this equipment is causing the harmful interference by turning the equipment off and then back on...

Page 101: ... exposure to radio waves Your wireless device is a radio transmitter and receiver It is designed and manufactured not to exceed the emission limits for exposure to Radio Frequency RF energy set by the Federal Communications Commission of the U S Government These limits are part of comprehensive guidelines and establish permitted levels of RF energy for the general population The guidelines are bas...

Page 102: ...g at its highest certified power level in all tested frequency bands Although SAR is determined at the highest certified power level the actual SAR level of the device while operating can be well below the maximum value Because the device is designed to operate at multiple power levels to use only the power required to reach the network in general the closer you are to a wireless base station ante...

Page 103: ...SAR levels evaluated as in compliance with the FCC RF emission guidelines SAR information on this device is on file with the FCC and can be found under the Display Grant section of http www fcc gov oet fccid after searching on FCC ID ZNFCR820 Additional information on Specific Absorption Rates SAR can be found on the Cellular Telecommunications Industry Association CTIA website at http www ctia or...

Page 104: ......

Reviews: