background image

HITACHI PROGRAMMABLE CONTROLLER 


APPLICATION MANUAL 


NJI-611B(X) 

IEC 61131-3 Compliant PLC 

(SERVICE MANUAL) 

Summary of Contents for EH-A14EDR

Page 1: ...HITACHI PROGRAMMABLE CONTROLLER APPLICATION MANUAL NJI 611B X IEC 61131 3 Compliant PLC SERVICE MANUAL ...

Page 2: ... If you have ant questions regarding the warranty please contact with your supplier or the local Hitachi Distributor Depending on failure part examination might be impossible Ordering parts or asking questions When contacting us for repair ordering parts or inquiring about other items please have the following details ready before contacting the place of purchase 1 Model 2 Manufacturing number MFG...

Page 3: ...nomic loss However depending on the circumstances items marked with may result in major accidents The both marks show important information Be sure to follow the instructions Icons for prohibited items and required items are shown below Identifies prohibition For example when open flames are prohibited is indicated Identifies requirement For example when grounding must be performed is indicated 1 ...

Page 4: ...ntary power interruptions or other causes Do not share the power supply of relay output and interlock circuitry because relay output might not work properly due to switching noise from interlock circuitry CAUTION When performing program change forced output RUN STOP etc while the unit is running be sure to check system safety carefully Failure to do so could lead to damage to equipment Supply powe...

Page 5: ...ion of revision Date of revision Manual number 1 The first edition Feb 2014 NJI 611 X 2 EtherCAT master and Modbus TCP master added Feb 2015 NJI 611A X 3 20 point Basic unit added and IDE updated to HX CODESYS Oct 2019 NJI 611B X ...

Page 6: ...MEMO ...

Page 7: ... Ethernet communication specifications 2 13 2 12 USB memory port specifications 2 14 2 13 Backup 2 14 2 14 LED indication 2 15 2 15 64 point Basic unit 2 16 2 15 1 Name and function of each part 2 16 2 15 2 Terminal layout and wiring 2 18 2 16 40 point Basic unit 2 19 2 16 1 Name and function of each part 2 19 2 16 2 Terminal layout and wiring 2 21 2 17 20 point Basic unit 2 22 2 17 1 Name and fun...

Page 8: ...2 3 6 7 Global variable 3 23 3 7 Configuration 3 24 3 8 Communication settings 3 25 3 9 Programming 3 27 3 10 Login 3 29 3 11 Boot application 3 32 3 12 Source Download Upload 3 33 3 13 Run Stop Reset 3 34 3 14 Global network variables 3 35 3 15 Modbus TCP RTU 3 38 3 15 1 Introduction 3 38 3 15 2 Modbus TCP master client 3 39 3 15 3 Modbus TCP slave server 3 42 3 15 4 Modbus RTU master 3 43 3 15 5...

Page 9: ...and USB 3 79 3 22 4 Boot from USB 3 79 3 23 USB data logging File system 3 80 3 24 Web visualization 3 83 3 25 Libraries 3 85 3 25 1 How to install 3 85 3 25 2 Real time clock 3 86 3 25 3 Serial communication 3 87 3 26 Troubleshooting 3 89 3 26 1 Error indication 3 89 3 26 2 Error code 3 89 3 27 Version 3 93 3 28 Package Manager 3 94 Chapter 4 Installation 4 1 to 4 8 4 1 Installation 4 1 4 2 Wirin...

Page 10: ...MEMO ...

Page 11: ...put 40 Transistor output 24 short circuit protection 28 Points EH A28EDR AC powered DC input 16 Relay output 12 NJI 419 X Expansion unit EH D28EDR DC powered DC input 16 Relay output 12 EH D28EDT DC powered DC input 16 Transistor output 12 EH D28EDTP DC powered DC input 16 Transistor output 12 EH D28EDTPS DC powered DC input 16 Transistor output 12 short circuit protection 16 Points EH D16ED DC po...

Page 12: ...er shown in Figure 1 1 1 Basic Unit 2 Expansion Unit 2 Expansion Unit 2 Expansion Unit 2 Expansion Unit 3 Expansion cable 3 Expansion cable 3 Expansion cable 3 Expansion cable Figure 1 1 MICRO EHV series PLC System configuration diagram No Device name Description of function 1 Basic Unit Reads input signals executes user application program and writes output signals 2 Expansion Unit Unit of extern...

Page 13: ...c pressure UP to 2000 m min 70kPa during transportation Vibration resistance Conforms to IEC 60068 2 6 Impact resistance Peak acceleration 147m s2 Duration 11ms Direction 3 repeat each impact 3times Noise resistance Noise voltage 1 500 Vpp Noise pulse width 100 ns 1μs Noise input by a noise simulator across input terminals of a power module according to measuring method of Hitachi IES Static noise...

Page 14: ...Serial RS 232C Modbus RTU master slave General purpose Option serial RS 422 485 Modbus RTU master slave General purpose Switch Indications Indications POW LED RUN LED OK LED STATUS LED RUN switch STOP RUN Remote STOP RUN enabled when the switch position is RUN Calendar Clock Support Built in RTC USB memory port Support Program transfer Data logging Web visualization Battery MV BAT for retentive da...

Page 15: ...s 1 s Process data communications PDO mapping using CoE Fail soft operation for slave communications errors Stop operation for slave communications errors SDO communications CoE Emergency message server receptions from slaves SDO requests and responses Configuration Setting node address using EHV CODESYS HX CODESYS network scan Display of network configuration information RAS functions Slave confi...

Page 16: ...EDT 24 V DC DC input 16 Transistor output sink 12 8 28 DIO EH D28EDTP 24 V DC DC input 16 Transistor output source 12 8 28 DIO EH D28EDTPS 24 V DC DC input 16 Transistor output source 12 short circuit protection 8 28 DIO 16 Points Expansion unit EH D16ED 24 V DC DC input 16 8 28 DIO EH D16ER 24 V DC Relay output 16 8 28 DIO EH D16ET 24 V DC Transistor output sink 16 8 28 DIO EH D16ETPS 24 V DC Tra...

Page 17: ...put 2 ch 10 bit OptionBoard OBV 485TAO RS 485 communication with Analog output 2 ch 10 bit OptionBoard OBV AIO Analog input 2 ch 10 bit Analog output 2 ch 10 bit OptionBoard OBV AIG Isolated Analog input 4 ch 14 bit OptionBoard OBV AIG OBV AIOG Isolated Analog input 2 ch 14 bit Isolated Analog output 2 ch 12 bit OptionBoard OBV AIOG OBV RTD Isolated RTD input 2 or 4 ch 200 to 850 C OptionBoard OBV...

Page 18: ...R 720 0 4 0 2 EH D64EDR 640 0 5 EH D64EDT 640 0 4 EH D64EDTPS 640 0 4 EH A28EDR 600 0 2 0 06 EH D28EDR 500 0 3 EH D28EDT 500 0 2 EH D28EDTP 500 0 2 EH D28EDTPS 500 0 2 EH D16ED 260 0 13 EH D16ER 300 0 11 EH D16ET 260 0 03 EH D16ETPS 260 0 04 EH A14EDR 400 0 16 EH D14EDR 400 0 16 EH D14EDT 300 0 16 EH D14EDTP 300 0 16 EH D14EDTPS 300 0 16 EH D8ED 260 0 16 EH D8ER 280 0 16 EH D8ET 260 0 16 EH D8ETPS...

Page 19: ... point type 40 40 point type 24 20 point type 12 Common 40 64 point type 2 20 point type 1 Polarity None Insulation system Photocoupler insulation Input display LED indication External Removable type screw terminal block M3 High speed counter specifications Item Single phase 2 phase Input Bit 0 2 4 6 8 Bit 0 and 2 Bit 4 and 6 Input voltage ON 18 V OFF 5 V Count pulse width 10 μs 17 μs Highest coun...

Page 20: ...erminal block M3 Externally supplied power for driving the relays Not required Contact life 2 20 000 000 times mechanical 200 000 times electrical 1 5A Insulation 1 500V or more external internal 500V or more external external 1 Minimum switching current is the unofficial value as a guide This value may vary with the switching frequency environmental conditions etc 2 Refer the diagram below Life o...

Page 21: ...equired to supply 12 to 30V DC between the V and C terminal externally 3 DC output Output 4 and over on MV D64DT MV D40DT MV D20DT Item Specifications Internal circuit diagram Output specifications Transistor output sink type Internal circuit V 4 C Rated load voltage 24 12 V DC 10 15 Minimum switching current 10 mA Leak current 0 1 mA max Maximum Load current 1 circuit 0 5 A 1 common 64 point type...

Page 22: ... V DC max It is required to supply 12 to 30V DC between the V and C terminal externally 5 DC output Output 4 and over on MV D64DTPS MV D40DTPS MV D20DTPS Item Specifications Internal circuit diagram Output specifications Transistor output Source short circuit protection Internal circuit V 4 C10 Short circuit protection Rated load voltage 24 12 V DC 10 15 Minimum switching current 10 mA Leak curren...

Page 23: ...cause relay outputs cannot react high frequency 2 8 Power supply for sensors 24V terminal on the input terminal block can supply current to the external equipments If this output is used as the power supply for the input of own unit the remaining can be used as power supply for the sensors The current I allowed using as the power supply for sensors can be calculated by the following formula I 430 ...

Page 24: ...unication specifications Specifications of RS 232C communication are shown in Table 2 8 Table 2 8 RS 232C communication specifications Item Specifications Transmission speed 4 800 bps 9 600 bps 19 200 bps 38 400bps 57 600bps 115 200bps Interface RS 232C Maximum cable length 15 m Connection mode 1 1 Synchronization method Start stop synchronization Supported function Modbus RTU master slave General...

Page 25: ...tions 2 11 1 Physical layer interface Pin No Signal name Remarks 1 TXD Transmit Data 2 TXD Transmit Data 3 RXD Received Data 4 Unused 5 Unused 6 RXD Received Data 7 Unused 8 Unused 2 11 2 Ethernet communication specifications Table 2 10 Ethernet communication specifications Item Specifications Ethernet standard Conforms to IEEE802 3 10BASE T 100BASE TX Automatic recognition Transmission modulation...

Page 26: ...81 Max simultaneous open file 10 N o t e 2GB USB memory of FAT16 is not recommended because access speed is not fast enough which could result in overload exception especially for WebVisualization To avoid contact failure due to vibration be sure to use small type USB memory device as follows 2 13 Backup 1 Battery optional Retentive data and RTC realtime clock data can be kept by MV BAT battery as...

Page 27: ...ription POW ON Power source is supplied OFF Power source is not supplied OK ON Normal operation PLC is ready to run Blinking Exception or warning status Refer to Section 3 26 Troubleshooting OFF Initialization status during power up or Error status Refer to Section 3 26 Troubleshooting RUN ON RUN status OFF STOP status STATUS Blinking Initialization status during power up or flash memory is being ...

Page 28: ...ED 22 Battery connector 24 Expansion connector No Item Description 1 POW LED indicates that the power is supplied 2 OK LED represents the result of the self diagnosis in the basic unit Normal ON Abnormal blink or OFF Refer to Section 3 26 Troubleshooting 3 RUN LED displays the operating condition RUN ON STOP OFF 4 STATUS LED blinks until the state in which PLC can RUN from power up 500ms ON 500ms ...

Page 29: ...B memory port USB host function Program transfer Data logging and Web visualization is supported Dip switch User program can be downloaded uploaded or verified according to switch position Refer to section 3 22 for details USB LED LED indicates the status of USB memory function 22 Battery connector This is a connector to battery Following data are maintained by battery 1 Data specified as VAR RETA...

Page 30: ...tput 5 to 30VDC 5 to 250VAC 2 MV D64DR DC power type Input wiring is same as MV A64DR 0V FE 24V NC 0 1 2 3 4 5 C10 NC 6 7 C11 NC 8 9 10 11 C12 NC 12 13 C13 NC 14 15 C14 NC 16 17 C15 NC 18 19 C16 NC 20 21 C17 22 23 C18 Power supply 24VDC Power for load Relay output 5 to 30VDC 5 to 250VAC 3 MV D64DTPS DC power type Input wiring is same as MV A64DR 0V FE 24V NC 0 1 2 3 C10 C10 V10 V10 4 5 6 7 8 9 10 ...

Page 31: ... LED 22 Battery connector 24 Expansion connector No Item Description 1 POW LED indicates that the power is supplied 2 OK LED represents the result of the self diagnosis in the basic unit Normal ON Abnormal blink or OFF Refer to Section 3 26 Troubleshooting 3 RUN LED displays the operating condition RUN ON STOP OFF 4 STATUS LED blinks until the state in which PLC can RUN from power up 500ms ON 500m...

Page 32: ...memory port USB host function Program transfer Data logging and Web visualization is supported Setting switch User program can be downloaded uploaded or verified according to switch position Refer to section 3 22 for details USB LED LED indicates the status of USB memory function 22 Battery connector This is a connector to battery Following data are maintained by battery 2 Data specified as VAR RE...

Page 33: ...40VAC Power for load Relay output 5 to 30VDC 5 to 250VAC 2 MV D40DR DC power type Input wiring is same as MV A40DR 0V FE 24V NC 0 1 2 3 4 5 C10 NC 6 7 C11 NC 8 9 10 11 C12 NC 12 13 C13 NC 14 15 C14 C14 Power supply 24VDC Power for load Relay output 5 to 30VDC 5 to 250VAC 3 MV D40DTPS DC power type Input wiring is same as MV A40DR 0V FE 24V NC 0 1 2 3 C10 C10 V10 V10 4 5 6 7 8 9 10 11 12 13 14 15 C...

Page 34: ... LED 22 Battery connector 24 Expansion connector No Item Description 1 POW LED indicates that the power is supplied 2 OK LED represents the result of the self diagnosis in the basic unit Normal ON Abnormal blink or OFF Refer to Section 3 26 Troubleshooting 3 RUN LED displays the operating condition RUN ON STOP OFF 4 STATUS LED blinks until the state in which PLC can RUN from power up 500ms ON 500m...

Page 35: ...memory port USB host function Program transfer Data logging and Web visualization is supported Setting switch User program can be downloaded uploaded or verified according to switch position Refer to section 3 22 for details USB LED LED indicates the status of USB memory function 22 Battery connector This is a connector to battery Following data are maintained by battery 3 Data specified as VAR RE...

Page 36: ...C Power for load Relay output 5 to 30VDC 5 to 250VAC 2 MV D20DR DC power type Input wiring is same as MV A20DR 0V FE 24V NC 0 1 2 3 4 5 C10 NC 6 7 C11 NC NC NC NC NC NC NC NC NC NC NC NC NC NC NC Power supply 24VDC Power for load Relay output 5 to 30VDC 5 to 250VAC 3 MV D20DTPS DC power type Input wiring is same as MV A20DR 0V FE 24V NC 0 1 2 3 C10 C10 V10 V10 4 5 6 7 NC NC NC NC NC NC NC 1 NC 5 C...

Page 37: ... OFF 3 Expansion cover Left side The cover for the expansion connector Used when connecting to the expansion cable from the front unit 4 Input terminals The terminal block to connect input signals The terminal screw size is M3 The terminal block supports 0 32 to 2 1 mm2 AWG22 to 14 If 2 crimping terminals are connected to one terminal screw use 0 32 to 1 3 mm2 AWG22 to 16 cable 5 Output terminals ...

Page 38: ...Output EH D64EDR DC power type Input wiring is same as EH A64EDR Power supply 24VDC Power for load Relay output 5 to 30VDC 5 to 250 VAC 0V FE 24V NC 0 1 2 3 4 5 C10 NC 6 7 C11 NC 8 9 10 11 C12 NC 12 13 C13 NC 14 15 C14 NC 16 17 C15 NC 18 19 C16 NC 20 21 C17 22 23 C18 Output EH D64EDTPS DC power type Input wiring is same as EH A64EDR Power supply 24VDC Power for load 12 24VDC 0V FE 24V NC 0 1 2 3 C...

Page 39: ...ower supply 100 to 240V AC Power for load Relay output 5 to 30V DC 5 to 250V AC NC EH D28EDR DC power type Input wiring is same as EH A28EDR C0 Power supply 24V DC C6 24V 19 C0 17 26 C1 C2 C3 C4 C5 C6 0V 16 18 20 25 27 24 21 23 22 Power for load Relay output 5 to 30V DC 5 to 250V AC NC Output EH D28EDTPS DC power type NC 20 0V 0 24V 1 2 3 C0 4 5 6 7 C1 8 9 10 11 C2 C2 12 13 14 15 C3 C3 24V 0V 16 1...

Page 40: ...3 24V 0V 16 17 NC 19 20 21 C0 18 NC V1 23 24 25 NC C1 C1 22 26 27 Power supply 24V DC Power for load 12 24V DC Input Power 24V DC Input Output EH D28EDT DC power type Input wiring is same as EH D28EDTP 27 V1 V0 24V 17 20 18 NC 23 25 C1 26 0V 16 NC 19 21 C0 V1 24 NC C1 22 Power supply 24V DC Power for load 12 24V DC Output ...

Page 41: ...e Power supply 24V DC 18 17 16 C0 19 21 20 23 22 NC C1 NC 25 24 27 26 29 28 31 30 C2 0V 24V Power for load Relay output 5 to 30V DC 5 to 250V AC Power for load Relay output 5 to 30V DC 5 to 250V AC EH D16ETPS DC power type EH D16ET DC power type Power supply 24V DC Power for load12 24V DC 16 V0 C0 18 17 20 19 22 21 24 23 25 C1 NC 26 V1 28 27 30 29 31 0V 24V Power for load 12 24V DC Power supply 24...

Page 42: ... Input wiring is same as EH A14EDR Power for load Relay output 5 to 30V DC 5 to 250V AC Power supply 24V DC 0V 24V C0 16 C1 17 19 18 21 20 C2 Output EH D14EDTP EH D14EDTPS DC power type For the DC input both sink and source types are available It is possible to reverse the polarity of 24 V DC Power for load 12 24V DC Power supply 24V DC Input Power 24V DC 0 24V 0V 2 1 C0 3 5 4 7 6 C1 0V 24V 17 16 ...

Page 43: ...V DC 0 24V 0V 2 1 C0 3 5 4 7 6 C1 NC NC NC NC NC NC NC NC NC 0V 24V Power supply 24V DC EH D8ER DC power type Power for load Relay output 5 to 30V DC 5 to 250V AC Power supply 24V DC 18 17 16 C0 19 21 20 23 22 NC C1 NC NC NC NC NC NC NC NC NC NC 0V 24V EH D8ETPS DC power type Power for load 12 24V DC Power supply 24V DC 16 V0 C0 18 17 20 19 22 21 NC 23 NC NC NC NC NC NC NC NC NC NC 0V 24V ...

Page 44: ...load Relay output 5 to 30V DC 5 to 250V AC Input power 24V DC 0 24V 0V 2 1 C0 3 NC NC NC NC NC C0 16 C1 17 19 18 NC NC C2 Input Output Power supply 24V DC 24V 0V EH D8EDTPS DC power type EH D8EDT DC power type Power for load 12 24V DC Power supply 24V DC Input power 24V DC 0 24V 0V 2 1 C0 3 NC NC NC NC NC 0V 24V 17 16 18 NC NC 19 V0 NC C0 Input Output Input Output Power for load 12 24V DC Power su...

Page 45: ... OC7 IO6 NC AC NC IO7 VO6 OC6 AC Output voltage 0 to 10V Ch 2 Ch 3 Ch 4 Ch 7 Current input and output Input and output are configured separately IN4JP IN4 IN3 IN2JP IN2 IN1 IN4 IN3JP IN3 IN2 IN1JP IN1 NC VO7 OC7 IO6 NC AC NC IO7 VO6 OC6 AC Input current 0 to 20mA Output current 0 to 20mA Power supply 100 to 240VAC Ch 6 Ch 1 Ch 2 Ch 3 Ch 4 Ch 7 EH D6EAN DC power type Input and output wirings are sa...

Page 46: ... EH D6ERTD DC power type Example of RTD input and Current output Power supply 24VDC Input temperature 100 to 600 C Output current 0 to 20mA 4 to 20mA Pt100 Ch1 Ch2 Ch3 Ch4 Ch6 Ch7 IN4b IN4A IN3B IN2b IN2A IN1B IN4B IN3b IN3A IN2B IN1b IN1A NC VO7 OC7 IO6 NC 0V NC IO7 VO6 OC6 24V EH A4ERTD AC power type EH D4ERTD DC power type Power supply 100 to 240VAC Input temperature 100 to 600 C Pt100 Ch1 Ch2 ...

Page 47: ... 24VDC Ch1 Ch2 Ch3 Ch4 IN4 IN3 IN2 IN1 NC NC IN4 IN2 IN1 CJ CJ VO7 OC7 IO6 NC NC 0V IO7 VO6 OC6 NC 24V Ch6 Ch7 IN3 Voltage output VO7 OC7 IO6 NC NC 0V IO7 VO6 OC6 NC 24V Ch6 Ch7 Output voltage 0 to 10V EH D4ETC DC power type Cold junction Thermocouple Sensor 200 to 1700 C Power supply 24VDC Ch1 Ch2 Ch3 Ch4 IN4 IN3 IN2 IN1 NC NC IN4 IN3 IN2 IN1 CJ CJ NC NC NC NC NC 0V NC NC NC NC 24V ...

Page 48: ...2 Specifications 2 36 2 19 External dimensions 64 point basic expansion unit 20 point 40 point basic unit and 28 point expansion unit 16 point 14 point 8 point and Analog RTD Thermocouple expansion unit Unit mm ...

Page 49: ...ramming function is fixed to RS 485 2 Communication LED Flashes data transmission reception 3 Basic unit connector This is a connector to basic unit 4 Terminating resistance switch This is a switch to select to enable disable the 120Ω built in termination resistor ON Enabled OFF Disabled Terminal layout Pin No Signal Meaning Internal circuit 8 1 Socket connector Top view 1 N C Not used Micro Proce...

Page 50: ...able diameter Single wire 0 2 mm2 to 1 5 mm2 Strand wire 0 2 mm2 to 1 0 mm2 5 Terminating resistance switch This is a switch to select to enable disable the 120Ω built in termination resistor ON Enabled OFF Disabled Terminal layout Pin No Signal Meaning Internal circuit 8 1 Socket connector Top view 1 SG Signal ground Micro Processor SDP SDN RDN RDP TERM SG VCC N C 120 Terminating resistance switc...

Page 51: ...Single wire 0 2 mm2 to 1 5 mm2 Strand wire 0 2 mm2 to 1 0 mm2 2 OBV 485TAI OBV 485TAO Analog Output terminal OBV AIO 3 OBV 485TAI 485TAO LED SD blinks when data is sent RD blinks when data is sent or received OBV AIO There is no LED 4 Common Connector A connector is located at the back side to connect basic unit Communication port signal and internal circuit Terminal layout No Signal Meaning Inter...

Page 52: ...less Input impedance Approx 100 kΩ Isolation Channel and Internal circuit Not isolated Between channels Not isolated Analog input specifications OBV 485TAO AIO Item Specifications No of output 2 Channel Output range 0 to 10V 10 24V max Accuracy 1 or less of full scale value Resolution 10 bits AD conversion time 8ms 2 Channel External wiring 2 core shield cable 3 m or less Load impedance More than ...

Page 53: ...s Cable diameter Single wire 0 2 mm2 to 1 5 mm2 Strand wire 0 2 mm2 to 1 0 mm2 OBV RTD RTD input terminal 2 OBV AIG Analog input terminal Terminals to connect analog I O signals or RTD input signals Cable diameter Single wire 0 2 mm2 to 1 5 mm2 Strand wire 0 2 mm2 to 1 0 mm2 OBV AIOG Analog output terminal OBV RTD RTD input terminal 3 OBV AIG OBV AIOG DIP switches DIP switches to change voltage cu...

Page 54: ...e of shipment from factory Switch No Setting Figure of setting Setting items OBV AIG OBV AIOG SW1 1 OFF 1 2 SW2 ON SW1 1 2 ON IN1 Voltage input IN1 Voltage input ON 1 2 SW2 ON SW1 1 2 ON IN1 Current input IN1 Current input SW1 2 OFF 1 2 SW2 ON SW1 1 2 ON IN2 Voltage input IN2 Voltage input ON 1 2 SW2 ON SW1 1 2 ON IN2 Current input IN2 Current input SW2 1 OFF 1 2 SW2 ON SW1 1 2 ON IN3 Voltage inpu...

Page 55: ...4 IN2 CH2 input 5 IN3 CH3 input 6 IN3 CH3 input 7 IN4 CH4 input 8 IN4 CH4 input 2 OBV AIOG terminal layout Terminal layout No Signal Function Internal circuit IN2 IN1 Analog input OUT1 OUT2 5 6 7 8 1 2 3 4 1 IN1 CH1 input Internal circuit 1 IN1 3 IN2 2 IN1 4 IN2 120k 250 Voltage Current 30k SW1 1 SW1 2 2 IN1 CH1 input 3 IN2 CH2 input 4 IN2 CH2 input Analog output OUT1 OUT2 IN2 IN1 2 3 4 1 7 8 5 6 ...

Page 56: ... 3b 8 NC Pt100 2 1b CH1 input 3 1B CH1 input B 4 NC 5 3A CH3 input A 6 3b CH3 input 7 3B CH3 input B 8 NC 4 OBV RTD terminal layout 2 wire Terminal layout No Signal Function Internal circuit RTD input 4B 4A 3B 3A 3B 3b 3A 2B 2A 1B 1A 1B 1b 1A 3 wire 2 wire 3 wire 2 wire 1 2 3 4 7 8 5 6 1 1A CH1 input A Internal circuit 1 1A 3 2A 2 1B 4 2B 0 49mA Pt100 5 3A 7 4A 6 3B 8 4B 2 1B CH1 input B 3 2A CH2 ...

Page 57: ...esolution Voltage output 0 to 10 V 0 to 4 000 Current output 0 to 20 mA 0 to 4 000 Accuracy 1 At 25 3 C 0 4 FS Temperature coefficient 0 01 C FS Conversion time 4 ms 1 to 20 2 channels Output load impedance Voltage output Min 1 k Current output 1 to 500 Max 10V Cable Shielded cable length Max 20 m Isolation Channel internal circuit Isolated Between channels None isolated 1 e g Accuracy at 35 C in ...

Page 58: ...CRO EHV OBV 485A Termination resistor 120Ω 1 2W 1 SG 4 SDP 5 SDN 6 RDN 7 RDP 8 TERM 1 SG 4 SDP 5 SDN 6 RDN 7 RDP 8 TERM Peripheral device MICRO EHV OBV 485A The example of the cable connection of RS 485 I F is shown below SG SN SP MICRO EHV OBV 485A Termination resistor 120Ω 1 2W 1 SG 4 SDP 5 SDN 6 RDN 7 RDP 8 TERM 1 SG 4 SDP 5 SDN 6 RDN 7 RDP 8 TERM Peripheral device MICRO EHV OBV 485A OBV 485TAI...

Page 59: ...th ends of the communication cable 2 Make wiring unconnected the SG signal ground of each device 3 Lower the transfer rate 4 Attach the ferrite core to the communication cable in a noisy environment 2 20 6 Installation of option board Remove the two covers A and B from the basic unit B A B A 1 Plug the connector of option board to the connector of the basic unit For the prevention of the connector...

Page 60: ...sic unit and the expansion unit or the expansion unit to each other There is no directivity in the cable Connect the right side to the left side of each unit PLC does not work correctly in improper connection Basic Unit Expansion Unit Expansion Unit Expansion Unit Expansion Unit Expansion cable Expansion cable Expansion cable Expansion cable EH MCB01 EH MCB01 is an accessory of expansion units EH ...

Page 61: ...m Windows XP SP3 Vista 7 32 64 bit 8 8 1 10 3 1 2 Installation of HX CODESYS Before installation shut down all other Windows applications If not the installation may not be finished correctly The version of HX CODESYS in this application manual is V3 5 SP8 Patch 4 1 The installation wizard starts up automatically by double click Setup_HXCODESYS Version exe on HX CODESYS installation DVD 2 Follow t...

Page 62: ...allation depending on the specifications of PC N o t e Several Microsoft components are necessary to be installed for HX CODESYS If they are not installed in your PC the installation of HX CODESYS stops and a dialog appears Click Install at the dialog to extract from setup file ...

Page 63: ... in the product To prevent communication error by noise prepare USB cable with ferrite core 2 Popup window appears at right bottom of screen Click the popup window 3 Click Close in this dialog skip to search the driver in PC 4 Open Device Manager right click on Default in Other devices and choose Update Driver Software ...

Page 64: ...Chapter 3 Programming 3 4 5 Enter the below path and click Browse to install the USB driver 6 Click Install 7 If the installation is finished successfully below dialog appears ...

Page 65: ...nu All programs HX CODESYS HX CODESYS Version then the start page is displayed Click icon or choose File New Project to create a new project file Then New Project dialog box appears Choose Standard project enter new file name specify location and click OK ...

Page 66: ...ic Diagram LD Sequential Function Chart SFC Structured Text ST Initial layout of the project is shown like this Devices and Massages window may not be shown at the first startup They can be viewed with the menu View If Devices device tree is behind the POUs tab click Devices tab to show it Double click on POU PLC_PRG to open Editor and Variable declaration Editor Variable declaration Devices Messa...

Page 67: ... only CPU unit is used Right click on Expansion units and choose Scan For Devices Then Scan Devices dialog appears Click Copy all devices to project N o t e Be sure to perform Scan For Devices after login and logout Scan For Devices works only when logout however gateway and active path must be set and opened once in advance Instead of Scan For Devices expansion units can be added manually by choo...

Page 68: ...e expansion unit according to the list below Model names Device Names EH A64EDR MICRO EXP 64 Digital I O EH D64E EH A28EDR MICRO EXP 8 28 Digital I O EH D28E EH D16E EH A14EDR EH D14E EH D8E EH A6EAN MICRO EXP Analog I O EH D6EAN EH A6ERTD EH D6ERTD EH A4ERTD EH D4ERTD EH D6ETC EH D4ETC ...

Page 69: ...Device to configure option board Configure option board according to the list below Model names Device Names OBV NES Option_Board OBV 485A OBV 485TAI OBV 485TAO OBV AIO OBV AIG Option_Board OBV AIG OBV AIOG Option_Board OBV AIOG OBV RTD Option_Board OBV RTD ...

Page 70: ...Device Then Update Device window appears Choose one of the devices and click Update Device button If necessary click at Display all versions for experts only and choose the certain device N o t e Display all versions for experts only is displayed in professional mode only If you use standard mode please switch to professional mode by choosing Tool Options as shown in the section 3 2 Startup ...

Page 71: ...as below Global variable Double click on plugged I O module or right click and choose Edit Object I O Mapping window appears as below Due to Motorola type byte order of RX processor IEC address is not started with 0 0 as follows Since the bit number shown at Channel corresponds to actual signal number put variable names according to the bit number ...

Page 72: ... system After defining variable names they will be automatically listed up when it is used in all POU with assist of auto complete If a variable is already used declared in POU or global variable list it can be taken by clicking icon in I O mapping window icon appears by clicking empty field ...

Page 73: ... used in the first time Auto Declare window will appear as below In this window there is an input field Address Enter I O address in this field according to data types If it is remained as blank the variable will be mapped in memory area After clicking OK button declared information is added automatically as below Declaration field ...

Page 74: ... QX2 0 Bit 15 IX6 7 Bit 15 QX2 7 Bit 16 IX5 0 Bit 16 QX1 0 Bit 23 IX5 7 Bit 23 QX1 7 MSB Bit 24 IX4 0 Bit 31 IX4 7 Bit 32 IX3 0 Bit 39 IX3 7 MSB Internal I O address example Bit number BOOL BYTE WORD DWORD LWORD Bit 0 MX7 0 MB7 MW3 MD1 ML0 LSB Bit 7 MX7 7 Bit 8 MX6 0 MB6 Bit 15 MX6 7 Bit 16 MX5 0 MB5 MW2 Bit 23 MX5 7 Bit 24 MX4 0 MB4 Bit 31 MX4 7 Bit 32 MX3 0 MB3 MW1 MD0 Bit 39 MX3 7 Bit 40 MX2 0 ...

Page 75: ...age for further information Execute program You might determine the outputs behaviour by a program available within the project Enter the name of this program here and it will be executed when the PLC gets stopped Via button the input Assistant can be used for this purpose Update all variables in all devices If this option is activated then for all devices of the current PLC configuration all I O ...

Page 76: ...ne task as shown below POU POU stands for Program Organization Unit This can be assumed as a paper to create your program Only one programming language can be used in one POU If you need another language add POU by right click on Application and choose Add object POU and choose language ...

Page 77: ...cle time of the task then CPU stops with processor load exception detected error code 25 Event task The task will be started as soon as the variable defined in the field gets a rising edge Freewheeling task The task will be processed as soon as the program is started and at the end of one run will automatically restarted in a continuous loop There is no cycle time defined Be noted that the priorit...

Page 78: ...ject In case of local variable POU name is defined Initialization Initial value when program starting can be set here If it s blank initialization value is 0 Address No need to enter I O address HX CODESYS will assign to free address automatically Comment Any text comment can be input Flags CONSTANT Enter a value in the Initialization field RETAIN The value is maintained by a battery after switch ...

Page 79: ...address MD10 MW20 and MW21 Then high word and low word can be accessed separately with using M addresses The relation between each data types are same as page 3 14 Just replace Q with M The marker memory does not support RETAIN nor PERSISTENT flags Variable declaration Login display The max size of marker memory is 16KB Supported address range is shown below Data type Address range BOOL MX0 0 to M...

Page 80: ...EST Test55 _Test Not allowed 2test Starting with numeric character test__200 Trailing underscores are not allowed test 5 Minus sign is not allowed test 3 Other signs than underscore are not allowed test 3 Space is not allowed IF Reserved word 3 6 4 Numeric literals Numeric literals are specified as follows Types Examples Applicable for Integer 12 0 123_456 986 10 1234 Underscore is ignored Real 12...

Page 81: ...conds Ex T 100S12ms t 0 1s 13 LREAL Long reals 64 1 7976931348623 E 308 to 2 2250738585072 E 308 14 STRING Variable length single byte character string 8 n 1 to 255 char 15 LINT Long integer 64 263 263 1 16 ULINT Unsigned long integer 64 0 to 264 1 17 LWORD Bit string of length 64 64 0 to 264 1 18 DATE Date 32 year month day Ex DATE 1996 05 06 d 1972 03 29 19 DATE_AND_TIME Date and time of Day 32 ...

Page 82: ...s empty this variable will be assigned in a certain memory area of CPU Click OK button this variable is registered in declaration part of POU as below This variable is valid only in the POU Even if same variable name is used in another POU Auto Declare window will appear and it will be assigned in another memory location and handled as different variable ...

Page 83: ...n all POUs Global Variable List must be created by right click on Application as below If new variable name is used in POU Auto Declare window appears as shown in local variables Choose VAR_GLOBAL at Scope as below New variable name test_input2 is registered in GVL as below instead of POU ...

Page 84: ...erformed Digital Filter Digital filter is applied on the input of both basic unit and expansion units The setting range is 1 to 40 and this function works with the value multiplied by 0 5ms Battery error detection Enable MICRO EHV detects battery error error code 71 Disable MICRO EHV does not detect battery error error code 71 Default settings N o t e The parameter Ethernet port Link speed Duplex ...

Page 85: ...ight click and choose Edit Object Device window will appear as below Choose Communication Settings tab and click Add gateway Gateway window will appear Click OK Sine the communication type between HX CODESYS and gateway in PC is TCP IP displayed driver name is TCP IP regardless of CPU s communication types ...

Page 86: ...tings are completed CPU name Target ID MV 64 16 10700006 MV 40 16 10700007 MV 20 16 10700014 N o t e Even if both Ethernet cable and USB cable are connected only the first detected device is displayed If the filter is changed from Target ID to None all types of devices in the network are found At the first time after USB driver installed it could fail to found MICRO EHV correctly in case of Window...

Page 87: ...o POU as below Contact Drag from ToolBox to Start here Menu FBD LD IL Insert Contact Right mouse click Insert Contact Shortcut key Ctrl K Coil Drag from ToolBox to Add output or jump here Menu FBD LD IL Insert Coil Right mouse click Insert Coil Shortcut key Ctrl A If new variable name is used Auto Declare window appears automatically Edit each input field and check boxes if necessary and Click OK ...

Page 88: ...Chapter 3 Programming 3 28 Parallel contact across several contacts Click several contacts with shift key and choose Insert Contact Parallel in right mouse click menu or press Ctrl R key ...

Page 89: ...t to be corrected N o t e If unknown message appears it is recommended to Clean all in Build menu All compile information is deleted by this operation When all errors are removed as below click or choose Login in Online menu to download the program to CPU If no application is in the CPU this message appears Click Yes to download If unknown version of application is in the CPU this message appears ...

Page 90: ...f connected expansion units are matched with configured ones green icon is displayed at each expansion unit also If any mounted I O module is mismatched red triangle icon is displayed at mismatched module as below right side Online monitoring After login actual status of variables are shown as below ...

Page 91: ...ues will be transferred to PLC Online change To change your program in running CPU online change you have to logout at first After program changing choose Login again You will have 3 options as below Login with online change Only incremental program is downloaded without CPU stop Login with download Whole the program is downloaded CPU is forced to stop Login without any change New program is not d...

Page 92: ...he application is copied from FLASH to RAM and executed automatically if RUN STOP switch is in RUN position Optional Timing to download boot application can be configured in Properties of Application Right click on Application of the project tree The default setting is shown below FLASH HX CODESYS Visualization Profile Referenced devices Referenced libraries CPU RAM Source Boot application Copied ...

Page 93: ...riginal program file shown below as case b and c a Online change from PC with source file to CPU without source file Login b Online change from PC without source file to CPU with source file and DL info Source upload and Login c Online change from PC without source file to CPU with source file Source upload and Login then program download is required because HX CODESYS is not able to verify progra...

Page 94: ...eption status is cleared only by Reset operation HX CODESYS has 3 different types of Reset operation Reset warm Reset cold and Reset origin All of them can initialize exception status but behaviors of CPU are different as shown below Be noted that Reset origin initializes not only an exception but also your application and boot application in CPU module Operation VAR VAR RETAIN VAR PERSISTENT Appl...

Page 95: ... Sender Network type Choose UDP Task Choose any one task The variables are sent at the end of a task cycle List identifier If more than 2 global variable list is configured set a number in ascending order Cyclic transmission Since variables are sent every task cycle set interval time as same or bigger than cycle time of configured task If smaller time than task cycle is set actual sending cycle is...

Page 96: ...ram is written in POU as below CPU Receive The next step is configuration for receiving CPU Right click on Application of Receive CPU and choose Network Variable List Receiver Be sure to check if Sender is properly set as configured list above Configuration is completed for both send and receive CPU ...

Page 97: ...cation path for Receive CPU and login download application You can see the variable test_var is counting up in the global network variable list in the Receive CPU N o t e If any parameters of global variable list is changed be sure to execute Clean or Clean All before login If more than 2 global variable lists are configured be sure to set another List identifier in ascending order Active Active C...

Page 98: ... Single Register X X 0x0F 15 Write Multiple Coils X 0x10 16 Write Multiple Registers X X 0x17 23 Read Write Multiple Registers X X X Supported Not supported Modbus command processing is executed in bus cycle task which is configured in PLC settings of Device as below You can specify any existing IEC tasks If the bus cycle task is unspecified task with the shortest cycle time is taken N o t e When ...

Page 99: ... Add device window opened click Ethernet in the device tree Then available devices will be shown in the Add Device window Click Modbus TCP master and Add Device button With Add device window opened click Modbus_TCP_master in the device tree Then Modbus TCP Slave is shown in the Add Device window Click Modbus TCP slave and Add Device button according to your Modbus system configuration e g if 3 sla...

Page 100: ...e unit to open configuration window Set IP address response timeout and port number as below Unit ID is used when a Modbus gateway Ethenet to serial device is used Open Modbus Slave Channel tab and click Add Channel to add function codes Configure Be sure to configure all slave modules to be controlled ...

Page 101: ... of T1 T2 Tn is the minimum time to keep low or high the trigger bit But this is very approximate value and it is not easy to know T1 Recommended time would be 50 to 200ms or more depending on the number of channels If long size data is sent from CPU in low baud rate eg 255 byte in 2 400 bps takes about 1 second 25 error processor load watch dog is detected independent from cycle time of bus cycle...

Page 102: ...t and choose Add Device Click Modbus TCP Slave Device in the Add Device window and Add Device button Configure each parameter as below According to the size of Holding Registers and Input Registers data area will be assigned as seen in Modbus TCP Slave Device I O Mapping tab N o t e It is necessary to supply the power to MICRO EHV before establishing a TCP connection from master devices ...

Page 103: ...vice and choose Add Device Add Device window appears Click Modbus COM and Add Device button With Add device window opened click Modbus_COM in the device tree Then available devices will be shown in the Add Device window Choose Modbus Master COM Port and Add Device button ...

Page 104: ...g if 3 slaves are to be controlled add 3 times of slave devices Double click on Modbus_COM or right click and choose Edit Object Modbus_COM Configuration window appears Set 1 body or 2 option board as COM port number Set parameters in this configuration window Function codes to be sent are configured in each slave Double click a slave unit to open configuration window Set slave address and respons...

Page 105: ...er as below If the Trigger setting is Rising edge trigger variable BOOL will be automatically assigned in QX address Data of Modbus will be assigned to IW or QW as seen in ModbusGenericSerialMaster I O Mapping tab Read data from slave is assigned to input area IW and data to be written to slave is assigned to output area QW ...

Page 106: ... master Right click on Modbus_COM and choose Add Device Click Modbus Serial Device in the Add Device window and Add Device button Configure each parameter as below According to the size of Holding Registers and Input Registers data area will be assigned as seen in Modbus Serial Device I O Mapping tab ...

Page 107: ...k EtherCAT Master and Add Device button With Add device window opened click EtherCAT_Master in the device tree Then available devices will be shown in the Add Device window Click slave units according to your system configuration and Add Device button If requested slave unit is not found in the Add Device window ESI file XML file is missing Get it from slave suppliers and install by choosing Tools...

Page 108: ...unication settings Double click on EtherCAT_Master or right click and choose Edit Object to open EtherCAT_Master window Click Browse button If active path is correctly set the CPU is detected in Select Network Adapter dialog box as below Click OK to set the MAC address of the CPU in Source Address MAC as below ...

Page 109: ...r the default value of Interval 4000 s must be changed to bigger In addition the cycle time EtherCAT task must be smaller than the cycle time of MainTask and other tasks If this value is too small to execute IEC program 25 error processor load watchdog will be detected The minimum interval time depends on several different factors as follows CPU load rate The size of user program for other tasks t...

Page 110: ...d from EtherCAT I O mapping Following information is based on our slave controller EH IOCA Declaration in EtherCAT I O mapping is about two times faster than declaration in POU EtherCAT cycle time depends on the total size of EtherCAT slaves It increases about 70 s word EtherCAT cycle time depends on the number of EtherCAT slaves It increases about 700 s unit ...

Page 111: ...I O refresh of standard I O started because of configuration between EtherCAT master and all slaves as below If this delay is not accepted use a special bit register EtherCAT_Master xConfigFinished which turns on when EtherCAT configuration is finished The below codes are sample program in ST Sample program Power ON I O refresh std I O I O refresh EtherCAT Configuration between master and slaves R...

Page 112: ... will limit the communication performance 3 16 7 Important restrictions Byte swapping If slave units of 16 32 64 bit channels are used be sure to configure Enabled 2 in Always update variables in each slave mapping dialog otherwise all I O data are byte swapped This Enabled 2 in Always update variables has been available since CODESYS V3 5 SP5 or newer version Even if Enabled 2 is configured it is...

Page 113: ... library 3 5 5 0 Auto restart slaves may not work always when power of slave unit is rebooted If slave units are rebooted while the networking is running restore the network by reset warm cold or rebooting CPU module Scan for Devices I O modules mounted on EH IOCA or other slaves information are not read out correctly with Scan for Devices It was improved in IoDrvEtherCAT library 3 5 6 20 The coun...

Page 114: ...are listed as below bit 0 IX7 0 bit 1 IX7 1 bit 2 IX7 2 bit 3 IX7 3 bit 4 IX7 4 bit 5 IX7 5 bit 6 IX7 6 bit 7 IX7 7 bit 8 IX6 0 bit 9 IX6 1 Single phase ch 1 ch 2 ch 3 ch 4 ch 5 2 phase ch 1 A ch 1 B ch 1 Z ch 3 A ch 3 B ch 3 Z Interrupt ch 1 ch 2 ch 3 ch 4 ch 5 Since the same input addresses are shared by single and 2 phase counters available combinations of 2 phase and single counter are shown a...

Page 115: ...rs and choose Add Device Then Add Device window appears Click 2Phase counter ch1 or ch3 and Add Device button Double click on _2Phase_counter_chx or right click and choose Edit Object 2 phase counter configuration window appears 2 phase counter has Configuration tab and Mapping tab as below ...

Page 116: ...e Rising edge Rising edge Falling edge Mapping Name I O Type Descriptions Enable Output QX BOOL TRUE Counter is enabled FALSE Counter is disabled Counter Input ID DWORD Counted value is stored in this register 0 to 4 294 967 295 When the counter value exceeds the maximum or minimum value it returns to 0 or 4 294 967 295 Counter mode 1 2 3 4 5 6 7 8 7 6 5 4 3 2 0 1 0 Counter value Phase A Phase B 2...

Page 117: ... choose Add Device Then Add Device window appears Click Single counter chx and Add Device button Double click on Single_counter_chx or right click and choose Edit Object Single counter Mapping window appears Single counter does not have Configuration tab which is different from 2 phase counters ...

Page 118: ...s disabled When the counter value exceeds the maximum or minimum value it returns to 0 or 4 294 967 295 Operations Counter can be controlled by variables and function blocks as below Operations Variable or FB Name ROM version Start Stop counter Variable Enable QX Read counter value Variable Counter ID 3 5 3 40 to 41 Function block MV_CU_Read 3 5 3 42 or newer Write current counter value Function b...

Page 119: ...tion window No function block is required to read counter value CPU ROM VER 3 5 3 42 or newer It is recommended to use a dedicated library instead of the variable ID because later counter value can be read than the variable Refer to the following description Library to operate counter Dedicated library must be added to the project to read write counter value and preset values Double click on Libra...

Page 120: ...ion block is to set preset value 1 and 2 for specified channel of counter Name Type I O Descriptions xExecute BOOL IN A rising edge starts the execution byChannel BYTE IN Channel number 2 phase counter 1or 3 Single counter 1 to 5 dwPreset1 DWORD IN 0 to 4 294 967 295 dwPreset2 DWORD IN 0 to 4 294 967 295 xDone BOOL OUT Execution done successfully xError BOOL OUT Error occurred MV_CU_Write FB name ...

Page 121: ...sk Configuration window appears Click System Events tab Click Add Event Handler then ADD Event Handler window appears Choose a counter event from Counter 1 to 5 in Event and enter a name in Function to call Click OK button then FUNCTION will be created When new FUNCTION is created a variable EventPrm type STRUCT EVTPARAM_Counterset is automatically defined in the FUNCTION This variable consists of...

Page 122: ...ble EventPrm byChannelIndex in the FUNCTION If counter value exceeds preset 1 then 1 is stored in EventPrm byChannelIndex Functions contain no internal state information Use global variables including local I O external I O in functions Local I O external I O used only in functions is not updated Make sure to use in other programs or function blocks also Sample program Preset2 Preset1 FUNCTION cal...

Page 123: ...ION under the task called accordingly Desired program can be written in this FUNCTION Available I O addresses of high speed counter and interrupt input are listed as below bit 0 IX7 0 bit 1 IX7 1 bit 2 IX7 2 bit 3 IX7 3 bit 4 IX7 4 bit 5 IX7 5 bit 6 IX7 6 bit 7 IX7 7 bit 8 IX6 0 bit 9 IX6 1 Single phase ch 1 ch 2 ch 3 ch 4 ch 5 2 phase ch 1 A ch 1 B ch 1 Z ch 3 A ch 3 B ch 3 Z Interrupt ch 1 ch 2 ...

Page 124: ...nterrupt chx and Add Device button Double click on Interrupt_chx or right click and choose Edit Object Interrupt configuration window appears Configuration Parameter Descriptions Choices Default Edge type Rising edge is transition from low to high Falling edge is transition from high to low Rising edge Rising edge Falling edge ...

Page 125: ...ars Choose an interrupt event from Interrupt 1 to 5 in Event and enter a name in Function to call Click OK button then FUNCTION will be created When new FUNCTION is created a variable EventPrm type STRUCT EVTPARAM_Interrupt is automatically defined in the FUNCTION This variable contains no data Library IoDrvHIES is implicitly added to Library Manager and this STRUCT is defined in it Create your pr...

Page 126: ... frequency of pulses After started frequency can be changed freely Separate function block is required to stop pulse train operation Available I O addresses of pulse train output and PWM output are listed as below bit 0 QX3 0 bit 1 QX3 1 bit 2 QX3 2 bit 3 QX3 3 bit 4 QX3 4 bit 5 QX3 5 Pulse Train output Pulse ch 1 ch 2 ch 3 Direction optional ch 1 ch 2 ch 3 PWM output ch 1 ch 2 ch 3 Since the same...

Page 127: ...rain is not output Number of pulses Input ID DWORD Accumulated number of pulses is stored position control only 0 to 4 294 967 295 direction disabled 2 147 483 648 to 2 147 483 647 direction enabled When the number of pulses exceeds the maximum or minimum value it returns to 0 or 4 294 967 295 Operations Pulse train output can be controlled by variables and function blocks as below Operations Vari...

Page 128: ...y must be added to the project for pulse train operations Double click on Library Manager or right click and choose Edit Object Library Manager window appears Click Add library and choose CmpHIESLib_MV CmpHIESLib library is added in the project ...

Page 129: ...3 648 to 2 147 483 647 direction enabled wInitial_FQ WORD IN Initial frequency 20 to 65 535 Hz If ramp is not used xMode 0 set 0 or leave as no connection wAccel_ratio WORD IN Acceleration ratio 1 to 65 535 Hz 100ms wDecel_ratio WORD IN Deceleration ratio 1 to 65 535 Hz 100ms xDone BOOL OUT Execution done successfully xError BOOL OUT Error occurred Note If this function block is executed while pul...

Page 130: ...BOOL OUT Error occurred MV_PLS_speed FB name Description MV_PLS_speed This function block is to output pulse train for speed control Pulse train operation continues until the function block MV_PLS_Stop is received Name Type I O Descriptions xExecute BOOL IN A rising edge starts the execution byChannel BYTE IN Channel number 1 to 3 xDirection BOOL IN 0 Forward 1 Reverse wInitial_FQ WORD IN Initial ...

Page 131: ...0 Hz xDone BOOL OUT Execution done successfully xError BOOL OUT Error occurred MV_PLS_Stop FB name Description MV_PLS_Stop This function block is to stop pulse train outputs for position and speed control both Name Type I O Descriptions xExecute BOOL IN A rising edge starts the execution byChannel BYTE IN Channel number 1 to 3 xMode BOOL IN 0 Stop with ramp 1 Stop without ramp wDec_ratio WORD IN D...

Page 132: ... 5 Pulse Train output Pulse ch 1 ch 2 ch 3 Direction optional ch 1 ch 2 ch 3 PWM output ch 1 ch 2 ch 3 Since the same output addresses are shared by pulse train and PWM outputs either pulse train or PWM outputs can be configured in each output ON OFF Cycle time Frequency 1 ON duty 50 ON OFF ON duty 80 ON OFF ON duty 20 ON duty Configuration Right click on PWM outputs and choose Add Device Then Add...

Page 133: ...dwFrequency DWORD IN Frequency of pulse train outputs 20 to 100 000 Hz wDuty WORD IN ON duty 0 to 100 xDone BOOL OUT Execution done successfully xError BOOL OUT Error occurred MV_PWM_Stop FB name Description MV_PLS_Stop This function block is to stop PWM output Name Type I O Descriptions xExecute BOOL IN A rising edge starts the execution byChannel BYTE IN Channel number 1 to 3 xDone BOOL OUT Exec...

Page 134: ...input 4 ch 2 ch Isolated Analog output 2 ch Isolated RTD input 2 4 ch X Supported Not supported Right click on Device and choose Add Device Add Device window appears Click the option board name according to the table below and Add Device button Option board type Device name in Add Device dialog Device version Required CPU ROM version OBV NES Option_Board 3 5 3 41 3 5 3 41 OBV 485A 3 5 3 41 OBV 485...

Page 135: ...al port 3 21 3 Analog input output setting Double click on Option_Board or right click and choose Edit Object Option_Board Configuration window appears Configuration parameters are different depending on option board types as below Set parameters accordingly Option Board Option Board OBV AIG CPU port COM1 fixed Option board port COM2 fixed ...

Page 136: ...ption Board OBV RTD Data of Analog input output will be assigned to IW QW as seen in Option_Board I O Mapping tab Analog outputs have been available since the option board device version 3 5 3 41 or newer and supported by CPU ROM VER 3 5 3 42 or newer ...

Page 137: ...mation 3 21 5 General purpose communication Besides Modbus RTU communication option board supports general purpose communication same as CPU port Add SysCom library by clicking Add library on Library manager Only the difference from CPU port is COM port number Be sure to set COM2 Refer to section 3 25 3 Serial communication for further information ...

Page 138: ...es Project files to be downloaded are created with HX CODESYS Choose the menu Online Create boot application in off line mode and save them to USB memory Then file Application app and Application crc will be created in the root directory of USB memory 2 Plug the USB memory to the USB connector of MICRO EHV 3 Set the dip switch 1 ON 2 3 4 OFF 4 Turn ON power to the PLC 5 After USB LED blinking proj...

Page 139: ...22 4 Boot from USB Application program is downloaded from USB to RAM memory in the PLC Currently stored application in the FLASH memory will NOT be overwritten When USB memory is removed and power is cycled original application program in the FLASH memory will be loaded to RAM as a boot project Follow the steps below 1 Create project files Project files to be downloaded are created with HX CODESYS...

Page 140: ... CAA File is available with USB memory One of the useful functions of CAA File is data logging A sample program of data logging is introduced as below This sample program will create a CSV file file name Datalog csv with 3 data time stamp dummy data text as follows New log data is additionally written to the same file every 10 seconds automatically Modify data format and writing timing according t...

Page 141: ...Chapter 3 Programming 3 81 Program ...

Page 142: ... to execute which could result in processor overload exception Instead of this create new directory manually with PC in advance N o t e Do not plug out USB memory while accessing file directory otherwise it is not properly recognized when plugged in the next time If it is necessary to plug out USB memory while PLC is in RUN status and USB memory is always accessed be sure to close file directory i...

Page 143: ...iables in the PLC Configuration Right click on Application and choose Add Object Visualization Then Visualization Manager and Visualization inserted under the Application Right click on Visualization and choose Add Object and WebVisualization Creating web page Refer to online help of HX CODESYS for further information to create visualization pages Access from web browser Created web visualization ...

Page 144: ...alization however 15 to 20 of cycle time is for program execution with Webvisualization Be sure to set longer cycle time for the task of user program Since Webvisualization requires a lot of memory Source download fails because the flash memory size in MICRO EHV is not enough In order to download source file disable Download information files in Additional files in Project Settings Source Download...

Page 145: ...owing libraries are available Add necessary CmpHIESLib_MV by choosing Add library as shown below CmpHIESLib_MV is Hitachi IES s special library including 2 Phase counters Single counters Interrupts Pulse Trans outputs PWM outputs If these libraries are not found in the library list as above install library by choosing Tools Install library ...

Page 146: ...dd library on Library manager In the CAA DTUtil Extern libraries GeTimeZoneInformation and SetTimeZoneInformation are not supported Following example is in FBD language Choose Insert Box in FBD LD IL menu and GetDateAndTime or SetDateAndTime as shown below Supported Supported Not supported Not supported ...

Page 147: ...rrent date and time is read out to the variable connected to dtDateAndTime as shown below When xExecute bit of GetDateAndTime is FALSE dtDateAndTime is default value 1970 1 1 0 0 0 That s why the current time is copied only when xDone flag is high 3 25 3 Serial communication Add SysCom library by clicking Add library on Library manager Instead of SysCom library CAA SerialCom can be used but a samp...

Page 148: ...88 It is recommended to use ST language for serial communication settings since it is more flexible COM1 Non parity 1 stop bit baudrate 19 200bps buffer size 100 bytes Timeout 10ms 8 bit frame Connect 02 123 Connect 02 123 0d ...

Page 149: ...mpHitachi_MV library Err code Error name Detected when Description PLC system Applica tion OK LED 88 Microprocessor failure Power on Overflow of internal watchdog timer due to system program error Stop Stop 11 System program error FLASH Power on Checksum value of system program Runtime in FLASH does not match the checksum calculated Stop Stop 12 System RAM failure Power on Read write check for sys...

Page 150: ...ivision command is 0 in IEC program Run Stop 31 Load boot project failed Power on Checksum value of application user program in FLASH does not match the checksum calculated Run Stop 70 I O configuration error Always I O configuration does not match with actual I O modules Run Run 71 Battery error Always Battery voltage is low or battery is disconnected Run Run 75 Option board invalid ID Power on H...

Page 151: ...ch 2 to the right side ON Dip switch 2 1 2 3 4 O N ON 3 Supply power to the PLC and check if OK LED is lighting up 4 Login and create boot project to restore your system 2 21 Error If power failure time of the PLC exceeds 12 hours data in variables configured as RETAIN backup by optional battery or capacitor in the unit are not retained undefined values When PLC is powered up with RETAIN data unde...

Page 152: ...ry If it is not registered in your library repository install CmpHitachiErrors_MV library by choosing Tools Install library Error code Libraries CmpHitachiErrors_MV library Input Output all Last detected error code WORD all Execution bit to clear error code BOOL Result BOOL 70 FB 70 Error bit BOOL Unit number WORD Slot number WORD 71 71 Error bit BOOL 77 77 Error bit BOOL 78 78 Error bit BOOL ...

Page 153: ...P Slave X X X X Modbus RTU Master X X X X Modbus RTU Slave X X X X EtherCAT Master X X CAN Profibus Profinet USB File System Logging X X X Web visualization X X X Program upload download X X X Expansion unit Positioning Expansion Unit Option board OBV AIG AIOG RTD X CODESYS Runtime version 3 5 3 40 3 5 3 40 3 5 3 40 3 5 3 40 Required devdesc xml version 3 5 3 40 3 5 3 41 3 5 3 42 43 3 5 3 44 Requi...

Page 154: ...1 Choose Tools Package Manager 2 Click Install new packages 3 Click CD or disk and choose the file Lib_MV V35SP3_201502 package If you don t have it ask your local supplier 4 If below information is displayed the package is successfully installed The following libraries and file are included in this package File name Description Device description files All versions of devdesc xml files from 3 5 3...

Page 155: ...itable enclosure such as a cabinet which opens with a key tool etc 2 Installation of a unit a Precaution when installing the unit 1 Fix the unit securely with screws in 2 places M4 length 20mm 0 79in or longer or DIN rail 2 In order to keep within allowable ambient temperature range a Ensure sufficient space for air circulation 50mm 1 97in or more at top and bottom 10mm 0 39in or more at right and...

Page 156: ...nsion 85 3 35 20 40 Points Basic 28 Points Expansion 140 5 51 64 Points Basic Expansion 185 7 28 Unit mm in b Mounting to a DIN rail Attaching to a DIN rail 2 1 1 Hook the base unit to a DIN rail as shown left 2 Press the base unit into the DIN rail until it clicks Note Make sure the base unit is securely fixed after installation Fixing the unit Install DIN rail clamps from both sides The unit cou...

Page 157: ...c unit and the expansion unit at the same time In addition the external power particular DC power supply for the PLC I O signals should be applied before the PLC units Also it is conceivable that a fault in the external power and a failure in the PLC unit lead to abnormal actions To prevent such actions from causing abnormal operation the entire system and from a point of view of creating a fail s...

Page 158: ...wer panel several kW or more thyristor exchanger electric welders etc 3 Be sure to connect a noise filter NF to the power cable c The terminal screw size is M3 Recommended torque is from 0 5 to 0 6 N m 4 4 to 5 3 in lbs d Use the same power supply system for the basic and expansion units 4 Wiring cable for I O signals 6 6 The terminal screw size is M3 Recommended torque is from 0 5 to 0 6 N m 4 4 ...

Page 159: ... external input contacts 2 For sensors such as a proximity switch and photoelectric switch current output type transistor open collector can be directly connected For voltage output type sensors connect them to the input terminal after first going through the transistor 3 Measures to prevent faulty contact in a strong electric contact Strong electric contact 3 W 560 Approx 50mA 24V DC 0 C The curr...

Page 160: ...to the current so be aware that interrupting rush current or directly driving the capacitor load will drastically reduce the life of the relay When switching is done with high frequency use a transistor output unit Above 20 40 64 points basic unit 40 64 points expansion unit 16 points expansion unit 500 100 10 1 0 1 0 2 5 50 20 10 1 0 5 1000 0 3 3 2 30 V DC 250 V AC R load 250 V AC cosφ 0 4 30 V D...

Page 161: ...xcess voltage to the analog input terminal beyond the rated input voltage Similarly do not subject the terminal to current that exceeds the rated input current Connecting the analog input terminal to a power supply other than the specified types may cause damage to the product or burning or its internal components For unused channels of the analog input short the input terminals before use When wi...

Page 162: ...31 in2 or more and wire it within a distance of 20m 65 62 ft Ground wiring Always connect a noise filter Class D grounding Use cable 0 75mm2 0 0011 in2 or less Leave a distance of 200 mm 7 87in or more from the power line and do not have it running next to the power cable I O signal cable Expansion cable Always segregate power line I O signal and power supply cable Metal plate Implement class D gr...

Page 163: ...t power up 2 Periodic inspection Turn off the power for the external I O circuit and check the following items once every six months Table 5 2 Items for periodic inspection Part Item Check criteria Remarks Programming device to CPU Check the operation of the programming device All switch and display lamps work properly Power supply Check for the voltage fluctuations 85 to 264 V AC Tester I O Outpu...

Page 164: ... to many point of outputs are activated for example Prepare spare units with considering 5 years lifetime in case ambient temperature is 30 C For longer lifetime take account of installation location in terms of temperature and air circulation around the unit 2 Battery A battery to maintain realtime clock data and retain memory is available Be noted following points about lifetime of battery The b...

Page 165: ...er off time should be less than 30 minute DANGER Precaution when handling the battery Use MV BAT for the new battery Be careful because a false replacement may cause the battery to explode Do not connect and of the battery reversely charge them take them apart heat them throw them into the fire short them CAUTION Disposal collection of the battery Old battery should be individually put in plastic ...

Page 166: ...Chapter 5 Maintenance 5 4 MEMO ...

Page 167: ...perly with MICRO EHV If attempting to copy a file from PC to PLC in Files tab of Device window it fails with an error message as below Instead of this function use Login or Create boot project 2 Add gateway button only for EHV CODESYS V3 5 SP3 Patch 6 If you click Scan network and delete the gateway before scanning completed warning dialog box appears After clicking OK Add gateway button will be d...

Page 168: ...re is powered up and cycled power just a few seconds after powered up the PLC could fail to start the system program correctly OK LED is not lighting up Login and execute Reset origin to reset the PLC 6 Error code 20 Error code 20 is not supported in MICRO EHV CPU ROM VER 3 5 3 44 or older 7 Modbus TCP RTU slave If unsupported function code is sent from a master to MICRO EHV as a slave MICRO EHV d...

Page 169: ...uring Modbus TCP communication it takes about 60 seconds to restart communication due to limitation of TCP protocol stack If Modbus client does not respond properly to closing command from MICRO EHV with reset operation status indication in EHV CODESYS shows green circle although communication stops The indication turns to red triangle 60 seconds after the reset operation but actual communication ...

Page 170: ...Appendix A1 4 MEMO ...
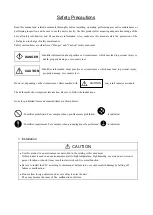
Reviews: