INSTR
UCTION MANU
A
L
GUIDE D'UTILISA
TION
MANU
AL DE INSTR
UCCIONES
DW610
Router
T
roupie
T
oupie électr
onique
Rebajadora con base fija
INSTRUCTIVO DE OPERACIÓN, CENTROS DE SER
VICIO
Y
PÓLIZA
DE GARANTÍA.
ADVERTENCIA:
LÉASE ESTE INSTRUC-
TIVO
ANTES DE USAR EL
PRODUCT
O.
IF YOU HAVE ANY QUESTIONS OR COMMENTS ABOUT THIS OR ANY D
E
WALT TOOL,
CALL US TOLL FREE AT:
1-800-4-DEWALT (1-800-433-9258)
General Safety Instructions for All Tools
WARNING! Read and understand all instructions.
Failure to follow all instructions listed
below, may result in electric shock, fire and/or serious personal injury.
SAVE THESE INSTRUCTIONS
•
KEEP WORK AREA CLEAN.
Cluttered areas and benches invite injuries.
•
CONSIDER WORK AREA ENVIRONMENT.
Don’t expose power tools to rain. Don’t use power
tools in damp or wet locations. Keep work area well lit.
•
GUARD AGAINST ELECTRIC SHOCK.
Prevent body contact with grounded surfaces; for exam-
ple, pipes, radiators, ranges, and refrigerator enclosures.
•
KEEP CHILDREN AWAY.
All visitors should be kept away from work area. Do not let visitors con-
tact tool or extension cord.
•
STORE IDLE TOOLS.
When not in use, tools should be stored in dry, and high or locked-up place
— out of reach of children.
•
DON’T FORCE A TOOL.
It will do the job better and safer at the rate for which it was intended.
•
USE RIGHT TOOL.
Don’t force small tool or attachment to do the job of a heavy duty tool. Don’t
use tool for purpose not intended; for example, don’t use circular saw for cutting tree limbs or
logs.
•
DRESS PROPERLY.
Do not wear loose clothing or jewelry. Contain long hair. Keep your hair,
clothing, and gloves away from moving parts. Loose clothing, jewelry, or long hair can be caught
in moving parts. Air vents often cover moving parts and should also be avoided.
•
USE SAFETY GLASSES.
Also use face or dust mask if operation is dusty.
•
DON’T ABUSE CORD.
Never carry tool by cord or yank it to disconnect from receptacle. Keep
cord from heat, oil, and sharp edges.
•
SECURE WORK.
Use clamps or a vise to hold work. It’s safer than using your hand and it frees
both hands to operate tool.
•
DON’T OVERREACH.
Keep proper footing and balance at all times.
•
MAINTAIN TOOLS WITH CARE.
Keep tools sharp and clean for better and safe performance.
Follow instructions for lubricating and changing accessories. Inspect tool cords periodically and if
damaged have repaired by authorized service facility. Inspect extension cords periodically and
replace if damaged. Keep handles dry, clean, and free from oil and grease.
•
DISCONNECT OR LOCK OFF TOOLS
when not in use, before servicing, and when changing
accessories, such as blades, bits, cutters.
•
REMOVE ADJUSTING KEYS AND WRENCHES.
Form habit of checking to see that keys and
adjusting wrenches are removed from tool before turning it on.
•
AVOID UNINTENTIONAL STARTING.
Don’t carry plugged-in tool with finger on the switch. Be
sure the switch is off when plugging in.
•
OUTDOOR USE EXTENSION CORDS.
When tool is used outdoors, use only extension cords
intended for use outdoors and so marked.
•
STAY ALERT.
Watch what you are doing. Use common sense. Do not operate tool when you are
tired.
•
CHECK DAMAGED PARTS.
Before further use of the tool, a guard or other part that is damaged
should be carefully checked to determine that it will operate properly and perform its intended
function. Check for alignment of moving parts, binding of moving parts, breakage of parts, mount-
ing, and any other conditions that may affect its operation. A guard or other part that is defective
should be properly repaired or replaced by an authorized service center unless otherwise indi-
cated elsewhere in this instruction manual. Have defective switches replaced by authorized ser-
vice center. Do not use tool if switch does not turn it on and off.
•
DO NOT OPERATE
portable electric tools near flammable liquids or in gaseous or explosive
atmospheres. Motors in these tools normally spark, and the sparks might ignite fumes.
Additional Safety Rules for Routers
•
KEEP HANDS AWAY
from cutting area. Never reach under the material for any reason.
Hold front of tool by grasping the contoured gripping area. Do not insert fingers or thumb into the
vicinity of the cutter head. Keep the router base firmly in contact with the work when cutting. Do
not stabilize the router by holding the base.
•
USE SHARP CUTTERS.
Dull cutters may cause the router to swerve or stall under pressure.
•
Never touch the bit immediately after use. It may be extremely hot.
•
Be sure that the motor has stopped completely before you lay the router down. If the cutter head
is still spinning when the tool is layed down, it could cause injury or damage.
•
Be sure that the router bit is clear of the workpiece before starting motor. If the bit is in contact
with the workpiece when the motor starts it could make the router jump, causing damage or
injury.
CAUTION:
Wear appropriate personal hearing protection during use. Under some conditions
and duration of use, noise from this product may contribute to hearing loss.
WARNING:
Some dust created by power sanding, sawing, grinding, drilling, and other con-
struction activities contains chemicals known to cause cancer, birth defects or other reproduc-
tive harm. Some examples of these chemicals are:
• lead from lead-based paints,
• crystalline silica from bricks and cement and other masonry products, and
• arsenic and chromium from chemically-treated lumber (CCA).
Your risk from these exposures varies, depending on how often you do this type of work. To
reduce your exposure to these chemicals: work in a well ventilated area, and work with
approved safety equipment, such as those dust masks that are specially designed to filter out
microscopic particles.
•
Avoid prolonged contact with dust from power sanding, sawing, grinding, drilling, and
other construction activities. Wear protective clothing and wash exposed areas with soap
and water.
Allowing dust to get into your mouth, eyes, or lay on the skin may promote absorp-
tion of harmful chemicals.
SAVE THESE INSTRUCTIONS
FOR FUTURE USE
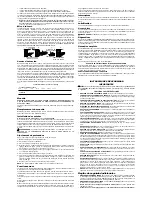
Grounding
This tool should be grounded while in use to protect the operator from electric shock. The tool
is equipped with an approved three-conductor cord and three-prong grounding type plug to fit
the proper grounding type receptacle. The green (or green and yellow) conductor in the cord is
the grounding wire. Never connect the green (or green and yellow) wire to a live terminal.
If your unit is intended for use on less than 150 volts, it has a plug similar to that shown in Figure
A. An adapter, Figures B and C, is available for connecting Figure A plugs to two-prong recep-
tacles. The green-colored rigid ear, lug, etc., must be connected to a permanent ground such as
a properly grounded outlet box. Whenever the adapter is used, it must be held in place by a
metal screw.
NOTE:
The 220 volt plug and plug outlet are different from those shown in Figures B and C.
WARNING:
Improper connection of the equipment grounding conductor can result in the
risk of electric shock. Check with a qualified electrician or service person if you are in doubt
as to whether the outlet is properly grounded. Do not modify the plug provided with the appli-
ance. If it will not fit the outlet, a proper outlet must be installed by a qualified electrician.
We recommend that you never disassemble the tool or try to do any rewiring in the electrical
system. Any repairs should be performed only by authorized service centers. Should you be
determined to make a repair yourself, remember that the green colored wire is the grounding
wire. Never connect this green wire to a live terminal. If you replace the plug on the power cord,
be sure to connect the green wire only to the grounding (longest) prong on a three-prong plug.
Never remove the grounding prong.
Extension Cords
Double insulated tools have 2-wire cords and can be used with 2-wire or 3-wire extension cords.
Only round jacketed extension cords should be used, and we recommend that they be listed by
Underwriters Laboratories (U.L.). If the extension will be used outside, the cord must be suitable
for outdoor use. Any cord marked as outdoor can be used for indoor work. The letters “W” or
“WA” on the cord jacket indicate that the cord is suitable for outdoor use.
An extension cord must have adequate wire size (AWG or American Wire Gauge) for safety, and
to prevent loss of power and overheating. The smaller the gauge number of the wire, the greater
the capacity of the cable, that is 16 gauge has more capacity than 18 gauge. When using more
than one extension to make up the total length, be sure each individual extension contains at
least the minimum wire size.
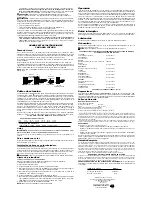
To determine the minimum wire size required, refer to the extension cord chart.
Minimum Gage for Cord Sets
Volts
Total Length of Cord in Feet
120V
0-25
26-50
51-100
101-150
240V
0-50
51-100
101-200
201-300
Ampere Rating
More Not
more
AWG
Than
Than
6
-
10
18
16
14
12
Before using an extension cord, inspect it for loose or exposed wires, damaged insulation, and
defective fittings. Make any needed repairs or replace the cord if necessary.
Collet
IMPORTANT NOTE: NEVER TIGHTEN COLLET NUT IF THERE IS NO CUTTER IN THE COL-
LET. COMPRESSING COLLET TOO MUCH MIGHT RESULT IN DAMAGE.
A 1/2" collet is installed in your router and a 1/4" collet is included in the package.
To Change Collet
Unplug the router. Using the supplied wrenches as necessary, simply unscrew and remove the
collet nut. Pull the collet out of the end of the shaft.
Installing Router Bits
TURN OFF AND UNPLUG ROUTER.
To install a router bit, first open the collet by loosening (counterclockwise) the collet nut. Use the
supplied wrenches if necessary. Insert the shaft of the desired bit into the collet as far as it will
go and then pull it out about 1/16" (1.5 mm). Hold the router shaft with one of the wrenches and
firmly tighten the collet nut with the other.
CAUTION:
Router Bits Are Sharp. Use Care In Handling Them.
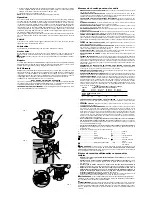
Depth Adjustment
TURN OFF AND UNPLUG ROUTER.
Follow the steps below to adjust router cutting depth.
1. Turn off the router and unplug the cord.
2. Select and install the desired bit.
3. Place the router down on its base on your work piece.
4. Loosen the wing nut (A) on the depth adjuster and turn the depth adjusting knob (B), shown
in Figure 1, to raise or lower the bit until it just touches the work piece.
5. Rotate the black calibrated knob (A) to align the “0” mark with the notch (B) in the housing,
as shown in Figure 2.
6. Turn the router upside down and put it on the work piece.
D
E
WALT Industrial Tool Co., 701 East Joppa Road, Baltimore, MD 21286
Printed in U.S.A. (JUL02-CD-1) Form No. 158670-01 DW610 Copyright © 1998, 2000
The following are trademarks for one or more D
E
WALT power tools: the yellow and black color
scheme; the “D” shaped air intake grill; the array of pyramids on the handgrip; the kit box con-
figuration; and the array of lozenge-shaped humps on the surface of the tool.
A
B
C
D
GROUNDING PIN
GROUNDED
OUTLET
BOX
GROUNDING
MEANS
GROUNDING PIN
ADAPTER


