background image


xStack Storage 

TM


D-Link xStack Storage iSCSI SAN Array 

Managed SAN Solution 
DSN-1100 
 
Hardware Reference Guide 

Version 1.0


Summary of Contents for DSN-1100 xStack Storage

Page 1: ...xStack Storage TM D Link xStack Storage iSCSI SAN Array Managed SAN Solution DSN 1100 Hardware Reference Guide Version 1 0 ...

Page 2: ...o change without notice The only warranties for D Link products and services are set forth in the express warranty statements accompanying such products and services Nothing herein should be construed as constituting an additional warranty D Link shall not be liable for technical or editorial errors or omissions contained herein Copyright 2008 D Link Systems Inc Trademarks Adobe and Acrobat are tr...

Page 3: ...es a lithium coin cell battery The lithium coin cell battery is a long life battery and it is very possible that you will never need to replace it However should you need to replace it consult your service documentation Do not dispose of the battery along with household waste Contact your local waste disposal agency for the address of the nearest battery deposit site Following are the safety agenc...

Page 4: ...iv Document Revision Level Revision Date Notes Version 1 0 November 10 2008 ...

Page 5: ...eceded by Cautions Cautions contain information which if not followed can cause damage to the xStack storage system They are preceded by Warnings Warnings contain information which if not followed can cause damage to the xStack storage system and to the person installing it They are preceded by Related Documentation In addition to this document the following documents are available from D Link xSt...

Page 6: ... or by phone Tech Support for customers within the United States D Link Technical Support over the Telephone Please see our support site for current number http support dlink com Monday to Friday 8 00am 5 00pm PST PDT D Link Technical Support over the Internet http support dlink com Tech Support for customers within Canada D Link Technical Support over the Telephone Please see our support site for...

Page 7: ... 2 Desktop Floor or Shelf Installation 20 3 2 Unpacking the DSN 1100 Storage System 21 3 3 Items Supplied by the User 21 3 4 Connecting to the iSCSI Data Ports 22 3 4 1 Connecting to the DSN 1100 Host Network Connection Ports 22 3 5 Connecting to the Management Port 22 3 6 Connecting the Power Cords 23 3 7 Powering on the DSN 1100 Storage System 23 Appendix A Replacing and Upgrading FRUs 25 A 1 Re...

Page 8: ...viii Contents This Page Left Intentionally Blank ...

Page 9: ... A Chip with the following features Up to 5 internal Serial Advanced Technical Attachment SATA drives Up to 512 MB of system memory Up to 1 GB of buffer cache memory Four 1GbE local area network LAN connectors accessed via the back panel A 10 100 Mbps management port An RS 232 C DB9 diagnostic port for troubleshooting purposes Complete configuration and management are available through the intuiti...

Page 10: ...y investment protection and reduced training costs Scalability over long distances ideal for remote data replication and disaster recovery Two internal fans provide cooling Battery pack ensures that a charged battery is on hand to preserve buffer cache contents if a power failure occurs Contents are backed up for approximately 72 hours 1 3 System Overview Figure 1 1 shows a typical DSN 1100 storag...

Page 11: ...apter 2 DSN 1100 Layout This chapter describes the hardware components on the DSN 1100 storage system The topics covered in this chapter are Section 2 1 Front Panel Components Section 2 2 Inside Front Cover Section 2 3 Rear Panel Components ...

Page 12: ...dy for operation or encountered a fault condition see Figure 2 1 and Table 2 1 Battery Status LED shows the state of the internal cache memory battery see Figure 2 1 and Table 2 1 A lock on the bezel that protects access to the power switch and drives inside the unit The hard drive power and drive activity fault LEDs see Figure 2 2 and Table 2 2 Figure 2 1 Front View of the DSN 1100 Storage System...

Page 13: ...OFF power is not being received OFF Array is powered off or performing its Power On Self Test Red ON a fault has occurred Ready Fault Green ON normal operation ON Illuminated steadily Good battery present ON Blinking Good battery present Battery Backup State Battery Status Green OFF Battery not installed or is less than 5 6V ...

Page 14: ...or each drive 00 through 04 LED Color Description Drive Power Blue ON Drive is powered and operational Green Blinking Data being transmitted or received from corresponding SATA drive Drive Activity and Fault Red ON Drive has experienced a fault and is offline Drive Power LED Drive Activity and Fault LED ...

Page 15: ...er switch see Figure 2 3 and Table 2 3 Five hot swappable drive trays see Figure 2 3 Figure 2 3 Front View with Cover Open Table 2 3 Inside Front Cover Switch Switch Description Power Applies power to the DSN 1100 storage system Pressing this switch for longer than 3 seconds removes power from the DSN 1100 storage system and turns it off Power Switch Drive 00 Drive 01 Drive 02 Drive 03 Drive 04 ...

Page 16: ...stic Port one 9600 bps RS 232 C DB9 diagnostic port is located to the right of the management port This requires a male to female straight through cable provided with the system Reset switch this is hidden within a small hole Please use the tip of a pen or a paper clip to reset the system Note This reboots the system and does not reset the unit to initial factory settings see Figure 2 4 and Table ...

Page 17: ...Port Activity LEDs LED Color Description Yellow link is operating at 1 Gbps Green link is operating at 100 Mbps Port Speed Yellow Green None link is operating at 10 Mbps ON link is operational Port Activity Green Blink data is being sent or received Table 2 6 RJ 45 Port Activity and Speed LEDs for the Fast Ethernet Management Port Color Description Green ON Link is operational Green Blinking Data ...

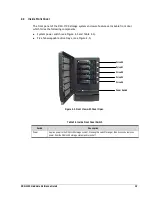
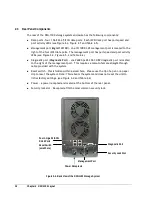
Page 18: ...18 Chapter 2 DSN 1100 Layout This Page Left Intentionally Blank ...

Page 19: ...stem The topics covered in this chapter are Section 3 1 Site Considerations Section 3 2 Unpacking the DSN 1100 Storage System Section 3 3 Items Supplied by the User Section 3 4 Connecting to the iSCSI Data Ports Section 3 5 Connecting to the Management Port Section 3 6 Connecting the Power Cords Section 3 7 Powering on the DSN 1100 Storage System ...

Page 20: ...ocation should offer a power outlet within six feet 1 82 meters of the DSN 1100 storage system The location should allow for at least six inches 152 3 mm of space around the DSN 1100 storage system for ventilation Do not place the DSN 1100 storage system next to on top off or below any device that generates a significant amount of heat or will block the fee flow of air through the DSN 1100 ventila...

Page 21: ... 3 1 Thereafter the additional items required for installation depend on the user category into which you fit Table 3 1 User Supplied Items to Perform the DSN 1100 Storage System Installation User Category User Supplied Items All Users A PC with a Network Interface Card NIC that will act as the iSCSI initiator See Note 1 A PC with a NIC and Internet access that will access the management console S...

Page 22: ...rt in sequence port 1 then port 2 and so on Do not skip ports when making these connections 3 5 Connecting to the Management Port Connecting a PC to the management port lets you configure and manage the DSN 1100 storage system This connection is made using a PC with an installed NIC and either a cross over cable if connecting directly to the management port or a straight through cable if connectin...

Page 23: ...le 3 2 Verifying Completion of the DSN 1100 Storage System Power on Process If the DSN 1100 Storage System Verify the Power on Process by Has no front panel Ready Fault LED Wait five minutes after powering on the DSN 1100 storage system Has a front panel Ready Fault LED The LED turns green when the startup process completes If the LED turns red reboot the DSN 1100 storage system If the problem per...

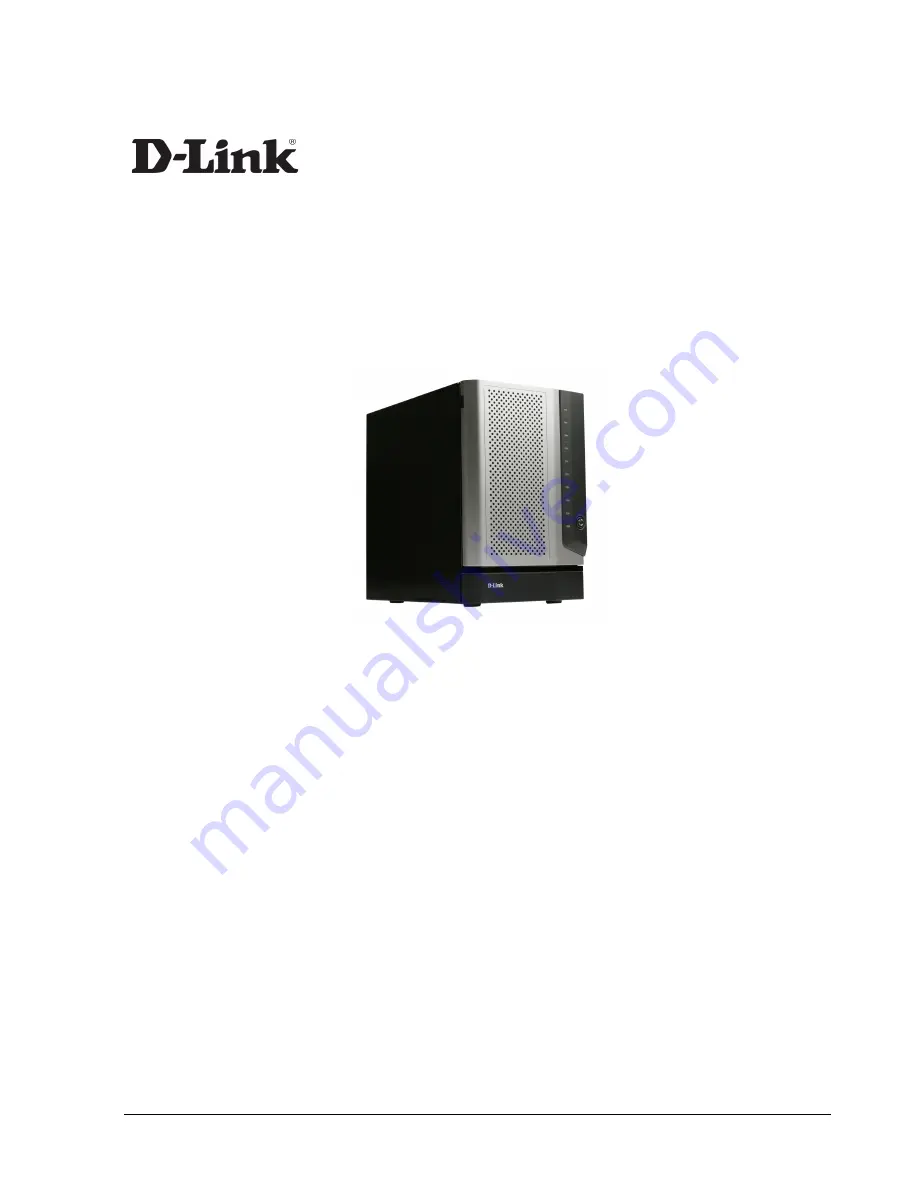
Page 24: ...24 Chapter 3 Installing the DSN 1100 Storage System This Page Left Intentionally Blank ...

Page 25: ...include Battery Pack System and buffer memory SATA drives Fans Power supply A 1 Removing the Cover To remove the cover use the following procedure 1 Power down the DSN 1100 storage system and remove the power cord from the back panel 2 Attach an ESD preventive wrist strap 3 Remove the six screws as shown in Figure A 1 4 Slide the cover towards the rear and remove as shown in Figure A 2 5 To replac...

Page 26: ...26 Appendix A Replacing and Upgrading FRUs Figure A 1 Removing the Cover Figure A 2 Slide the Cover Back and Remove Screw Screw Screw Screw Screw Screw Slide Cover to Rear and Lift Up ...

Page 27: ...a battery to back up the buffer cache contents The battery pack connects to the DSN 1100 controller board using a 3 pin locking connector at J11 see Figure A 3 for detailed drawing of its location The battery itself is attached to the chassis by means of two 3M Dual Lock re closable fastener strips which allow easy field replacement of the pack if required Figure A 3 Battery Pack Connector J11 Loc...

Page 28: ... as shown to align the fastener strips Make sure the battery cable and connector is located nearest to the battery socket J11 on the controller see Figure A 4 Figure A 4 Aligning the Battery 2 Press the battery down firmly as shown in Figure A 5 until you feel it lock into place Figure A 5 Press the Battery Down Firmly Until it Locks ...

Page 29: ...e in the mounting plate as shown in Figure A 6 Do not damage the insulation on the wires Figure A 6 Align the Battery Plug with Connector J11 4 Align the battery plug with connector J11 as shown in Figure A 7 and insert it fully into the socket Figure A 7 Align the Battery Plug with Connector J11 ...

Page 30: ...placing and Upgrading FRUs 5 The connector locked firmly into connector J11 as shown in Figure A 8 Figure A 8 Battery Plug Locked in Place 6 The installed battery is shown in Figure A 9 Figure A 9 The Installed Battery ...

Page 31: ...e Memory The xStack Storage controller can address up to 1GB of buffer memory and comes standard with 256MB 1 x 256MB modules installed This should work well for most applications However several applications such as video streaming of the product could benefit from increased cache memory Please see Figures A 10 and A 11 for buffer memory location Note on Memory Table A 1 lists the specifications ...

Page 32: ...32 Appendix A Replacing and Upgrading FRUs Figure A 11 Buffer Cache Memory DIMM Socket Figure A 12 System Memory DIMM Socket ...

Page 33: ...MM 0 J15 System Memory Module Total System Memory DIMM 1 J14 Buffer Cache Memory Module Total Buffer Cache Memory Total Memory 256MB 256MB 256MB 256MB 512MB 256MB 256MB 512MB 512MB 768MB 512MB 512MB 512MB 512MB 1GB 512MB 512MB 1GB 1GB 1 5GB To upgrade or replace memory use the following procedure 1 Power down the DSN 1100 storage system and remove the power cord from the back panel 2 Attach an ESD...

Page 34: ...h the metal fingers into the DIMM socket see Figure A 14 Stop sliding when the DIMMM is securely seated in the socket Figure A 14 Inserting a DIMM 9 Snap the latches into place Do not use excessive force because the socket might break 10 Replace the cover see section A 1 11 Power on the DSN 1100 storage system If error messages relating to memory are displayed remove the DIMM and reinstall it maki...

Page 35: ... part of a volume that may or may not be redundant Before removing a drive from an operating xStack Storage Array make sure it is the correct one A 3 1 Drive and Tray Removal A drive tray assembly can be removed by pressing upwards on the green latch found on the tray and removing it with the handle as shown in Figure A 15 and Figure A 16 Figure A 15 Drive and Tray Removal Figure A 16 Remove Drive...

Page 36: ...stall a hard drive in a drive tray 1 If there is one remove the plastic air dam from the tray by squeezing the two levers together and lifting the piece out of the tray as shown in A 17 Figure A 17 Removing the Plastic Air Dam Piece 2 Your tray should now look like Figure A 18 Figure A 18 Tray with Air Dam Removed ...

Page 37: ...d drive in tray as shown in Figure A 19 Figure A 19 Place Hard Drive in Tray 4 Align the mounting holes and insert four mounting screws to hold the drive securely in the drive tray as shown in Figure A Figure A 20 Secure the Hard Drive in the Drive Tray ...

Page 38: ... drive bay as shown in Figure A 21 Push the tray at the point indicated in Step 2 of Figure A 22 and push until it is seated firmly within the bay As you press you will see the tray handle begin to move inwards as the locking mechanism enters the locking slot When you see this then you must push the tray handle inwards as shown in Figure A 23 until you hear the green locking mechanism click Figure...

Page 39: ...DSN 1100 Hardware Reference Guide 39 Figure A 22 Press Here Until You See the Lever Move Inwards Figure A 23 Press Lever Inwards Until it Locks ...

Page 40: ... supply use the following procedure 1 Power down the DSN 1100 storage system and remove the power cord from the back panel 2 Attach an ESD preventive wrist strap 3 Open the enclosure to access the DSN 1100 storage system controller see section A 1 4 Remove the two screws shown in Figure A 24 found on the rear of the chassis Figure A 24 Remove These Two Screws on the Rear of the Chassis Screw Screw...

Page 41: ...igure A 25 found on the bottom of the chassis Figure A 25 Remove These Two Screws on the Bottom of the Chassis 6 Open the clip which holds the power supply wiring harness in place as shown in Figure A 26 Figure A 26 Open the Power Supply Harness Retention Clip Screw Screw ...

Page 42: ... 27 Figure A 27 Remove the Power Supply Harness Connector 8 Carefully slide the power supply out of the chassis as shown in Figure A 28 NOTE Be sure not to damage the insulation on the wiring harness Figure A 28 Remove the Power Supply Harness Connector 9 To install a power supply please reverse these steps ...

Reviews: