ENGLISH
DIR-860L
Wireless AC1200
Dual Band Gigabit Cloud Router
If any of the above items are missing, please contact your reseller.
DIR-860L Wireless AC1200 Dual Band Gigabit Cloud Router
Power Adapter
Ethernet Cable
Wi-Fi Configuration Card
Quick Install Guide
1
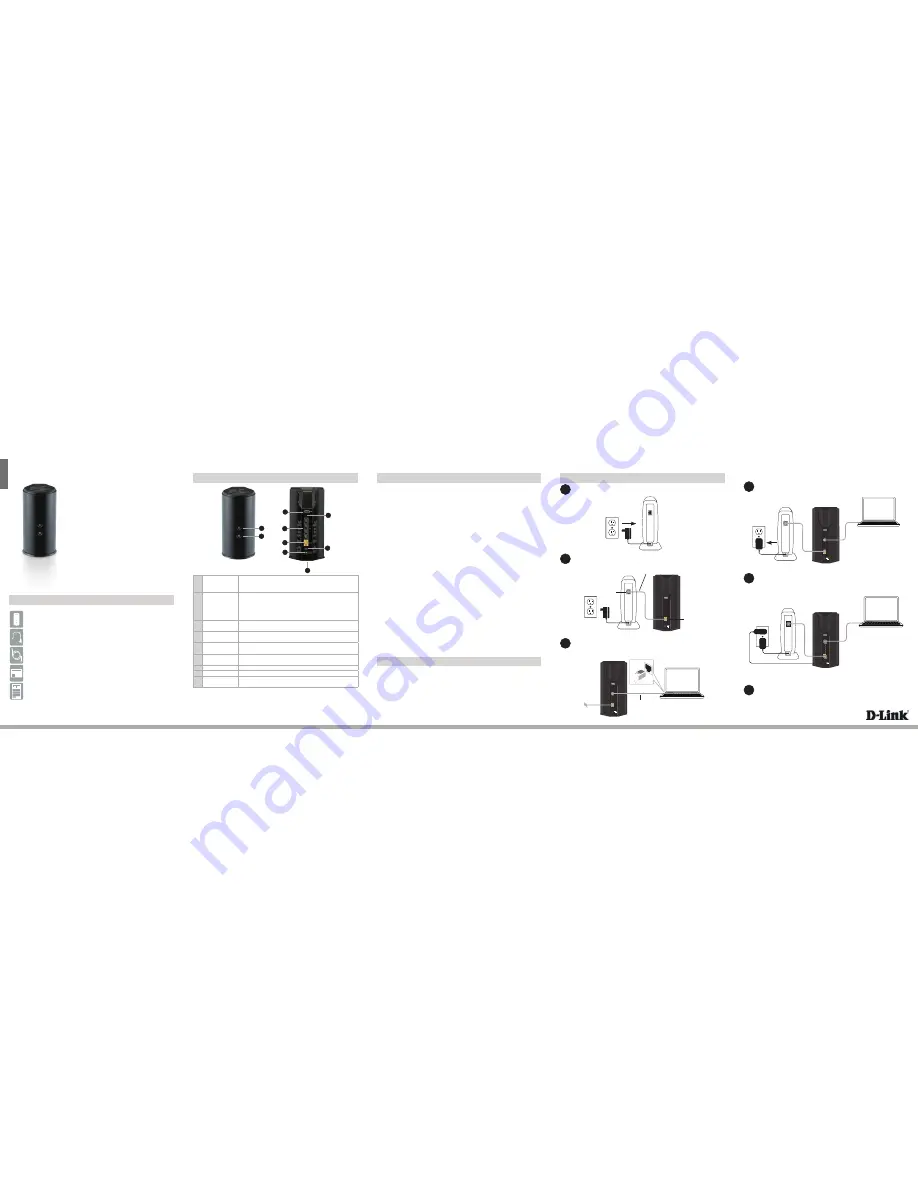
Power LED
A solid green light indicates a proper connection to the
power supply. The light will be solid orange during boot-up
and will blink green during the WPS process.
2
Internet LED
A solid light indicates a connection to the Internet port. If the
LED is orange, the connection is good but the router cannot
connect to the Internet. If this LED is blinking orange, this
indicates that the “on demand” connection type is set and
the Internet connection is idle.
3
USB Port
Connect a USB flash drive to share content throughout
your network.
4
WPS Button
Press to start the WPS process. The Power LED will start to
blink.
5
LAN Ports (1-4) Connect Ethernet devices such as computers, switches, and
game consoles.
6
Internet Port
Connect your broadband modem to this port using an
Ethernet cable.
7
Power Button
Press to power the router on and off.
8
Power Port
Connect the supplied power adapter.
9
Reset Button
Press and hold the reset button with a paper clip for six
seconds to reset the router to the factory default settings.
1
3
4
5
6
7
8
1
Unplug the power to your DSL or Cable modem.
2
Connect an Ethernet cable from the Internet port of the router to the
Ethernet port on your DSL or Cable modem.
3
Connect another Ethernet cable from the Ethernet port on your
computer to one of the LAN ports on the router.
4
Plug the power back into your DSL or cable modem. Please wait about
one minute before continuing.
5
Plug the power adapter into your router and connect to an available
power outlet or surge protector. If the Power LED does not light up, press
the Power button on the back of the router.
12V 2A
USB
WPS
1
2
3
LAN
4
INTERNET
POWER
12V 2A
USB
WPS
1
2
3
LAN
4
INTERNET
POWER
Modem
Modem
DIR-860L
DIR-860L
Computer
Modem
DIR-860L
12V 2A
USB
WPS
1
2
3
LAN
4
INTERNET
POWER
Computer
Package Contents
Hardware Overview
Minimum Requirements
Connect your Router
12V 2A
USB
WPS
1
2
3
LAN
4
INTERNET
POWER
6
After the router has powered up, verify that the Power (green) and Internet
(orange or green) LEDs are both lit then continue with the
Configuration
section on the other side.
Modem
DIR-860L
Computer
Ethernet Port
Ethernet Cable
Internet Port (yellow)
Ethernet Cable
•
Users with DSL providers
- If you are using a PPPoE connection, you will need
your PPPoE user name and password. If you do not have this information, contact
your Internet provider. Do not proceed until you have this information.
•
Users with Cable providers
- Make sure you unplug the power to your modem.
In some cases, you may need to turn it off for up to 5 minutes.
•
Advanced Users
- If your ISP provided you with a modem/router combo, you will
need to set it to “bridge” mode so the DIR-860L router can work properly. Please
contact your ISP or refer to the user manual for your modem/router device.
Before you Start
Network Requirements:
• An Ethernet-based broadband modem
Web-based Configuration Requirements:
Computer with the following:
• Windows® or Mac OS® X operating system
• An installed Ethernet adapter or wireless adapter
Supported Browsers:
• Internet Explorer 7 or higher
• Safari 4 or higher
• Chrome
• Firefox
Make sure you have the latest version of Java installed. Visit
www.java.com
to download the latest version.
mydlink Requirements:
• iPhone/iPad/iPod Touch (iOS 3.0 or higher)
• Android device (1.6 or higher)
• Web Browser Requirements:
• Internet Explorer 7 or higher
• Safari 5 or higher
• Chrome
• Firefox
Note:
To learn more about mydlink, visit
http://www.mydlink.com
.
2
9