background image

4-Port Wireless Ethernet Router

AAM6020VI-B6

User Manual

Version 1.0

Version Date: June 8, 2005

Summary of Contents for AAM6020VI-B6

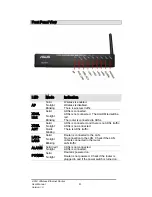
Page 1: ...4 Port Wireless Ethernet Router AAM6020VI B6 User Manual Version 1 0 Version Date June 8 2005 ...

Page 2: ...ct the Power Adapter 6 INSTALLATION DIAGRAM 7 CONFIGURING YOUR COMPUTER 8 Windows 2000 8 Windows XP 9 LOGGING INTO THE ROUTER 10 DEVICE INFO 11 Summary 11 WAN 12 STATISTICS 12 LAN Statistics 12 WAN Statistics 13 ATM Statistics 13 ADSL Statistics 14 ADSL BER Test 15 Route 17 ARP 18 QUICK SETUP 19 ATM PVC Configuration 19 ADVANCED SETUP 21 WAN 21 Connection Type 23 NAT 27 Virtual Servers 27 Port Tri...

Page 3: ... 42 Security 42 MAC Filter 44 Wireless Bridge 45 Advanced 46 TROUBLESHOOTING DIAGNOSTICS 48 MANAGEMENT 48 Settings 48 Backup Settings 48 Restore User Settings 49 Restore Default 50 System Log 50 Configure System Log 51 SNMP 52 Internet Times 52 Access Control 53 Services 53 IP Addresses 53 Passwords 54 Update Software 55 Reboot Router 55 APPENDIX 56 FCC Warning Statement 56 Declaration of Conformi...

Page 4: ...with sufficient ventilation To prevent overheating do not obstruct the ventilation openings of this equipment Plug this equipment into a surge protector to reduce the risk of damage from power surges and lightning strikes Operate this equipment only from an electrical outlet with the correct power source as indicated on the adapter Do not open the cover of this equipment Opening the cover will voi...

Page 5: ...is connected to ADSL Solid ADSL is connected and there is no ADSL traffic No light ADSL is not connected XDSL ACT Quick blinking There is ADSL traffic Solid Router is connected to the LAN No light No connection to the LAN Check if the LAN cable is connected to the router LAN1 LAN4 Blinking LAN traffic Solid red ADSL is not connected ALARM No light ADSL is connected Solid Router is powered on POWER...

Page 6: ...wer adapter Reset Restart press the button for less than 4 seconds Default settings press the button for 4 seconds or longer LAN1 LAN4 RJ 45 connects the unit to an Ethernet device such as a PC or a switch Console NOTE To be used by maintenance professionals only If the router needs repair bring it to a service professional Line e RJ 11 cable connects to the splitter provided ...

Page 7: ...e PC to the Router Use the Ethernet cable to connect your computer directly to the router Connect one end of the Ethernet cable to one of the ports labeled LAN on the rear panel of the router and connect the other end to the Ethernet port of your computer Attach any additional PCs to the router using RJ 45 cables to the port labeled LAN on the rear panel of the router Connect the Power Adapter Com...

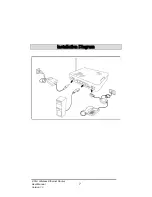
Page 8: ...4 Port Wireless Ethernet Router User Manual 7 Version 1 0 Installation Diagram ...

Page 9: ...in that order 2 Click on Local Area Connection When you have the Local Area Connection Status window open click on Properties s 3 Listed in the window are the installed network components If the list includes Internet Protocol TCP IP then the protocol has already been enabled and you can skip to Step 10 4 If Internet Protocol TCP IP does not appear as an installed component then click on Install l...

Page 10: ...P 1 In the Windows taskbar click on the Start button and point to Settings and then click Network Connections 2 In the Network Connections window right click on the Local Area Connection icon and click on properties 3 Listed in the Local Area Connection window are the installed network components Make sure the box for Internet Protocol TCP IP is checked and then click on Properties s 4 In the Inte...

Page 11: ... Enter r A login screen like the one below will be displayed after you connect to the user interface 3 Enter your user name and password and then click on OK to display the user interface NOTE There are two default user name and password combinations The user user name and password combination can display device status but cannot change or save configurations The admin admin combination can perfor...

Page 12: ...t can be accessed using the menu items under Device Info Summary Access the general status report from the router by clicking on Summary y under Device Info o It shows information about the router such as the version of the software bootloader etc It also displays the current status of your DSL connection as shown below ...

Page 13: ...er User Manual 12 Version 1 0 WAN Access the WAN status report from the router by clicking on WAN N under Device Info STATISTICS LAN Statistics Access the LAN statistics from the router by clicking on the LAN item under Statistics ...

Page 14: ...User Manual 13 Version 1 0 WAN Statistics Access the WAN statistics from the router by clicking on the WAN N item under Statistics s ATM Statistics Access ATM statistics from the router by clicking on the ATM M item under Statistics s ...

Page 15: ...er User Manual 14 Version 1 0 ADSL Statistics You can view ADSL statistics by clicking on the ADSL L item under Statistics s Information contained in this screen is useful for troubleshooting and diagnostics of connection problems ...

Page 16: ...io of error bits to the total number transmitted If you click on the ADSL BER Test button at the bottom of the ADSL Statistics page the following pop up screen will appear allowing you to set the tested time and to begin the test Below is an ADSL BER Test result screen displaying information about the test and the error bits and ratio ...

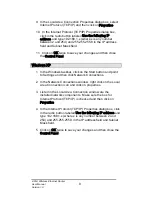
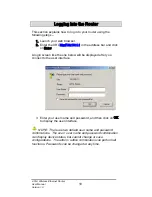
Page 17: ...4 Port Wireless Ethernet Router User Manual 16 Version 1 0 ...

Page 18: ...4 Port Wireless Ethernet Router User Manual 17 Version 1 0 Route Access the routing status report from the router by clicking on the Route e item under Device Info o ...

Page 19: ...4 Port Wireless Ethernet Router User Manual 18 Version 1 0 ARP Access the ARP status report from the router by clicking on the ARP P item under Device Info o ...

Page 20: ...omatically detect the first usable PVC and automatically detect PPPoE PPPoA and Bridge Protocol with DHCP Server available To continue click on the Next t button If you do not use DSL Auto connect then you may need to change the VPI and VCI numbers Quality of service can also be enabled on this screen Furthermore if you do not use DSL Auto connect then you will need to select the connection type a...

Page 21: ...et Router User Manual 20 Version 1 0 The next screen to appear will depend on the connection type that was selected in the previous screen The following screen is a result of choosing IP over ATM IPoA as the connection type ...

Page 22: ...N LAN and ADSL settings WAN Configure the WAN settings as provided by your ISP Click on the Add d button if you want to add a new rule for the WAN interface The ATM PVC Configuration screen appears The ATM PVC Configuration screen allows you to configure an ATM PVC identifier VPI and VCI and select a service category ...

Page 23: ...ifier The valid range is 32 to 65535 Service Category Five classes of traffic are listed o UBR Without PCR o UBR With PCR o CBR o Non Realtime VBR o Realtime VBR Enabling QoS for a PVC improves performance for selected classes of applications However since QoS also consumes system resources the number of PVCs is reduced If you want to enable QoS service click on the Enable Quality Of Service e che...

Page 24: ...twork protocols and encapsulation modes PPP over ATM PPPoA PPP over Ethernet PPPoE MAC Encapsulation Routing MER IP over ATM IpoA Bridging Select the mode that your ISP has instructed you to use and click on Next t After you click on Next t the below screen appears allowing you disable the bridge service if desired ...

Page 25: ...p Summary screen displaying the WAN configurations made Click on the Save e button when the settings are correct The below screen will appear showing the WAN settings that you made When satisfied with the settings and no changes are necessary click on the Finish h button To remove any settings click on the Remove e button ...

Page 26: ...4 Port Wireless Ethernet Router User Manual 25 Version 1 0 After selecting the Finish h button the below screen will appear At this point the router will reboot to save the changes made ...

Page 27: ...he DSL Router IP address and Subnet Mask for the LAN interface to correspond your LAN s IP Subnet The Save e button only saves the LAN configuration data but does not apply the configurations Select the Save Reboot t button to save the LAN configuration data and reboot the router and apply the new configurations ...

Page 28: ... can configure the Virtual Server Port Triggering and DMZ Host Virtual Servers A virtual server allows you to direct incoming traffic from the WAN side to a specific IP address on the LAN side Select the virtual server from the drop down list and complete the server IP address then click on the Save Apply button ...

Page 29: ...ou need to remove any of the server names select the check box and click on the Remove e button Port Triggering Click on the Add d button to add Port Triggering to your Internet application The below screen appears when you click on Add d allowing you to select the application that you want to set the port settings for After a selection has been made click on the Save Apply button ...

Page 30: ...rt Wireless Ethernet Router User Manual 29 Version 1 0 The below screen appears after you save your selections You will be able to add or remove selections made by clicking on the Add d and Remove e buttons ...

Page 31: ...click on Save Apply y Firewall IP Filtering Outgoing The outgoing filter will block the LAN traffic from entering the WAN side Click on the Add d button to create filters The below screen will appear when you click on Add d Input the filter name source information from the LAN side and destination information from the WAN side Then click on Save Apply y ...

Page 32: ... on the Add d button to add incoming filter settings Enter a filter name information about the source address from the WAN side and information about the destination address to the LAN side Select the protocol and WAN interface then click on Save Apply y to add the setting You can view and delete the incoming filter settings from this screen ...

Page 33: ...C Filtering MAC filtering can forward or block traffic by MAC address You can change the policy or add settings to the MAC filtering table using the MAC Filtering Setup screen If you click on Change Policy y a confirmation dialog allows you to verify your change ...

Page 34: ... After you save the settings a screen showing the settings will appear On this screen you will be able to view and delete MAC filtering rules Port Mapping Port mapping is a feature that allows you to open ports to allow certain Internet applications on the WAN side to pass through the firewall and enter your LAN To use this feature mapping groups need to be created To do this follow the below inst...

Page 35: ...Port Wireless Ethernet Router User Manual 34 Version 1 0 2 After clicking the Add d button the below configuration screen appears allowing you enter the groups and the interfaces they are associated with ...

Page 36: ...ess Ethernet Router User Manual 35 Version 1 0 Quality of Service You can configure the Quality of Service to apply different priorities to traffic on the router On this screen you can view and delete QoS settings ...

Page 37: ...fault Gateway screen As default the box is checked for automatic assigned default gateway to be enabled Click the Save Apply button to enable or disable this feature Static Route Use the Routing Static Route screen to add a static route to the routing table Enter the route information and click on Save Apply y to make it active No reboot is required ...

Page 38: ...4 Port Wireless Ethernet Router User Manual 37 Version 1 0 RIP If RIP is enabled the router operation can be configured as active or passive ...

Page 39: ...4 Port Wireless Ethernet Router User Manual 38 Version 1 0 DNS DNS Server Use the DNS Server screen to request automatic assignment of a DNS or to specify a primary and secondary DNS Dynamic DNS ...

Page 40: ...nabled and ADSL2 Enabled Set this value only as directed by your ISP Phone Line Pair The 6211 ADSL router supports phone lines on pins 2 and 3 or pins 1 and 4 to connect your ADSL line If your phone system uses pins 2 and 3 attach a normal RJ11 cable to the router and select Inner pair on the screen if your phone system uses pins 1 and 4 attach the phone with the supplied RJ11 cable and select Out...

Page 41: ...everb Medley No retrain L3 Tone Settings The frequency band of ADSL is split up into 256 separate tones each spaced 4 3125 kHz apart With each tone carrying separate data the technique operates as if 256 separate modems were running in parallel The tone range is from 0 to 31 for upstream and from 32 to 255 for downstream Do not change these settings unless so directed by your ISP ...

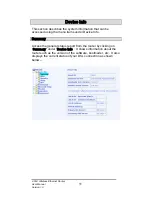
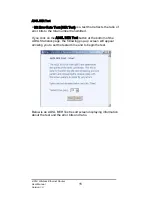
Page 42: ...4 Port Wireless Ethernet Router User Manual 41 Version 1 0 ...

Page 43: ...ation method and to enable or disable WEP encryption Note that depending on the network authentication that is selected the screen will change accordingly so additional fields can be configured for the specific authentication method Network authentication methods include the following Open n anyone can access the network The default is a disabled WEP encryption setting Shared d WEP encryption is e...

Page 44: ...ent The main difference is that the password is entered manually A group re key interval time is also required WPA2 Wi Fi Protected Access 2 second generation of WPA which uses AES Advanced Encryption Standard instead of TKIP as its encryption method Network re auth interval is the time in which another key needs to be dynamically issued WPA2 PSK Wi Fi Protected Access 2 Pre Shared Key suitable fo...

Page 45: ...dd the MAC addresses that you want to manage and then select the mode that you want to use to manage them You can disable this feature or you can allow or deny access to the MAC addresses that you add to the list The following screen appears when you want to add a MAC address to the filter When completed click on the Save Apply button ...

Page 46: ...4 Port Wireless Ethernet Router User Manual 45 Version 1 0 Wireless Bridge In this next screen you can select which mode you want the router to be in either access point or wireless bridge ...

Page 47: ...h a message is sent to a specified group of recipients Basic Rate e the set of data transfer rates that all the stations will be capable of using to receive frames from a wireless medium Fragmentation Threshold d used to fragment packets which help improve performance in the presence of radio frequency RF interference RTS Threshold Request to Send Threshold determines the packet size of a transmis...

Page 48: ...om Wi Fi technology 54g Protection n the 802 11g standards provide a protection method so 802 11g and 802 11b devices can co exist in the same network without speaking at the same time Do not disable 54g Protection if there is a possibility that a 802 11b device may need to use your wireless network In Auto Mode the wireless device will use RTS CTS Request to Send Clear to Send to improve 802 11g ...

Page 49: ...anual 48 Version 1 0 Troubleshooting Diagnostics The diagnostics screen allows you to run diagnostic tests to check your DSL connection In addition you can test the connection to your DSL service provider Management Settings Backup Settings ...

Page 50: ...1 0 Restore User Settings To restore saved settings select Management Settings Restore User Settings Ш Ш Select the backup file you want to restore and click on Update Settings s The router will restore settings and reboot to activate the restored settings ...

Page 51: ...To restore the router to factory default settings select Management Settings Restore Default Ш Ш Reply OK to the confirmation dialog The router will restore the default settings and reboot System Log The System Log dialog allows you to view the System Log and configure the System Log options To view the System Log click on the View System Log g button to check the log file ...

Page 52: ... Informational and Debugging All events above or equal to the selected log level will be logged and displayed If the selected mode is Remote or Both events will be sent to the specified IP address and UDP port of a remote system log server If the selected mode is Local or Both events will be recorded in the local memory Select the desired values and click on the Save Apply y button to configure th...

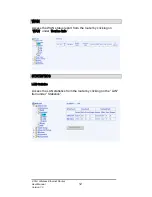
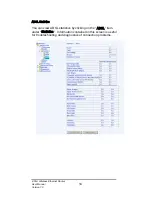
Page 53: ...4 Port Wireless Ethernet Router User Manual 52 Version 1 0 SNMP Internet Times ...

Page 54: ...nection is defined only the LAN side can be configured Services IP Addresses Web access to the router can be limited when Access Control Mode is enabled The IP addresses of allowed hosts can be added using Access Control IP Address Ш Add the IP address to the IP address list by clicking on the Add button then select Enabled d to enable Access Control Mode ...

Page 55: ...rmitted to access the local management services enter the IP address in the box and click on the Save Apply button Passwords Access the Passwords s screen under the Access Control l section to change a password Select an account and enter the current password and the new password and then click on the Save Apply y button ...

Page 56: ...oftware image file from your ISP 2 Enter the path to the image file location or click on the Browse button to locate the image file 3 Click the Update Software e button once to upload the new image file Reboot Router Select Management Reboot Router to reboot the router using Ш the web interface The router will save the current configuration and reboot itself using the new configuration ...

Page 57: ...terference will not occur in a particular installation If this equipment does cause harmful interference to radio or television reception which can be determined by turning the equipment off and on the user is encouraged to try to correct the interference by one or more of the following measures ЁReorient or relocate the receiving antenna ЁIncrease the separation between the equipment and receiver...

Page 58: ...ments for electromagnetic compatibility Article 3 1b Testing for electromagnetic compatibility according to EN 301 489 1 and EN 301 489 17 has been conducted These are considered relevant and sufficient Effective use of the radio spectrum Article 3 2 Testing for radio test suites according to EN 300 328 has been conducted These are considered relevant and sufficient CE Mark Warning This is a Class...

Reviews: