


Chapter 8 Basic Setting
XGS4600 Series User’s Guide
98
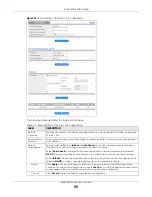
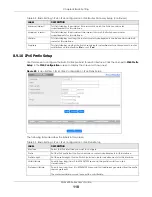
The following table describes the labels in this screen.
Table 22 Basic Setting > Port Setup
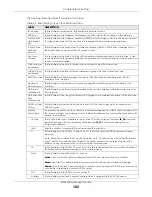
LABEL
DESCRIPTION
SLOT
This field appears only in stacking mode. Click the drop-down list to choose the slot number of
the Switch in a stack.
Port
This is the port index number. In stacking mode, the first number represents the slot ID and the
second one is the port number. Please note that the default stacking ports (the last two ports of
your Switch) cannot be configured. They are reserved for stacking only.
*
Settings in this row apply to all ports.
Use this row only if you want to make some settings the same for all ports. Use this row first to set
the common settings and then make adjustments on a port-by-port basis.
Note: Changes in this row are copied to all the ports as soon as you make them.
Active
Select this check box to enable a port. The factory default for all ports is enabled. A port must
be enabled for data transmission to occur.
Name
Type a descriptive name that identifies this port. You can enter up to 128 ASCII characters
except [ ? ], [ | ], [ ' ] or [ " ].
Note: Due to space limitations, the port name may be truncated in some Web
Configurator screens.
Speed/Duplex
Select the speed and the duplex mode of the Ethernet connection on this port. Choices are
Auto
,
Auto-1G
,
10-an
(10M/auto-negotiation),
10M/Full Duplex
,
100-an
(100M/auto-
negotiation),
100M/Full Duplex
,
1G/Full Duplex
, and
10G/Full Duplex
(Gigabit connections only).
Selecting
Auto-1G
or
Auto
(auto-negotiation) allows one port to negotiate with a peer port
automatically to obtain the connection speed and duplex mode that both ends support. When
auto-negotiation is turned on, a port on the Switch negotiates with the peer automatically to
determine the connection speed and duplex mode. If the peer port does not support auto-
negotiation or turns off this feature, the Switch determines the connection speed by detecting
the signal on the cable and using half duplex mode. When the Switch’s auto-negotiation is
turned off, a port uses the pre-configured speed and duplex mode when making a connection,
thus requiring you to make sure that the settings of the peer port are the same in order to
connect.
Flow Control
A concentration of traffic on a port decreases port bandwidth and overflows buffer memory
causing packet discards and frame losses.
Flow Control
is used to regulate transmission of signals
to match the bandwidth of the receiving port.
The Switch uses IEEE 802.3x flow control in full duplex mode and backpressure flow control in half
duplex mode.
IEEE 802.3x flow control is used in full duplex mode to send a pause signal to the sending port,
causing it to temporarily stop sending signals when the receiving port memory buffers fill.
Back Pressure flow control is typically used in half duplex mode to send a "collision" signal to the
sending port (mimicking a state of packet collision) causing the sending port to temporarily stop
sending signals and resend later.
Select
Tx Rx
to allow the Switch port to send pause signal to the connected device, and for the
connected device to send a pause signal to the Switch. The Switch will temporarily stop sending
signals after receiving pause signal.
Select
Tx
to allow the Switch port to send pause signal to the connected device.
Select
Rx
to allow the connected device to send a pause signal to the Switch. The Switch will
temporarily stop sending signals.
Otherwise, select
Disable
.
802.1p Priority
This priority value is added to incoming frames without a (802.1p) priority queue tag.
Содержание XGS4600 Series
Страница 24: ...24 PART I User s Guide ...
Страница 44: ...44 PART II Technical Reference ...
Страница 180: ...Chapter 13 Spanning Tree Protocol XGS4600 Series User s Guide 180 Figure 145 MSTP and Legacy RSTP Network Example ...
Страница 189: ...Chapter 16 Mirroring XGS4600 Series User s Guide 189 Figure 150 Advanced Application Mirroring Standalone Mode ...
Страница 244: ...Chapter 22 Policy Rule XGS4600 Series User s Guide 244 Figure 189 Policy Example EXAMPLE ...
Страница 277: ...Chapter 25 Multicast XGS4600 Series User s Guide 277 Figure 215 Advanced Application Multicast MVR Standalone Mode ...
Страница 559: ...Chapter 59 Access Control XGS4600 Series User s Guide 559 Figure 460 Example Lock Denoting a Secure Connection EXAMPLE ...
Страница 586: ...Chapter 69 Configure Clone XGS4600 Series User s Guide 586 Figure 479 Management Configure Clone Standalone Mode ...
Страница 587: ...Chapter 69 Configure Clone XGS4600 Series User s Guide 587 Figure 480 Management Configure Clone Stacking Mode ...
Страница 594: ...Chapter 71 Port Status XGS4600 Series User s Guide 594 Figure 485 Management Port Status Port Details Standalone Mode ...
Страница 604: ...604 PART III Troubleshooting and Appendices ...


