


Chapter 4 Web Configurator
XGS4600 Series User’s Guide
47
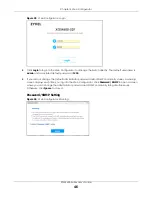
Figure 27
Web Configurator: Password
Change the default administrator and/or SNMP passwords, and then click
Apply
to save your changes.
Table 5 Web Configurator: Password/SNMP
LABEL
DESCRIPTION
Administrator
This is the default administrator account with the “admin” user name. You cannot change the default administrator
user name.
Old Password
Type the existing system password (
1234
is the default password when shipped).
New Password
Enter your new system password. Up to 32 characters are allowed for the new password
except [ ? ], [ | ], [ ' ], [ " ], [ space ], or [ , ].
Retype to confirm
Retype your new system password for confirmation.
General Setting
Use this section to specify the SNMP version and community (password) values.
Version
Select the SNMP version for the Switch. The SNMP version on the Switch must match the version
on the SNMP manager. Choose SNMP version 2c (
v2c
), SNMP version 3 (
v3
) or both (
v3v2c
).
Note: SNMP version 2c is backwards compatible with SNMP version 1.
Get Community
Enter the
Get Community
string, which is the password for the incoming Get- and GetNext-
requests from the management station.
The
Get Community
string is only used by SNMP managers using SNMP version 2c or lower.
Set Community
Enter the
Set Community
string, which is the password for the incoming Set- requests from the
management station.
The
Set Community
string is only used by SNMP managers using SNMP version 2c or lower.
Trap Community
Enter the
Trap Community
string, which is the password sent with each trap to the SNMP
manager.
The
Trap Community
string is only used by SNMP managers using SNMP version 2c or lower.
Apply
Click
Apply
to save your changes to the Switch’s run-time memory. The Switch loses these
changes if it is turned off or loses power, so use the
Save
link on the top navigation panel to
save your changes to the non-volatile memory when you are done configuring.
Cancel
Click
Cancel
to begin configuring this screen afresh.
Содержание XGS4600 Series
Страница 24: ...24 PART I User s Guide ...
Страница 44: ...44 PART II Technical Reference ...
Страница 180: ...Chapter 13 Spanning Tree Protocol XGS4600 Series User s Guide 180 Figure 145 MSTP and Legacy RSTP Network Example ...
Страница 189: ...Chapter 16 Mirroring XGS4600 Series User s Guide 189 Figure 150 Advanced Application Mirroring Standalone Mode ...
Страница 244: ...Chapter 22 Policy Rule XGS4600 Series User s Guide 244 Figure 189 Policy Example EXAMPLE ...
Страница 277: ...Chapter 25 Multicast XGS4600 Series User s Guide 277 Figure 215 Advanced Application Multicast MVR Standalone Mode ...
Страница 559: ...Chapter 59 Access Control XGS4600 Series User s Guide 559 Figure 460 Example Lock Denoting a Secure Connection EXAMPLE ...
Страница 586: ...Chapter 69 Configure Clone XGS4600 Series User s Guide 586 Figure 479 Management Configure Clone Standalone Mode ...
Страница 587: ...Chapter 69 Configure Clone XGS4600 Series User s Guide 587 Figure 480 Management Configure Clone Stacking Mode ...
Страница 594: ...Chapter 71 Port Status XGS4600 Series User s Guide 594 Figure 485 Management Port Status Port Details Standalone Mode ...
Страница 604: ...604 PART III Troubleshooting and Appendices ...


