


Chapter 28 DHCP Snooping
XGS4600 Series User’s Guide
308
28.3.2 DHCP Snooping VLAN Configure
Use this screen to enable DHCP snooping on each VLAN and to specify whether or not the Switch adds
DHCP relay agent option 82 information to DHCP requests that the Switch relays to a DHCP server for
each VLAN.
To open this screen, click
Advanced Application
>
IP Source Guard
>
IPv4 Source Guard Setup
>
DHCP
Snooping
>
Configure
>
VLAN
.
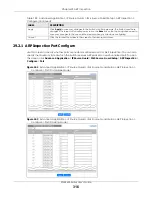
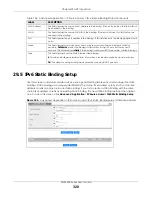
Figure 235
Advanced Application > IP Source Guard > IPv4 Source Guard Setup > DHCP Snooping >
Configure > VLAN
The following table describes the labels in this screen.
Table 128 Advanced Application > IP Source Guard > IPv4 Source Guard Setup > DHCP Snooping >
Configure > VLAN
LABEL
DESCRIPTION
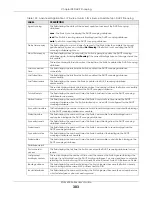
VLAN Search by VID Enter the VLAN ID you want to manage. Use a comma (,) to separate individual VLANs or a
dash (–) to indicates a range of VLANs. For example, “3,4” or “3–9”.
Search
Click this to display the specified range of VLANs in the section below.
VID
This field displays the VLAN ID of each VLAN in the range specified above. If you configure
the
*
VLAN, the settings are applied to all VLANs.
Enabled
Select
Yes
to enable DHCP snooping on the VLAN. You still have to enable DHCP snooping
on the Switch and specify trusted ports.
Note: The Switch will drop all DHCP requests if you enable DHCP snooping and
there are no trusted ports.
Option 82 Profile
Select a pre-defined DHCP option 82 profile that the Switch applies to all ports in the
specified VLANs. The Switch adds the information (such as slot number, port number, VLAN ID
and/or system name) specified in the profile to DHCP requests that it broadcasts to the DHCP
VLAN, if specified, or VLAN. You can specify the DHCP VLAN in the
DHCP Snooping Configure
screen.
Apply
Click
Apply
to save your changes to the Switch’s run-time memory. The Switch loses these
changes if it is turned off or loses power, so use the
Save
link on the top navigation panel to
save your changes to the non-volatile memory when you are done configuring.
Cancel
Click this to reset the values in this screen to their last-saved values.
Change Pages
Click
Previous
or
Next
to show the previous/next screen if all status information cannot be
seen in one screen.
Содержание XGS4600 Series
Страница 24: ...24 PART I User s Guide ...
Страница 44: ...44 PART II Technical Reference ...
Страница 180: ...Chapter 13 Spanning Tree Protocol XGS4600 Series User s Guide 180 Figure 145 MSTP and Legacy RSTP Network Example ...
Страница 189: ...Chapter 16 Mirroring XGS4600 Series User s Guide 189 Figure 150 Advanced Application Mirroring Standalone Mode ...
Страница 244: ...Chapter 22 Policy Rule XGS4600 Series User s Guide 244 Figure 189 Policy Example EXAMPLE ...
Страница 277: ...Chapter 25 Multicast XGS4600 Series User s Guide 277 Figure 215 Advanced Application Multicast MVR Standalone Mode ...
Страница 559: ...Chapter 59 Access Control XGS4600 Series User s Guide 559 Figure 460 Example Lock Denoting a Secure Connection EXAMPLE ...
Страница 586: ...Chapter 69 Configure Clone XGS4600 Series User s Guide 586 Figure 479 Management Configure Clone Standalone Mode ...
Страница 587: ...Chapter 69 Configure Clone XGS4600 Series User s Guide 587 Figure 480 Management Configure Clone Stacking Mode ...
Страница 594: ...Chapter 71 Port Status XGS4600 Series User s Guide 594 Figure 485 Management Port Status Port Details Standalone Mode ...
Страница 604: ...604 PART III Troubleshooting and Appendices ...


