background image

 Chapter 1 Hardware Installation

UNS Series Hardware Installation Guide

13

1.7.4  UNS Port LEDs

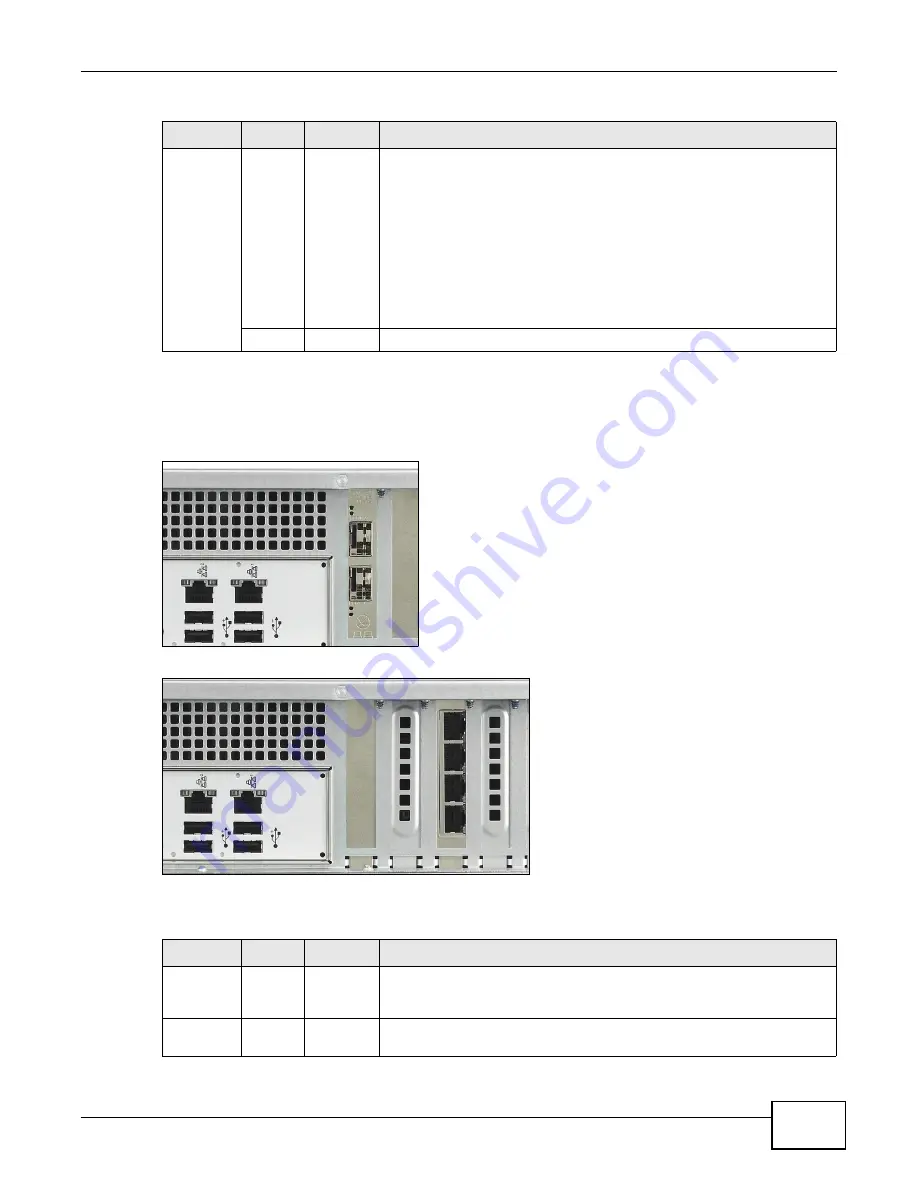
On the UNS2700, ports 1 and 2 are 1 Gbps ports; ports 3 and 4 are 10 Gbps ports.

On the UNS2300, ports 1-6 are 1 Gbps ports.

The following table describes the Ethernet port LEDs.

2 - System Red

On

There is a warning level event. Warning level events include:

System  Overheated, 

Voltage abnormal, 

Fan abnormal, 

UPS power low, 

Power abnormal,

Pool failed, 

Disk  I/O  failed,

Data error 

Firmware upgrade failed

Off

There is no warning level event or the power is off.

Table 4   

UNS


Power Switch LEDs  (continued)

LED

COLOR STATUS

DESCRIPTION

Table 5   

Ethernet Port LEDs 

LED

COLOR STATUS

DESCRIPTION

1G - 
Activity 
(Left)

Green

Blinking

The UNS is transmitting or receiving to/from an Ethernet device through 
the 1G port.

Off

The UNS is not transmitting or receiving to/from an Ethernet device 
through the 1G port.

1

3

4

2

1

3

4

5

6

2

Содержание UNS2300

Страница 1: ...Quick Start Guide www zyxel com UNS2300 UNS2700 Unified Network Storage Version 1 00 Edition 1 06 2013 Copyright 2013 ZyXEL Communications Corporation Hardware Installation Guide ...

Страница 2: ...a rack Graphics in this book may differ slightly from your product Every effort has been made to ensure that the information in this manual is accurate Related Documentation User s Guide This guide shows how to use the Web Configurator to configure the UNS Web Configurator Online Help Click the help icon in the web configurator for help in configuring screens and supplementary information ...

Страница 3: ...ments 2 Separate the Slide Rails 3 Connect the Inner Rail to the UNS 4 Connect the Outer Rail to the Rack 5 Insert the UNS into the Rack 1 2 1 Prepare the Installation Requirements A rack with 2U space Two sliding rails 10 M6 screws for attaching both outer rails to the rack The rack depth can be from 71 12 cm to 91 44 cm 28 to 36 inches Note Failure to use the proper screws may damage the unit 1 ...

Страница 4: ...e inner rail completely to separate the rails 1 2 3 Connect the Inner Rail to the UNS 1 Connect the inner rail to the UNS by latching it onto the screws on the UNS body 2 Repeat this procedure for the other inner rail on the other side of the UNS 1 2 4 Connect the Outer Rail to the Rack Find a space in the rack that is 2U high The space between two triangles is 1U high 1 Adjust the length of the o...

Страница 5: ...e Rack It is recommended that two people insert the UNS with inner railings attached into the rack The inner rail attached to the UNS has two locks Use the inner lock to slide the inner rail into the outer rail already attached to the rack 1 Release the inner lock and slide the UNS with inner rail attached onto the outer rail already fastened to the rack 2 Push the inner rail all the way into the ...

Страница 6: ...from the rack use the outer lock on the inner rail 1 3 Insert a Hard Drive 1 3 1 Drive Tray Slot Numbering The drive trays with hard drive can be installed into any slot T This is the ordering of the slots Do the following to remove a hard drive tray from the UNS 3 Slot 1 Slot 4 Slot 7 Slot 10 Slot 2 Slot 5 Slot 8 Slot 11 Slot 3 Slot 6 Slot 9 Slot 12 ...

Страница 7: ... slide out the hard drive tray 3 This is the empty hard drive tray Place a compatible hard drive into the hard drive tray as shown Turn the tray over while holding the hard drive inside and fasten the hard drive to the tray with the provided screws The screw positions for 3 5 inch hard drives and 2 5 inch hard drives are shown in the figure 1 2 3 Tray Hard Drive ...

Страница 8: ...ve tray back into the UNS by sliding it gently all the way in and then closing the front Note Do NOT close the front handle before you slide the hard drive tray all the way back in 1 4 About the Power Modules There are two power module slots with two power modules One module is redundant so if one power module fails the system can operate on the remaining module It is recommended that you use two ...

Страница 9: ... to remove a power module use the handle 2 to slowly pull it out with one hand and place the other hand under it to support it 1 5 Make Rear Panel Connections The following is the rear panel for the UNS2700 The following is the rear panel for the UNS2300 1 2 1 2 3 4 C V 1 2 3 4 5 6 C V ...

Страница 10: ...troubleshoot the UNS using the command line interface CLI Port 1 Connect an Ethernet cable to this port to access UNS using the web configurator This port can operate at 10 100 1000 Mbps speeds and is not VLAN aware If there is no DHCP server in your network then the default IP address of this port is 169 254 1 1 You can use that IP address to access the web configurator 1G Ports 2 on UNS2700 and ...

Страница 11: ...Power Module LEDS and Buzzer The LEDs are to the right of the power socket Table 2 Hard Disk Tray LEDs LED COLOR STATUS DESCRIPTION 1 Status Green On The hard disk is inserted and working normally Amber On The hard disk has failed Blinking The hard disk data is being rebuilt Off There is no hard disk in the tray or the power is off 2 Access Green Blinking The hard disk is being accessed Off The ha...

Страница 12: ...ing Power supply to the module is low Off Power supply to the module is abnormal too much current or not enough voltage or the temperature is too high Buzzer Button B Red N A If the alarm sounds push the buzzer button 1 to turn the alarm off The buzzer LED 1 will then turn from red to green Buzzer LED Red On An alarm sounds if one of the power modules is connected but not supplying power to the UN...

Страница 13: ...stem Overheated Voltage abnormal Fan abnormal UPS power low Power abnormal Pool failed Disk I O failed Data error Firmware upgrade failed Off There is no warning level event or the power is off Table 4 UNS Power Switch LEDs continued LED COLOR STATUS DESCRIPTION Table 5 Ethernet Port LEDs LED COLOR STATUS DESCRIPTION 1G Activity Left Green Blinking The UNS is transmitting or receiving to from an E...

Страница 14: ...port is connected at 100 Mbps Yellow On The 1G port is connected at 1000 Mbps Off The 1G port is connected at 10 Mbps or there is no connection 10G Speed Top Green On The 10G port is connected at 10000 Mbps Blinking The UNS is transmitting or receiving to from an Ethernet device through the 10G port at 10000 Mbps Yellow On The 10G port is connected at 1000 Mbps Blinking The UNS is transmitting or ...

Страница 15: ...book or computer must be in the range 169 254 1 2 to 169 254 1 254 Table 6 UNS Finder LABEL DESCRIPTION Rescan Click this to have the UNS Finder search again for UNS devices in your network About Click this to get more information on this UNS Finder release Exit Click this to close the UNS Finder program IP Address This is the IP address of the UNS port connected to your network System Name This i...

Страница 16: ...ur web browser The default login name and password is admin and 1234 Use the menus on the left to configure the UNS See the User s Guide or the web help to find more information on these screens 1 9 1 Choose a RAID Configuration It is important that you choose your RAID carefully Changing RAID later requires that you back up all the data first and then restore it after your new RAID has been confi...

Страница 17: ...ensional parity protection over the member disks RAID 50 Striping over the member RAID 5 volumes RAID 60 Striping over the member RAID 6 volumes Table 8 RAID Comparison GOAL RAID SCHEME SAFETY MIN NO OF HARD DISKS USAGE CAPACITY PERFORMANCE Efficiency and cost RAID 0 None 2 All Best Data Security RAID 1 Best 2 50 Best Read Data Security with cost constraints RAID 5 Good 3 N 1 N no used Fast read s...

Отзывы: