background image

Chapter 17 Applications

Cloud Storage User’s Guide

230

17.8  Web Publishing Screen

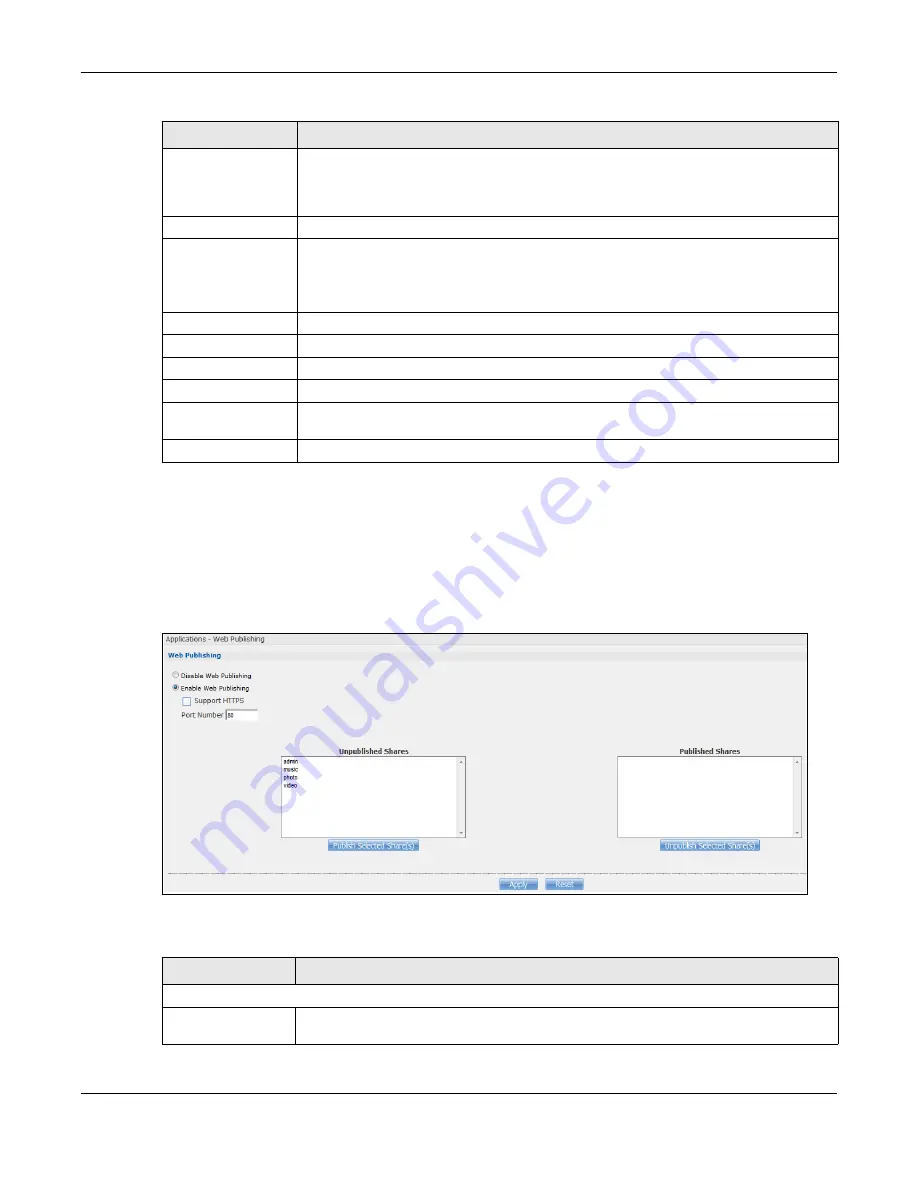
Use this screen to turn web publishing on or off and select shares to publish. Click 

Applications > 

Web Publishing

 to open the following screen. 

Figure 130   

Applications > Web Publishing

The following table describes the labels in this screen. 

Health

This field displays how many full copies of the file are available for this task. The NAS 
can download a file with a higher health value more efficiently. If the health value is less 
than 1 (0.65 for example), there is no full copy of the file, and the NAS may not be able 
to complete downloading the file.

Time Left

This is the time remaining to complete the task.

Priority

Use this field to set the priority for downloading the task.

Select 

Auto

 to have the NAS automatically determine the task’s priority.

Select 

High

 to have the NAS download this file before the other files.

Comment

Enter a description for this task. Click 

Apply

 to save the description.

Start Time

This field displays when the NAS started to download files.

Completed on

This field displays when the file was successfully downloaded to the NAS.

Info-Hash

This information is used to verify the torrent file.

Tracker

This field displays the tracker that NAS is currently connected to. A tracker is a server 
used for finding peers sharing the file.

Close

Click this to close the screen.

Table 78   

Applications > Download Service > Task Info (continued)

LABEL

DESCRIPTION

Table 79   

Applications > Web Publishing

LABEL

DESCRIPTION

Web Publishing

Disable / Enable 
Web Publishing

Turn on web publishing to let people access files in the published shares using a web 
browser, without having to log into the Web Configurator.

Содержание NAS540

Страница 1: ...e www zyxel com Cloud Storage NAS Series Version 5 1 Edition 2 Copyright 2016 ZyXEL Communications Corporation User s Guide Default Login Details Web Address nas326 nas542 nas540 nas520 User Name admi...

Страница 2: ...f individual screens and supplementary information Online Support Information Visit our product support website at http www zyxel com support support_landing shtml and choose from these topics ZyXEL S...

Страница 3: ...sktop at a Glance 36 Web Configurator 38 Storage Manager 47 Status Center 103 Control Panel 106 Videos Photos Music File Browser 124 Administrator 139 Managing Packages 144 Tutorials 146 Technical Ref...

Страница 4: ...utton 17 Chapter 2 Getting Started 19 2 1 Overview 19 2 2 FindMe 19 2 3 NAS Starter Utility 19 2 3 1 NAS Seeker Screen 20 2 3 2 Main NAS Starter Utility Screen 21 2 3 3 Directory of the NAS 22 2 3 4 N...

Страница 5: ...38 7 1 Overview 38 7 2 Accessing the NAS Web Configurator 38 7 3 Desktop 41 7 3 1 Status Zone 43 7 3 2 Grouping Icons 44 Chapter 8 Storage Manager 47 8 1 Overview 47 8 2 Storage Manager Overview 47 8...

Страница 6: ...113 10 5 UPnP Port Mapping Screen 113 10 5 1 UPnP and the NAS s IP Address 114 10 5 2 UPnP and Security 115 10 5 3 The NAS s Services and UPnP 115 10 5 4 UPnP Router 116 10 5 5 Configuring UPnP Port...

Страница 7: ...play 148 14 2 2 NAS Icon Right click Options 149 14 3 Windows 7 Network Map 150 14 4 Playing Media Files in Windows 7 152 14 5 Windows 7 Devices and Printers 152 14 5 1 Windows 7 Desktop Shortcut 153...

Страница 8: ...oring Archived Files by Backup Job 196 14 14 4 Restoring by Backup Files 198 Part II Technical Reference 201 Chapter 15 Status Screen 203 15 1 Overview 203 15 2 Status Screen 203 Chapter 16 System Set...

Страница 9: ...34 17 11 2 Download Service 235 17 11 3 Download Service Notification 236 17 11 4 P2P Download Security 236 17 11 5 Web Publishing Example 238 17 11 6 Web Publishing 240 17 11 7 Printer Sharing 240 17...

Страница 10: ...to Use Dropbox with the NAS 276 Chapter 21 Using Time Machine with the NAS 278 21 1 Overview 278 21 2 Time Machine Screen 278 21 3 Using Time Machine 278 Chapter 22 Users 281 22 1 Overview 281 22 2 W...

Страница 11: ...creens 302 26 1 Overview 302 26 2 What You Can Do 302 26 3 Power Screen 302 26 3 1 Editing the Power Control Schedule Screen 304 26 4 Log Screen 306 26 4 1 Report Config Screen 307 26 4 2 Email Settin...

Страница 12: ...ting 337 28 1 Troubleshooting Overview 337 28 2 Power Hardware Connections and LEDs 337 28 3 NAS Starter Utility 339 28 4 NAS Login and Access 340 28 4 1 Enabling Scripting of Safe ActiveX Controls 34...

Страница 13: ...Table of Contents Cloud Storage User s Guide 13 Index 366...

Страница 14: ...The NAS s RAID 1 capability clones contents from one drive to another If a drive is damaged or corrupted you still have another drive to restore from or use Get up and running quickly with the easy to...

Страница 15: ...tacks from the Internet Refer to the Quick Start Guide for hardware connections and how to install and remove hard drives from the disk trays Note Turn off and disconnect the NAS before you install or...

Страница 16: ...g data to the hard disk drive Slow Blinking Sleeping HDD LED blinking is enabled and the hard disk drive is in hibernation Red On The NAS detected an error on the hard disk drive like a bad sector for...

Страница 17: ...n the rear panel to restore the NAS s default settings Figure 3 The RESET Button Press the RESET button until you hear one beep after about two seconds then release it You will hear one more beep afte...

Страница 18: ...e location in order to prevent unauthorized reset of the device You may need to close and re open the NAS Starter Utility to discover the NAS This is because the NAS automatically re acquires IP addre...

Страница 19: ...FindMe 1 Connect to https findme zyxel com in your browser to find and connect to your NAS 2 Use the default username admin and password 1234 to log in See Chapter 7 on page 38 for more on the web de...

Страница 20: ...n the Windows system tray to start the NAS Starter Utility Alternatively you can click Start Programs ZyXEL NAS Starter Utility Figure 5 NAS Starter Utility Desktop Icon Figure 6 NAS Starter Utility W...

Страница 21: ...e each one a unique name for identification purposes IP Address This is the current IP address of the NAS Table 2 NAS Seeker continued LABEL DESCRIPTION Table 3 NAS Starter Utility Main Screen LABEL D...

Страница 22: ...ig Failed Run Initialization Wizard This button displays if the NAS detects that the NAS has not yet configured any of the installed hard disks Click this button to go to the Web Configurator login sc...

Страница 23: ...on the NAS and the drive letter on your computer to which you want to map it The shares that each user can select to map depends on the user s permissions For example if share1 is private to user1 the...

Страница 24: ...o enter a user name and password to connect to the Internet Enter your user name and password IP Address Use these fields to configure the IP address of the LAN interface through which you are connect...

Страница 25: ...etwork DNS Domain Name System DNS is for mapping a domain name to its corresponding IP address and vice versa Select Use from DHCP server if the NAS is automatically given DNS information from the ISP...

Страница 26: ...ess the NAS through the Internet The myZyXELcloud Web portal also lets you monitor the NAS s health from anywhere 3 2 ZyXEL Drive Use the ZyXEL Drive app to stream or download photos videos and music...

Страница 27: ...emotely Cloud Storage User s Guide 27 Figure 14 ZyXEL Drive Welcome 3 2 2 NAS and File List My own NAS Access and share files from your own NAS Shared With Me Access files on someone else s NAS folder...

Страница 28: ...otely Cloud Storage User s Guide 28 Figure 15 NAS and File List 3 2 3 Uploading and Media Streaming Use ZyXEL Drive to upload photos and videos from your mobile device to the NAS You can also stream v...

Страница 29: ...Chapter 3 Accessing Your Cloud Remotely Cloud Storage User s Guide 29 Figure 16 Uploading and Media Streaming...

Страница 30: ...directly on your Android or iOS device View photos stored on your NAS with the app s built in slideshow Play music stored on your NAS Watch videos stored on your NAS Upload files from your Android dev...

Страница 31: ...S540 access the NAS s default photo music and video shares You can play download upload and manage files Download access and manage files downloaded from the NAS to your Android or iOS device and mana...

Страница 32: ...Chapter 4 zCloud Cloud Storage User s Guide 32 Figure 19 zCloud Android and iOS TV Streaming...

Страница 33: ...ens Chapter 23 on page 287 to create and manage groups of user accounts You can assign users to groups and grant individual groups access rights to specific shares Use the Shares screens Chapter 24 on...

Страница 34: ...e the NAS s Backup screens Section 27 3 on page 321 to schedule backups of files and folders on your NAS to a USB device or SD card See Section 14 14 2 on page 194 for an example 6 3 Remote Backups Us...

Страница 35: ...line backup and storage account 6 6 Synchronizing Files Besides backups the NAS also provides pure synchronization solutions Note Synchronization is not backup When you delete a file in one location s...

Страница 36: ...36 PART I Web Desktop at a Glance...

Страница 37: ...37...

Страница 38: ...e NAS Web Configurator 1 Make sure your NAS is properly connected and that your computer is in the same subnet as the NAS refer to the Quick Start Guide or the appendices 2 Open your browser and type...

Страница 39: ...his screen displays if you have not created a volume yet Click Create Volume to make a volume or click the x to close the screen to go to the Desktop Section 7 3 on page 41 Figure 22 Welcome Screen 5...

Страница 40: ...choose Existing on disk group you will go to the screens below after clicking Next Figure 24 Existing on Disk Group If this is the first time the NAS has created a volume it needs to reboot after the...

Страница 41: ...Chapter 7 Web Configurator Cloud Storage User s Guide 41 Figure 25 Reboot 7 3 Desktop The Desktop screen displays after you log in Hover your mouse over the heading bar icons to display their names...

Страница 42: ...The Web Configurator session automatically times out if left idle for 15 minutes Simply log back into the NAS if this happens to you 1 Desktop click this to minimize all windows so you can see the de...

Страница 43: ...to view and play video files in the shares that publish videos 11 myZyXELcloud click this to go to mycloud zyxel com to set up a free DDNS hostname for the NAS so you can connect to it easily from th...

Страница 44: ...them a group as shown below Click this to select widgets to show on the status bar Select or clear the widgets to show or hide on the Status bar Click OK to save your changes or Cancel to exit this s...

Страница 45: ...ter the group is created the default group name is NewGroup You can click the icon to change the group name In the following example the group name is changed to Media Figure 29 Change the Group Name...

Страница 46: ...Chapter 7 Web Configurator Cloud Storage User s Guide 46 Figure 30 Move the Group Location...

Страница 47: ...top to go to the following screens in a new window 8 2 Storage Manager Overview Click Storage Manager on the Desktop to display the status of both internal and external storage and configure disk grou...

Страница 48: ...displays the overall health state of the NAS A green circle with a check mark indicates healthy An orange circle with an exclamation mark indicates attention This appears when a volume or disk group i...

Страница 49: ...clamation point represents the volume is in a down state Down means you cannot recover the volume Full means the volume has run out of space Available gray on the circle represents the volume s percen...

Страница 50: ...OF HDD NO OF HDD ALLOWED TO FAIL DESCRIPTION CAPACITY Basic 1 0 Use Basic with one disk It has no fault tolerance 1 x HDD size JBOD 2 4 0 Use JBOD with two or more disks for maximum capacity This is...

Страница 51: ...re or RAID 5 RAID 5 RAID 5 with a hot spare or RAID 6 Table 10 Expand Volumes and Disk Groups EXPANSION METHOD DESCRIPTION Using unallocated disk space You can add more storage space to a volume if th...

Страница 52: ...rmat internal hard disks and create a new volume All data on the disk s will be lost Note This button is not available while the NAS is creating deleting or changing the RAID type of any volume or dis...

Страница 53: ...ealthy volume Degraded An orange circle represents a degraded RAID 1 volume Crashed A red circle represents a down volume The following status also displays the percentage of an action has been comple...

Страница 54: ...he RAID type Normal A green circle represents a healthy volume Degraded An orange circle represents a degraded RAID 1 volume Crashed A red circle represents a down volume The following status also dis...

Страница 55: ...a volume on a disk group instead if you want to have multiple volumes on a disk See Section 8 3 3 on page 64 for more information Moreover the maximum size for one volume is 16TB Figure 35 Create Vol...

Страница 56: ...another disk s with high performance Use RAID 5 with three or more disks to balance performance hard disk capacity usage with data protection in case of disk failure Use RAID 6 with four disks for mo...

Страница 57: ...Chapter 8 Storage Manager Cloud Storage User s Guide 57 Figure 36 Manage Volume Repair RAID A...

Страница 58: ...Chapter 8 Storage Manager Cloud Storage User s Guide 58 Figure 37 Manage Volume Expand the volume by adding disk s A...

Страница 59: ...Chapter 8 Storage Manager Cloud Storage User s Guide 59 Figure 38 Manage Volume Change RAID Type...

Страница 60: ...Chapter 8 Storage Manager Cloud Storage User s Guide 60 Figure 39 Manage Volume Change RAID Type A...

Страница 61: ...s shows the name of the volume you have selected Status This field displays the status of the volume RAID Type This field displays the type of RAID on which the volume is built Disk Info Status This f...

Страница 62: ...entries in this column Disk Name This field shows the name of a hard disk Size This field shows the total disk size Model Name This field shows the model of the hard disk Expected Capacity This field...

Страница 63: ...t or unselect all entries in this column Disk Name This field shows the name of a hard disk Size This field shows the total disk size Model Name This field shows the model of the hard disk Choose a RA...

Страница 64: ...reen to open the screen as shown Note It is suggested to create a volume directly on a disk instead of on a disk group if high performance is important to you See Section 8 3 1 on page 55 for more inf...

Страница 65: ...Chapter 8 Storage Manager Cloud Storage User s Guide 65 Figure 40 Create Volume on an Existing Disk Group...

Страница 66: ...Chapter 8 Storage Manager Cloud Storage User s Guide 66 Figure 41 Create Volume on a New Disk Group...

Страница 67: ...allocate to this volume Click MAX to allocate all available size of the disk group to the volume Back Click Back to go to the previous step Next Click Next to go to the next step Cancel Click Cancel...

Страница 68: ...k group Unallocated capacity This field displays the percentage of the available size the size in used and total size of the disk group Create Volume Volume Name This field displays the default name o...

Страница 69: ...Table 15 Edit Volume on Disk Group LABEL DESCRIPTION Unallocated capacity on Disk Group X This field displays the percentage of the disk group size unallocated to other volumes the size in use and to...

Страница 70: ...is available only when you can repair expand or change RAID type Delete Select a disk group and click Delete to remove it Note If you delete a disk group all data in the disk group is erased Add Hot...

Страница 71: ...s finished and the evaluated remaining time Repairing The NAS s percentage progress in repairing the volume For a RAID 1 volume this also displays the percentage of resynchronizing the NAS has finishe...

Страница 72: ...e progress in creating the volume Deleting The NAS s percentage progress in deleting the volume Expanding The NAS s percentage progress in expanding the volume For a RAID 1 volume this also displays t...

Страница 73: ...ists all available hard disks in the table and displays the disk trays the hard disks are currently installed in the graphic on the right Select one or more hard disks where you want to create a disk...

Страница 74: ...tter performance than RAID 6 with slightly less data protection See Table 8 on page 50 or Section 8 6 on page 98 for more information Note Use the same capacity of hard disks for RAID 1 5 6 or 10 to a...

Страница 75: ...n select a disk and click S M A R T to open the screen as shown Table 18 Hard Disk LABEL DESCRIPTION Status This field shows the status of an installed hard disk Normal A green circle displays This re...

Страница 76: ...This shows the temperature of the hard disk in degrees celsius o C and fahrenheit o F Performance This shows your hard disk s performance Good or Bad Power_On_H ours This field shows the number of hou...

Страница 77: ...al Number This field shows this individual hard disk s serial number from the manufacturer LU WWN Device Id This field shows the hard disk s Logical Unit World Wide Name Device Identifier Firmware Ver...

Страница 78: ...indicates the best scenario The values 100 or 200 usually represent the mean or normal value Worst This is the lowest value attained by the hard disk since S M A R T started its assessment of the hard...

Страница 79: ...ndividual raw S M A R T attribute value is better Close Click this button to close the screen Table 20 S M A R T Info LABEL DESCRIPTION Table 21 S M A R T Attributes ID ATTRIBUTE NAME BETTER DESCRIPTI...

Страница 80: ...load and unload cycles into head landing zone position 194 Temperature Low This is the hard drive s internal temperature 195 Hardware ECC Recovered High This is the time between ECC Error Correction...

Страница 81: ...moves from track to track 220 Disk Shift Low This is how far the disk has moved relative to the spindle this kind of shift is usually due to shock 221 G Sense Error Rate Low This is the number of erro...

Страница 82: ...NAS1 over the Internet Your computer is the iSCSI initiator and the NAS is the iSCSI target When the initiator is successfully connected to the target your computer can use VOL1 on the NAS as its own...

Страница 83: ...creen Table 22 iSCSI iSCSI LUNs LABEL DESCRIPTION Create Click this to create a new LUN on a volume See more details on Section 8 4 1 1 on page 84 Un map Click this to open the following screen where...

Страница 84: ...en where you can delete an existing LUN Key in DELETE and click Delete to remove an existing LUN Click Cancel to close this screen Info Click this item to check detailed information about the LUN Name...

Страница 85: ...Chapter 8 Storage Manager Cloud Storage User s Guide 85 Figure 50 Creating a New LUN...

Страница 86: ...e to the LUN Thin provisioning Allocate space only when an initiator writes data to it Instant allocation Allocate the specified disk space to the LUN when you create the LUN Enable Write Back Select...

Страница 87: ...SCSI target See more details on Section 8 4 2 1 on page 88 Edit Click this to modify the configuration of the iSCSI target See more detailed on Section 8 4 2 2 on page 92 Disable Enable Disable Click...

Страница 88: ...arget name IQN Displays the target s iSCSI Qualified Name IQN format Allowed initiator IQN Displays the allowed initiator s iSCSI Qualified Name IQN format Authentication Displays the authentication m...

Страница 89: ...Chapter 8 Storage Manager Cloud Storage User s Guide 89 Note The NAS can create only 10 targets at maximum Figure 52 Creating a new LUN...

Страница 90: ...cter IQN The iSCSI Qualified Name IQN of the target is automatically generated after you enter the target name Allowed initiator IQN The allowed initiator name is in the iSCSI Qualified Name IQN forma...

Страница 91: ...thenticate the initiator when attempting connection Password The password is for the target to authenticate the initiator when attempting connection Confirm password Re type the password to make sure...

Страница 92: ...iSCSI Targets Edit Properties Apply Click Apply to save the settings Cancel Click Cancel to close the screen without saving any settings Table 25 Create a New Target continued LABEL DESCRIPTION Table...

Страница 93: ...id characters for password are 0 9 a z and A Z and the valid length is 12 14 characters Enable mutual CHAP Select this check box to perform mutual CHAP on the target Username The user name is for the...

Страница 94: ...ing any settings Table 28 iSCSI Targets Edit Advanced LABEL DESCRIPTION CRC checksum Cyclic Redundancy Check CRC checksum is a technique for detecting data transmission errors It ensures correct data...

Страница 95: ...mes on SD cards or external disks attached to the USB ports You cannot spread a volume across external disks like you can with internal disks 8 5 2 External Storage Screen Click Storage Manager Extern...

Страница 96: ...d USB disk See Section 8 5 3 on page 97 for more information Edit Click this to modify the volume name Volume name Type a volume name from 1 to 31 characters Acceptable characters are all alphanumeric...

Страница 97: ...does not support Unformatted means the USB connected device is not formatted with a file system Note There is no explicit message from CIFS that tells users their volume is degraded or down Volume Na...

Страница 98: ...RIPTION Volume Name Type a volume name from 1 to 31 characters Acceptable characters are all alphanumeric characters and spaces _ underscores and periods The first character must be alphanumeric A Z 0...

Страница 99: ...g with no mirroring nor parity for data redundancy so if one disk fails the entire array will be lost The major benefit of RAID 0 is performance The following figure shows two disks in a single RAID 0...

Страница 100: ...counting and financial data small database systems and enterprise servers RAID 6 RAID 6 can tolerate two simultaneous drive failures by calculating dual distributed parity data on striped data across...

Страница 101: ...AID 5 RAID 5 provides the best balance of capacity and performance while providing data redundancy It provides redundancy by striping data across three disks and keeps the parity information AP on the...

Страница 102: ...operates as a three disk RAID 1 or RAID 5 array with the fourth disk on standby The standby disk automatically comes into play if a disk in the array fails The advantage of a hot spare is that if a d...

Страница 103: ...Center System Information The following table describes the labels in this screen Table 37 Status Center System Information LABEL DESCRIPTION Refresh Click the Refresh icon to update this display Stat...

Страница 104: ...If too many users are using the NAS then the NAS may appear sluggish Memory This shows how much of the NAS s total memory is being used Process Name This displays the top 10 processes that occupy the...

Страница 105: ...ION Type Displays the type of the user account User Displays the user name Groups Displays the group the current user belongs to WAN LAN Displays whether the connection is from the WAN or the LAN Serv...

Страница 106: ...n Section 10 6 on page 119 to enable or disable Telnet and SSH access Use the DyDNS screen Section 10 7 on page 120 to configure the domain name settings of your NAS Use the FW Upgrade screen Section...

Страница 107: ...Screens Use the TCP IP screens to have the NAS use a dynamic or static IP address subnet mask default gateway PPPoE and DNS servers and to test the network connection 10 4 1 Configuring General TCP IP...

Страница 108: ...fault gateway DNS Server DNS Domain Name System is for mapping a domain name to its corresponding IP address and vice versa If you have the IP address es of the DNS server s enter them Automatically S...

Страница 109: ...Cancel Click this to return to the previous screen without saving Edit Click this to modify the IPv4 or IPv6 settings of LAN 1 and LAN 2 For editing the PPPoE settings see Section 10 4 2 2 on page 11...

Страница 110: ...g Connect LAN1 and LAN2 to the same Ethernet switch Figure 62 Link Aggregation Use this screen to set up port trunking Click Control Panel Network TCP IP Network Interface and then click Create Figure...

Страница 111: ...he NAS will choose addresses for themselves and be able to communicate Manually Select this option for the interface to use fixed TCP IP information You must fill in the following fields IP Address Ty...

Страница 112: ...e PPPoE continued LABEL DESCRIPTION Table 43 Control Panel Network TCP IP Web Configurator LABEL DESCRIPTION Port Number Specify the port number of HTTP connection Note The port number 8082 is reserve...

Страница 113: ...you select on the NAS It is recommended that you place the NAS behind an Internet gateway firewall device to protect the NAS from attacks from the Internet Many such Internet gateways use UPnP to simp...

Страница 114: ...example the Internet gateway uses PAT to accept Internet user FTP sessions on port 2100 translate them to port 21 and forward them to the NAS 10 5 1 UPnP and the NAS s IP Address It is recommended th...

Страница 115: ...get it to work you may also have to configure the Internet gateway to also allow NetBIOS traffic See Section 16 3 on page 205 for more on CIFS FTP File Transfer Protocol is a standard file transfer s...

Страница 116: ...he network Figure 70 Network UPnP Port Mapping UPnP Router The following table describes the labels in this screen 10 5 5 Configuring UPnP Port Mapping Click Network UPnP Port Mapping UPnP Port Mappin...

Страница 117: ...can remove a port mapping rule Click Yes to remove the selected port mapping rule or No to close this screen Enabled Disabled Use this to enable or disable a selected port mapping rule Status Display...

Страница 118: ...pecify the port number 1 65 535 Internet uses need to use to connect to the Internet gateway s WAN port in order to access the service on the NAS Whoever wants to access a service on the NAS from the...

Страница 119: ...t 10 6 Terminal Screen Use this screen to enable or disable Telnet and SSH Secure SHell access to the NAS Telnet or SSH access lets you use line commands to configure the NAS Use these commands at you...

Страница 120: ...ead of using an IP address that changes each time you reconnect Your friends or relatives will always be able to call you even if they don t know your IP address Click Control Panel Network DyDNS to o...

Страница 121: ...Password Enter the password assigned to your DNS account Status This shows the DyDNS update result Disabled You have manually disabled the DyDNS feature Error An unrecoverable error such as authentic...

Страница 122: ...ing table describes the labels in this screen Table 49 Control Panel System FW Upgrade Latest Firmware Check LABEL DESCRIPTION Model Name Displays the model name of you NAS Current Firmware Version Di...

Страница 123: ...before accessing the NAS again If you interrupt the upgrade then the NAS may become unusable See page 354 for your model s LED behavior during firmware upgrade Reset Click this to refresh the screen...

Страница 124: ...r you configure the share and the folder separately You can map a share to a network drive for easy and familiar file transfer for Windows users A folder icon with a hand indicates a share The adminis...

Страница 125: ...file s size in bytes Last Modified This column displays the last time the file or folder was changed in year month day hour minute second format Create New Folder Click this to open the following scr...

Страница 126: ...screen while an upload is going on Download Select a file and click this to save the file to your computer Note Do not refresh the screen while a download is going on Compress Select files or folders...

Страница 127: ...and the deleted item is stored in the recycle bin Later if you want to retrieve a deleted item you can select the item from the recycle folder and move copy the item to another share Publish this sha...

Страница 128: ...are names The NAS creates automatic volume names for external USB disk volumes These are a type of share so the share name you configure cannot conflict with the external USB disk volume names ExtVol1...

Страница 129: ...Chapter 11 Videos Photos Music File Browser Cloud Storage User s Guide 129 Figure 78 Photo Thumbnail Figure 79 Photo List A C B...

Страница 130: ...indicates the category of files Search Use this to look for a file by name A View files Double click an item to play it You can also select check boxes for multiple items when you display the files a...

Страница 131: ...display the location in Google Maps Click Clear to delete the markers of other photos and only display the current photo s marker Figure 81 Google Maps 11 3 2 Slideshow Photos In a Photo menu click th...

Страница 132: ...lash Player plug in installed to view slideshows Figure 82 Slideshow 11 4 Music Click the Music icon on the Desktop to open the music folder in a new tab Double click the music folder to view and play...

Страница 133: ...Chapter 11 Videos Photos Music File Browser Cloud Storage User s Guide 133 Figure 83 Music Thumbnail Figure 84 Music List A C A B...

Страница 134: ...category of files Search Use this to look for a file by name A View files Double click an item to play it You can also select check boxes for multiple items when you display the files as a list B The...

Страница 135: ...Chapter 11 Videos Photos Music File Browser Cloud Storage User s Guide 135 Figure 86 Video Thumbnail Figure 87 Video List A C B A...

Страница 136: ...e category of files Search Use this to look for a file by name A View files Double click an item to play it You can also select check boxes for multiple items when you display the files as a list B Th...

Страница 137: ...y the rest of the video files in a folder So for example a folder has video files 1 10 and you play video 3 When video 3 finishes the device continues playing the rest of the videos in the folder 4 10...

Страница 138: ...th media clients and select which shares to share See Section 17 5 on page 216 for details 11 9 iTunes Server Use the iTunes server to share media files with iTunes users on your network See Section 1...

Страница 139: ...overview of its screens 12 2 Administrator Screens The Desktop screen displays an Administrator icon when you log in with an administrator account Click it to open the administrator configuration scr...

Страница 140: ...n The following table describes the navigation panel screens Table 58 Global Labels and Icons LABEL ICON DESCRIPTION Language Select the web configurator language from the drop down list box Help Clic...

Страница 141: ...log server and select the categories to include in the log report TFTP Server Configure the NAS to accept log files from TFTP clients pyLoad Configure the NAS to use pyLoad to manage your downloads in...

Страница 142: ...ayed as shown in the following figure Table 60 Common Administrator Screen Icons ICON DESCRIPTION Edit Click this to go to a screen where you can change the configuration settings of an entry Delete C...

Страница 143: ...Chapter 12 Administrator Cloud Storage User s Guide 143 Session Example Windows...

Страница 144: ...lled The Packages screen also includes a list of packages to add Note Check what packages do before you install them Only install packages you actually plan to use Note Get support for each package th...

Страница 145: ...Package Management screen Refer to the applications own documentation for further information Gallery This web based application allows your NAS to host pictures You can upload images in your local co...

Страница 146: ...ring Tutorials see page 155 Download Service Tutorial see page 162 Copy and Flickr Auto Upload Tutorial see page 173 FTP Uploadr Tutorial see page 174 Web Configurator s Security Sessions see page 177...

Страница 147: ...torage User s Guide 147 2 Click View network computers and devices 3 The NAS icon displays twice because the NAS is both a media server and a storage device Double click either NAS icon to open the We...

Страница 148: ...e NAS must be set as a home or work network in order for the NAS icons to display If the network containing the NAS displays as Public 1 Click Network and Sharing Center and then the network s link ci...

Страница 149: ...S you can see it in the computer s list of devices see Section 14 5 on page 152 Click Uninstall to remove the NAS from the list of devices installed in your computer View device web page opens the Web...

Страница 150: ...nique physical hardware address MAC You need the MAC address to register the product at myZyXEL com Customer support may also request it for troubleshooting purposes Unique identifier is a unique UPnP...

Страница 151: ...If the network containing the NAS displays as Public click the network s link 2 in the figure although it is already set to home here and use the Set Network Location screen to set the network s loca...

Страница 152: ...14 5 Windows 7 Devices and Printers After you use the NAS s network icon s install option you can manage the NAS from the Windows 7 Devices and Printers folder Click Start Control Panel Hardware and S...

Страница 153: ...is screen Troubleshoot opens Windows device troubleshooting wizard Remove device removes the NAS from the Windows 7 Devices and Printers folder Properties opens a window of NAS details and troubleshoo...

Страница 154: ...ll as copy files to it and access the files on it See Chapter 2 on page 19 for details Restore previous versions is the Windows 7 option for restoring a file or folder It does not apply to this shortc...

Страница 155: ...lume See the rest of this User s Guide for details on configuring the NAS s various screens 14 6 1 Creating a User Account Jimmy wants to create accounts for his sons Bob and Kevin This is how he woul...

Страница 156: ...Creating a Share Suppose Jimmy has already created separate accounts for his sons Bob and Kevin Now Jimmy wants to create a share for each son He also wants to make sure that each son can only access...

Страница 157: ...wants to create a group for his sons and another one for the parents Jimmy can assign access rights to his sons group for certain shares such as a cartoons share and allow only the parents group to ac...

Страница 158: ...NAS share where data is stored to a Windows network drive you can use Windows Explorer to transfer files to and from the NAS as if it was another folder on your computer Here he maps Jimmy s share to...

Страница 159: ...k OK You do not need to do this if the username and password are the same as Jimmy s Windows login 5 After the mapping is done you can then simply copy and paste or drag and drop files from to your lo...

Страница 160: ...u can also use FTP to access the NAS Suppose Jimmy is temporarily using a different computer and wants to access his share without mapping it to the computer This is how he would do it 1 Open the FTP...

Страница 161: ...ng a Share Through the Web Configurator You can browse and access files through the web configurator 1 Log into the NAS web configurator see Section 7 2 on page 38 using the appropriate user name and...

Страница 162: ...ce Tutorial This tutorial covers using the NAS to download a file from the Internet Use this same procedure for P2P downloads as well as regular HTTP web and FTP downloads See Section 17 11 2 on page...

Страница 163: ...s the download should start in a few seconds there may be a link to click if the download does not start automatically See if that link opens the file or the pop up window 3 Right click the download l...

Страница 164: ...Chapter 14 Tutorials Cloud Storage User s Guide 164 5 Click Add 6 Right click the URL field and select Paste 7 The URL displays in the URL field Click Apply...

Страница 165: ...to the NAS see Section 14 7 1 on page 162 you can have the NAS download files during a specific time period of the day You can also configure the P2P download settings to control bandwidth and optimiz...

Страница 166: ...od Note If power failure occurs during the active download period the NAS will verify whether the downloaded files were damaged If a file is corrupted the NAS will download the file again If the file...

Страница 167: ...tively download three torrent files but only upload one at a time Enter 3 in the Maximum Number of Active Torrents field and enter 1 in the Maximum Number of Seeding Jobs field Keep sharing until the...

Страница 168: ...service notifications For example Google Reader cannot support this feature if the NAS has a private IP address Note It is recommended to subscribe to the download service notifications using the buil...

Страница 169: ...The following screen displays Click Subscribe 4 Click the Favorite icon on your browser and select the Feeds tab to check the updates of your NAS s download list Firefox Example 1 After you activate...

Страница 170: ...ng screen displays Select Live Bookmarks from the drop down list and click Subscribe Now 3 The following screen displays Select Bookmarks Menu and click Add 4 From the Firefox s Bookmarks Menu select...

Страница 171: ...not blinking 2 Use a USB cable to connect the printer s USB port to one of the NAS s USB ports Make sure the printer is also connected to an appropriate power source 3 Turn on the printer 4 The NAS de...

Страница 172: ...inter manufacturer s website the driver is not installed on the NAS Note You must install the printer driver on each computer that will use the printer After the driver installation finishes the compu...

Страница 173: ...details on setting up a Flickr account for auto upload In this example Amy select the NAS s photo share for auto upload This is how Amy would transfer the files from her USB disk to the NAS 1 Click Ap...

Страница 174: ...ally upload files saved on the NAS to a remote FTP server Amy wants to share files on her NAS with Susan They each have an NAS at home so Susan has to set her NAS as an FTP server for Amy to automatic...

Страница 175: ...er NAS This is how Amy would set up the NAS s FTP Uploadr 1 Click Applications Auto Upload FTP Uploadr to open the FTP Uploadr screen Select Enable FTP Uploadr and click Apply to turn on FTP Uploadr 2...

Страница 176: ...ants to share video files with Susan In the Preferences screen click the Add button and select video from the Shares drop down list box enter a forward slash in the Path field and click Apply to add t...

Страница 177: ...eps described above to configure FTP Uploadr on her NAS Once Susan completes the setup Amy can also receive files from Susan s NAS 14 11 Web Configurator s Security Sessions These tutorials show you h...

Страница 178: ...r s Guide 178 2 Next let s modify the certificate by changing the Common Name to this NAS s host name of nsa the Organization to ZyXEL and the Key Length to 2048 3 The NAS restarts its network service...

Страница 179: ...9 14 11 2 Downloading and Installing Customized Certificate 1 Log in and return to Maintenance SSL Under Modify the Existing Certificate click Download 2 Save the file to your computer 3 Find the cert...

Страница 180: ...uide 180 4 Install the certificate The rest of the steps in this section are an example of installing a certificate in Windows In the Certificate dialog box click Install Certificate 5 In the Certific...

Страница 181: ...torials Cloud Storage User s Guide 181 6 Leave Automatically select certificate store based on the type of certificate selected and click Next 7 In the Completing the Certificate Import Wizard screen...

Страница 182: ...9 Finally click OK when presented with the successful certificate installation message 14 11 3 Turn on the NAS s Web Security Now that you have customized the NAS s certificate and installed it in you...

Страница 183: ...web browser and open it again to reset its session with the NAS Log in and click Control Panel TCP IP Web Configurator Select Enable HTTPS connection and click Apply 2 A warning screen pops up if appl...

Страница 184: ...redirects your formerly non secure HTTP connection to a secure HTTPS connection Your browser may give you a warning about the device s public key certificate Add an exception to allow your browser to...

Страница 185: ...Chapter 14 Tutorials Cloud Storage User s Guide 185 6 Before you add an exception verify that the device to which you are trying to connect is providing the correct certificate Click View...

Страница 186: ...Storage User s Guide 186 7 The SHA1 fingerprint must match the NAS s certificate you downloaded from the NAS to your computer Double click the NAS s certificate file and then click Details and look at...

Страница 187: ...Chapter 14 Tutorials Cloud Storage User s Guide 187 8 If the certificate fingerprints match click Confirm Security Exception otherwise click Cancel E X A M P L E...

Страница 188: ...s 185 to 186 See the next section for how to use FTPES with the NAS for secure FTP transfers 14 12 Using FTPES to Connect to the NAS This section covers how to use FTP over Explicit TLS SSL with the N...

Страница 189: ...hich Gonzo has access display Now you can use FTP to securely transfer files to or from the NAS Use a secure method to let your users know the correct fingerprint for the NAS s certificate so they can...

Страница 190: ...er 14 Tutorials Cloud Storage User s Guide 190 2 Select All under the SHARED sidebar Look for the NAS from the Network list 3 Expand the NAS to display the shares you may access E X A M P L E E X A M...

Страница 191: ...Mac search for the NAS Click Connect 6 Once you establish the connection you can access the NAS from the Finder or directly from the desktop 14 14 How to Use the BackupPlanner Note The screens and lin...

Страница 192: ...1 Creating an Archive Backup To backup the NAS every week to a remote NAS 1 Click Protect Backup Add Job Figure 93 Protect Backup 2 Identify the backup job and select Archive New files are often adde...

Страница 193: ...emote NAS is reachable click Test Connection Figure 95 Protect Backup Add Job Step 2 4 In this example the target NAS is on the LAN so leave the compression off Security is already configured on the t...

Страница 194: ...backup job and select Synchronization You want only your current set of files in the Backup Photo folder of your External storage so you select Mirror to make the target folder identical to the source...

Страница 195: ...3 4 For this example assume not many files need to be backed up so leave the compression off Turn on the encryption to protect these sensitive files during the transfer The final files stored on the...

Страница 196: ...he files a synchronization backup creates The copy of files that the NAS creates on the other NAS s Backups share can be used directly by anyone with access to that share 14 14 3 Restoring Archived Fi...

Страница 197: ...Select which backup to use and click Next Figure 104 Protect Backup Restore Archive Step 1 3 Select the files and folders you want to restore and click Next Figure 105 Protect Backup Restore Archive...

Страница 198: ...NAS or the RAID array containing the backup job failed you cannot restore archived files by the backup job In this example the NAS s RAID array failed You ve replaced the hard drives and re configure...

Страница 199: ...elect the backup job and backup time and click Next Figure 109 Protect Restore Step 2 3 Select everything in the share except the recycle folder Click Next Figure 110 Protect Restore Step 3 4 Browse t...

Страница 200: ...Chapter 14 Tutorials Cloud Storage User s Guide 200 Figure 111 Protect Restore Step 4 5 The NAS restores the files and you can use them again...

Страница 201: ...201 PART II Technical Reference...

Страница 202: ...202...

Страница 203: ...ystem Information Server Name This displays the name which helps you find the NAS on the network Click the Edit icon to go to the screen where you can configure this Model Name This displays which mod...

Страница 204: ...ected to the NAS Type This shows whether it s a Windows CIFS web web configurator or FTP connection to the NAS Share Name This displays the shared folder name on the NAS that the user is connected to...

Страница 205: ...e enables you to install and use the following applications Gallery This web based application allows your NAS to host pictures You can upload images in your local computer or shares to this applicati...

Страница 206: ...e NAS so you can connect to it easily from the Internet The following applications come with their own configuration screens and documentation Gallery NZBGet PHP MySQL phpMyAdmin Logitech Media Server...

Страница 207: ...f you have previously installed the application Uninstall Cancel Installation Choose the item s on the list and click this to uninstall the selected application s from your system or cancel their acti...

Страница 208: ...applications installed and enabled by the NAS that have their own web configurators Disabled This displays for applications installed and disabled by the NAS that have their own web configurators Unk...

Страница 209: ...S that you can configure in the NAS Web Configurator Enabled This displays for applications installed and enabled by the NAS that have their own web configurators Disabled This displays for applicatio...

Страница 210: ...lphabet a z and is NOT case sensitive Description Add text here to describe the NAS if the Server Name field is not enough Use up to 61 characters You can use all characters except the following Workg...

Страница 211: ...work administrator if you are unsure of this information Synchronize Now Click this for the NAS to retrieve the correct time from the configured time server right away Time Zone Time Zone Choose the t...

Страница 212: ...nion on the last Sunday of October All of the time zones in the European Union stop using Daylight Saving Time at the same moment 1 A M GMT or UTC So in the European Union you would select October Las...

Страница 213: ...rowser Use the Print Server screen Section 17 9 on page 231 to share a printer Use the Copy Sync Button screen Section 17 10 on page 232 to transfer files between a USB device and the NAS Use the Auto...

Страница 214: ...a DLNA compliant media server and or an iTunes server The NAS streams files to DLNA compliant media clients or computers using iTunes The Digital Living Network Alliance DLNA is a group of personal c...

Страница 215: ...tos in a FamilyPhotos share you could web publish it and others could use a web browser to access the photos at http my NAS s IP Address MyWeb FamilyPhotos RSS RSS Really Simple Syndication is a forma...

Страница 216: ...igured 10 in the Connection Limit field The FTP connection limit will only be 3 6 ports in the range divided by 2 because it is the smaller value Starting Port Enter the first port number in the range...

Страница 217: ...o have the NAS share the media files in the shares selected in the Share Publish tab Clear it to stop the NAS from sharing media files through the Playzone screens or media players Click the hyper lin...

Страница 218: ...abels in this screen 17 6 iTunes Server Screen Click Applications iTunes Server to open the following screen Use this screen to turn the iTunes server on or off Figure 122 Applications iTunes Server A...

Страница 219: ...ications Download Service LABEL DESCRIPTION Enable Download Service Use this option and click the Apply button to turn the download service off or on If you turn off the service all downloads are paus...

Страница 220: ...mpleted item and click this to re seed a P2P file or download a file again If you want to re seed a P2P task keep the P2P file and the completed file in their original locations Task Info Select an it...

Страница 221: ...ding This value is in the format ConnectedPeers AllPeers Health where Connected Peers is the number of computers to which the NAS is connected in order to download the file AllPeers refer to the total...

Страница 222: ...lated to the magnet link For a P2P download using a torrent file you can copy and paste the URL of the torrent file The NAS will automatically download the torrent file and use it You do not have to m...

Страница 223: ...nnel name where it store all files downloaded from that channel where is a folder that you have set Edit Click this to open the following screen where you can set the default folder location where you...

Страница 224: ...umn points to the location in the share where the NAS will save the downloaded files P2P download jobs are stored in incoming where is a folder that you have set HTTP FTP jobs are stored in where is a...

Страница 225: ...lick Apply to save your settings and Cancel to close the screen Download Period Control This feature sets the NAS to download files only within a specified time period Enable Download Period Control U...

Страница 226: ...restriction Max upload rate You may need to limit the bandwidth the NAS uses to share files through P2P download if your network s other Internet applications are not getting enough upstream bandwidth...

Страница 227: ...lps keep you in good standing in the P2P download community Enter 1 to share a file indefinitely Leave both check boxes blank to have the NAS stop sharing the file as soon as the download finishes If...

Страница 228: ...IP filter table You can find an online IP filter table in websites such as http www bluetack co uk config level1 gz When you change the URL of the online IP filter table the NAS also performs an updat...

Страница 229: ...le 78 Applications Download Service Task Info LABEL DESCRIPTION Status This is the current status of the task Name This is the name of the task Size This is the size of the file to be downloaded Uploa...

Страница 230: ...g the task Select Auto to have the NAS automatically determine the task s priority Select High to have the NAS download this file before the other files Comment Enter a description for this task Click...

Страница 231: ...ser s address bar to access the share s web page Unpublished Shares This list box displays the shares that the NAS does not publish for web browser access Publish Selected Share s Select shares in the...

Страница 232: ...all print jobs from the NAS queue for a particular printer However since the NAS sends print jobs to the printer as soon as it can this button may only have an effect if there are very large or many...

Страница 233: ...date and time of the copy in year_month_day_hour_minute_second format Backup Files to be Replaced This option is only available if you do not select Create a New Folder for Copied Files Select this op...

Страница 234: ...ser name and password or other form of security is used The media server is enabled by default with the video photo and music shares published Songs from the iTunes Store After using iTunes on your co...

Страница 235: ...thereof ZyXEL bears NO responsibility or liability for your use of the download service feature Torrent Files The NAS needs a torrent file for P2P download to download a file The torrent file gives t...

Страница 236: ...ection 14 7 3 on page 168 for a tutorial about using the download service notification In the Download Service screen select Enable Download Notify and click Apply An RSS feed icon appears Click the i...

Страница 237: ...ti virus to check files you download for computer viruses P2P Download and Your Firewall The anti virus feature on a firewall probably cannot check P2P downloads for viruses so use anti virus software...

Страница 238: ...r firewall s HTML web based configuration interface to set this up see the firewall s manual for details You may also have to configure a corresponding firewall rule Figure 138 Firewall Configured to...

Страница 239: ...s 192 168 1 33 and the name of the web published share is FamilyPhotos So you would enter http 192 168 1 33 MyWeb FamilyPhotos in your browser s address bar Then press ENTER or click Go A screen displ...

Страница 240: ...public IP address of your Internet gateway and configure NAT or port forwarding on your Internet gateway and possibly firewall rules in order to let people access the NAS s web published shares from t...

Страница 241: ...SYNC button to start copying files See Section 17 10 on page 232 for details about configuring the copy settings The following figure illustrates how copying files works when you copy files from a USB...

Страница 242: ...beep to synchronize files See Section 17 10 on page 232 for details about configuring the synchronization settings USB NAS or USB NAS When you synchronize files in one direction contents on the source...

Страница 243: ...in both directions simultaneously Figure 144 Synchronizing Files Example 2 A on the USB device and B on the NAS are modified more recently File A from the USB device replaces file A on the NAS File B...

Страница 244: ...isplays the share folder s path Type the location of the folder using forward slashes as branch separators or use Browse to find or create a folder on the NAS After you click Apply in the Syslog Serve...

Страница 245: ...p down list boxes displays how the selected custom format looks For example if you select Full Date the individual log entries would display with something like 2009 May 13 17 15 51 in front of them A...

Страница 246: ...following applications configuration screens through the Package Management screen Refer to the applications own documentation for further information Gallery This web based application allows your N...

Страница 247: ...Refer to Section 18 3 1 on page 248 for the Add NFS Share screen NFS Session Click this to view active NFS sessions You can see the list of users who have access to the NFS shares Refer to Section 18...

Страница 248: ...wing Figure 148 Network NFS Add Edit The following table describes the labels in this screen Table 85 Network NFS Add Edit LABEL DESCRIPTION Volume Name Select the volume where the folder you want to...

Страница 249: ...Users with this access right can only view and copy files in the NFS share but cannot modify or delete them Read Write Users with this access right can view edit or delete files in the NFS share Note...

Страница 250: ...ing table describes the labels in this screen Table 87 Applications TFTP Server LABEL DESCRIPTION Enable TFTP Server Select this to have the NAS accept log files from TFTP clients Clear it to stop the...

Страница 251: ...yLoad LABEL DESCRIPTION Enable pyLoad Select this to have the NAS manage your downloads Clear it to turn the feature off Management Page This is the IP address and port number of the NAS s pyLoad mana...

Страница 252: ...t the volume in which to install ownCloud and store ownCloud data and click Apply The NAS must have a connection to the Internet to download the package 3 The installation progress appears in the ownC...

Страница 253: ...lick Finish Setup 6 The main ownCloud screen displays Use this web interface to manage files on the NAS ownCloud server Click your user name in the upper right corner to see the help for more informat...

Страница 254: ...Memopal account s online backup set does not delete the files from the NAS just as deleting a file from the NAS does not delete a backup copy in your Memopal account s online backup set Deleting a fi...

Страница 255: ...ount Limit File Size Select this and enter a number of MegaBytes if you want to restrict the size of files the NAS uploads to the Memopal account You have to enter your password again if you select th...

Страница 256: ...can link multiple NAS user accounts to Google accounts You can link an individual NAS user account to multiple Google accounts You can only link each individual Google account to one NAS user account...

Страница 257: ...r account and a Google account Click Delete to remove the NAS s link to the selected Google account You must disable the Google Drive feature for the account before you can do this A screen pops up to...

Страница 258: ...you can use the other sections of this screen to add or delete linked accounts or disable Google Drive Enabled Synchronizing The GoogleDrive feature is synchronizing the local sync folder and the Goog...

Страница 259: ...le Drive Edit Click this to open the following screen where you can specify the share or folder to synchronize with Google Drive The NAS s sharing configuration must allow the user access The user mus...

Страница 260: ...lient feature uses the Grive app Review what the Grive app wants to use and click Accept if you agree Copy the code and paste it into the field in the Web Configurator screen Click Apply to have the N...

Страница 261: ...pplications GoogleDriveClient Update Period The following table describes the labels in this screen Apply Click this to save your changes and complete the authorization Cancel Click this to return to...

Страница 262: ...You Can Do Use the Flickr YouTube screen Section 19 4 on page 262 to upload photos and videos to your Flickr and YouTube accounts Use the FTP Uploadr screen Section 19 5 on page 270 to upload files t...

Страница 263: ...BEL DESCRIPTION Flickr YouTube Disable Enable Select a service from the list and click this to turn the service on or off If you disable the service and add more files to the watch folder s the NAS wi...

Страница 264: ...orage User s Guide 264 Figure 158 Yahoo Flickr Login Page The following page displays asking for your authorization Click OK I LL ALLOW IT to establish a link between the NAS and your Flickr account F...

Страница 265: ...o the NAS web configurator Click Get Ready in the following screen to complete the authorization process Figure 160 Confirming Flickr Authorization Once the NAS is associated with your Flickr account...

Страница 266: ...er is available for auto upload represents a missing folder The share may be deleted from the NAS or the hard disk was removed from the NAS Share Name This is the share selected for auto upload Path T...

Страница 267: ...can see your media files on Flickr Determine who has the right to see files uploaded to your Flickr account Select Only You if you do not want anyone else to see your files You may also restrict the...

Страница 268: ...labels in this screen Table 95 Applications Auto Upload Config YouTube LABEL DESCRIPTION YouTube Account Configuration Username This field displays the Youtube account authorized for the auto upload f...

Страница 269: ...Name Enter a new folder name and click to create it Type This is the type of the folder file Name This is the name of the folder file Select a folder If you don t select a folder a forward slash displ...

Страница 270: ...d FTP Uploadr to open the screen shown next Figure 164 Applications Auto Upload FTP Uploadr The following table describes the labels in this screen Table 96 Applications Auto Upload FTP Uploadr LABEL...

Страница 271: ...rom the list and click this to display the status and settings about the FTP server Domain Name IP Address This is the domain name or IP address of the FTP server Port Number This is the port number u...

Страница 272: ...check whether you can use the settings to connect to the FTP server Apply Click this to save your changes Cancel Click this to return to the previous screen without saving Table 97 Applications Auto...

Страница 273: ...Click Apply to save your settings and Cancel to close the screen Settings Grace Period Specify how long the NAS should wait when you add a new file for auto upload For example if you set the grace per...

Страница 274: ...and have the NAS download torrent files 20 2 Dropbox Screen Use the Dropbox screen to log the NAS into your Dropbox account This creates Drop2NAS and zDownload folders in your Dropbox account See Sec...

Страница 275: ...ile from your Dropbox account Dropbox account has been already used on other NAS One Dropbox account can only work with one NAS at a time Log the other NAS out of your Dropbox account to be able to us...

Страница 276: ...the same name to the Drop2NAS folder the NAS adds a number to the names of the files in the NAS s Enable Dropbox Select this to synchronize and back up your Dropbox account The first time you do this...

Страница 277: ...pies torrent files in the zDownload folder to the NAS s admin download torrents folder and automatically starts downloading them The NAS adds a suffix to the name of each torrent file in the Dropbox a...

Страница 278: ...me Machine backups Click Applications Time Machine to open the following screen Figure 170 Applications Time Machine The following table describes the labels in this screen 21 3 Using Time Machine Aft...

Страница 279: ...e with the NAS Cloud Storage User s Guide 279 1 Click Apple System Preferences Then go to System and select Time Machine 2 Turn Time Machine ON Then click Change Disk 3 Select share01 as the backup di...

Страница 280: ...onfiguring user accounts and shares see Section 14 6 on page 155 In this example user1 12345 is used Then click Connect 5 Time Machine starts backing up files to share01 after 120 seconds If you want...

Страница 281: ...ssword Access the contents of other shares to which he is given access rights 22 2 What You Can Do Use the main Users screen Section 22 3 on page 281 to display a list of user accounts created on the...

Страница 282: ...Edit User Select an account and click this to open a screen where you can edit the properties of the account Refer to Section 22 3 2 on page 283 to see the screen Delete Selected Users Select an acco...

Страница 283: ...er button in the screen shown previously to edit an existing account Figure 172 Sharing Users Add or Edit a User General Settings Figure 173 Sharing Users Add or Edit a User Quota per volume User Type...

Страница 284: ...ator to give the account full configuration and management access to the NAS Select User to give the account basic access rights to the NAS and allow the user to manage his own shares change his own p...

Страница 285: ...letter case as an existing user For example if a user exists with the name BOB you cannot create a user named bob If you enter a user bob but use BOB when connecting via CIFS or FTP it will use the ac...

Страница 286: ...the selected account Group List Click this to display the selected user s group membership Volume Name This field displays the volume s created on the NAS Used Space This field displays how much stora...

Страница 287: ...es 23 2 What You Can Do Use the main Groups screen Section 23 3 on page 287 to display and manage a list of groups created on the NAS Use the Add Group screen Section 23 3 1 on page 288 to create new...

Страница 288: ...isplay a search field Type the name of a group and then click Search to look up the group you specified Click Clear to close the search function Edit Group Select a group and click this to open a scre...

Страница 289: ...erted to a single space Table 106 Sharing Groups Add or Edit a Group LABEL DESCRIPTION Group Name Type a name from 1 to 32 single byte no Chinese characters allowed for example ASCII characters See Se...

Страница 290: ...matter the letter case as an existing group For example if a group exists with the name FAMILY you cannot create a group named family The group name cannot be the same as a system group name such as E...

Страница 291: ...a list of shares created on the NAS Use the Add Shares screen Section 24 3 1 on page 293 to create additional shares on the NAS Use the Recycle Bin screen Section 24 4 on page 295 to configure and cle...

Страница 292: ...find the hard disk associated with the share the disk may be removed from the NAS for example You may install the disk back to the NAS to recover the share or you may delete the share from the NAS Sh...

Страница 293: ...me cannot be the same as another existing share See Section 11 2 2 on page 128 for more information on share names Volume You should have already created volumes a single accessible storage area with...

Страница 294: ...ess Assign access rights full read only or deny to users or groups If you publish the share to the media server or the web all users will have at least read only access to the share regardless of what...

Страница 295: ...the item in the recycle folder You may move or copy the deleted item to another share Table 109 Sharing Shares Add Share or Edit Share Advanced LABEL DESCRIPTION Available Users Groups This field lis...

Страница 296: ...ring Shares Recycle Bin LABEL DESCRIPTION Clean Recycle Bin every N days Specify how often you want to clear the contents in all recycle bins The specified days correspond to how long a file has been...

Страница 297: ...r file and click this to open a screen Enter the name you want and click OK to make the changes Note When you change a file name make sure you keep the file extension Delete Select a file folder from...

Страница 298: ...Table 111 Sharing Shares Share Browser continued LABEL DESCRIPTION Table 112 Sharing Shares Share Browser Move or Copy LABEL DESCRIPTION Shares Select the destination share from the drop down list Pa...

Страница 299: ...rage User s Guide 299 Yes Click this to move or copy the file folder to the designated share Close Click this to return to the Share Browser screen Table 112 Sharing Shares Share Browser Move or Copy...

Страница 300: ...wing table describes the labels in this screen Table 113 Sharing WebDAV LABEL DESCRIPTION Enable WebDAV http Https Select this to allow remote users to work with files stored on the NAS Edit the acces...

Страница 301: ...nload and install NetDrive 2 Click Add Drive and use the URL for WebDAV connections to the NAS to add a drive entry for accessing the NAS Figure 185 NetDrive Example 3 Name the drive and specify the U...

Страница 302: ...the Log screen Section 26 4 on page 306 to check the system s logs Use the Configuration screen Section 26 5 on page 310 to backup or restore the NAS configuration file Use the SSL screen Section 26 6...

Страница 303: ...ge gets down to the percentage you specify in this field This allows the NAS to shut down properly and avoid data loss caused by a power failure when the UPS stops supplying power A setting around 50...

Страница 304: ...or reboot according to the schedules you configured Click Edit to go to the screen where you can configure the power control schedules Refer to Section 26 3 1 on page 304 for this screen Note Enable...

Страница 305: ...riteria Click the heading cell again to reverse the sort order Type This field displays whether the power control schedule has the NAS turn on turn off or reboot Frequency This field shows how often m...

Страница 306: ...the NAS is turned off at the time when a restart or power off is scheduled the NAS does not perform the restart or power off If the NAS is turned on at the time when a power on is scheduled the NAS do...

Страница 307: ...TION Refresh Click this to update the log display Purge all Logs Click this to erase all logs from the NAS Report Config Click this to open a screen where you can configure email alerts for logs Refer...

Страница 308: ...Email To Enter the e mail address where you want to receive the log alerts Email From Enter the e mail address the NAS uses in the From field of the e mail header for its log alerts Email Server Enter...

Страница 309: ...ce Log Report Config Report Setting LABEL DESCRIPTION Email Alert Select the Enable Email Log check box to have the NAS send an alert email to the configured email address whenever the NAS generates a...

Страница 310: ...guration settings Figure 193 Maintenance Configuration Table 119 Maintenance Log Report Config Syslog Server Setting LABEL DESCRIPTION Enable Syslog Server Check this to enable syslog server Server Ad...

Страница 311: ...irm Click OK to continue or Cancel to quit Restore Configuration When you restore a file configuration the NAS checks the volumes share paths on the NAS and the configuration file If the volume exists...

Страница 312: ...ng to connect to the NAS or for sending by email to other users for them to install prior to logging into the NAS for the first time After saving the certificate to your computer double click it to in...

Страница 313: ...IP address if you want to use this for the common name Host Domain Name Select this option and enter the NAS s domain name if you want to use this for the common name Organizational Unit Optional Ent...

Страница 314: ...hnical Reference This section provides technical background information on the topics discussed in this chapter 26 9 1 Log Classes The following table shows information on log classes Table 124 Log Cl...

Страница 315: ...s FTP Upload Copy Sync Button ERROR USB s Backup Folder Does Not Exist Copy Sync Button ERROR USB s Target Folder Does Not Exist Copy Sync Button ERROR USB Sync Failed at s It is a Folder in Internal...

Страница 316: ...2P upload rate to d KB s by user Download Service INFO Download service set max download slot to d Download Service INFO Download service set seeding time to d minutes Download Service INFO Download s...

Страница 317: ...work NOTICE Port Group on s is changed Renew DHCP client Network NOTICE Account pppoe was changed Network NOTICE Add account pppoe Network NOTICE ADD interface ppp0 Network NOTICE Interface ppp0 will...

Страница 318: ...ystem Busy Using Volume and RAID Please Reboot and Try Again Storage ERROR Create External Normal Volume s s FAILED Storage ERROR Rename External Volume to s FAILED Storage ERROR Scan External Volume...

Страница 319: ...Volume1 FAILED storage Info Expand Disk Group Disk Group 1 SUCCESS storage error Expand Disk Group Disk Group 1 FAILED System INFO NTP update failed System INFO NTP updates successfully from s System...

Страница 320: ...NFO Start to restore backup job s Backup Restore INFO Restore backup job s successfully Backup Restore ERROR Restore backup job s failed s Backup Restore INFO Start to restore backup job s from s Back...

Страница 321: ...onfiguration changes Back up the NAS configuration file before you make major configuration changes See Section 27 5 on page 336 Need to transfer data from your computer to the NAS after volume s have...

Страница 322: ...Refer to Section 27 3 8 on page 330 to see the screens Abort Job Select a backup job in the list and click this to stop the process if the backup job is currently active Activate Job Enable the select...

Страница 323: ...es from the source folder since the last backup The first backup is a full backup You can also do a full backup after several incremental backups Enter how many incremental backups the NAS runs before...

Страница 324: ...up or down through the folders files for a folder means all sub folders and files and new folders files added later will be backed up for a file means the file will be backed up a grayed out check bo...

Страница 325: ...Address Username always admin Remote Admin s Password Click Show target content to connect to the remote NAS so you can select the target share for the backup For Rsync The remote device must be a NAS...

Страница 326: ...ally need this feature before enabling it Bandwidth Restrict the bandwidth of synchronization backups to help stop them from using all of your network connection s available bandwidth This is more imp...

Страница 327: ...hen the NAS performs the backup job Start Time hh mm This is available if you selected Daily Weekly or Monthly as your backup frequency Select the time in hour minute format when you want the NAS to p...

Страница 328: ...her internal or external the backup files are stored If the target location is a remote NAS this shows the remote IP address Target Path This field is read only and shows the target folder for the bac...

Страница 329: ...ups for n day s 1 3650 Enter a value n from 1 to 3650 to specify how many days the NAS stores all backup files After this day has expired all backup files will be deleted Next Click this to go to the...

Страница 330: ...erform the backup job Step 2 Please select the day of the month This is only available if you selected Monthly as your backup frequency Select the day in a month when you want the NAS to perform the b...

Страница 331: ...p 3 Use this screen to select the location in the NAS where you want to restore your backup Figure 209 Protect Backup Restore Archive Step 3 Table 136 Protect Backup Restore Archive Step 2 LABEL DESCR...

Страница 332: ...target and start restoring Original Location Select this to restore the files to their original location in the NAS Other Location Click this to select a folder where you want to place the restored f...

Страница 333: ...backup Click Browse to select the backup file IP Address Enter the address of the NAS you want to use User Enter the username you use to access the NAS Password Enter the password of your NAS account...

Страница 334: ...ackup you want to restore you can see a list of all the backups you performed in the Job Name table If you selected Internal or External Volume for the backup you want to restore you can see a list of...

Страница 335: ...ere you want to restore your backup Figure 213 Protect Restore Step 4 Table 140 Protect Restore Step 3 LABEL DESCRIPTION Step 3 Please select which file s folder s to restore Folder Chooser Select the...

Страница 336: ...e NAS password then use the RESET button see Section 1 7 on page 17 to return the NAS to the factory default configuration Note Configuration File Backup and Restoration does not affect data your file...

Страница 337: ...S External USB Drives Storage Firmware File Transfer Networking Some Features Screens Do Not Display Media Server Functions Download Service Functions Web Publishing Auto Upload Package Management Bac...

Страница 338: ...rned on The NAS must be turned off before you remove or install the hard disk 1 Turn the NAS off remove the front panel and make sure there is a SATA I or SATA II 3 0 Gbit s compatible hard disk insta...

Страница 339: ...ilure occurs during the active download period the NAS will verify whether the downloaded files were damaged If a file is corrupted the NAS will download the file again If the file is intact but not c...

Страница 340: ...cted and each has a unique name Alternatively if you have a DHCP server on your network and you can access it s list of assigned IP addresses you could see which IP address belongs to which NAS You ca...

Страница 341: ...each connection To connect through the wired Ethernet connection use the wired Ethernet connection s IP address To connect through the wireless connection use the wireless connection s IP address Mak...

Страница 342: ...urity 2 Click the Custom Level button 3 Under Script ActiveX controls marked safe for scripting make sure that Enable is selected the default 4 Click OK to close the window Figure 215 Security Setting...

Страница 343: ...Utility to initialize your NAS See Chapter 2 on page 19 for more information Check that you entered your login name and password correctly Check that the share exists and check its access settings Che...

Страница 344: ...re has an ANONYMOUS or EVERYONE access right If the user is already logged into a share using her username and password she will NOT be able to access a share that has ANONYMOUS FTP only access rights...

Страница 345: ...d with the share s specific files and or folders Account names added to the list are linked to the files and folders that they are allowed to access along with what kinds of actions they are allowed t...

Страница 346: ...y local computer or storage device to the NAS After you initialize your hard disk you can directly access the folders in your NAS and transfer files in the same way you transfer files in your local co...

Страница 347: ...he media files in the published shares No user name and password or other form of security is used The media server is enabled by default with the video photo and music shares published One of the com...

Страница 348: ...upports I published a folder with the media server function but the media client does not play some of the files or does not play them properly 1 Files with formats that are not supported on the media...

Страница 349: ...ver option If you uploaded many files it may take awhile for the NAS to find and list all of them Then try reconnecting your iTunes client I cannot use iTunes to play files located on my NAS 1 Make su...

Страница 350: ...folder that you have set All jobs triggered by RSS channels create the subfolder in using the channel name where it store all files downloaded from that channel where is a folder that you have set Ch...

Страница 351: ...about testing network connections 2 Click Maintenance Log to check the NAS s log for a message about the file 2a If the log message displays no such file or directory the file may have been removed fr...

Страница 352: ...on in the NAS 3 Make sure the file size does not exceed the limit imposed by the service At the time of writing Flickr restricts the file size to 10 MB and YouTube restricts the file size to 100 MB 4...

Страница 353: ...ve Google Drive stopped syncing 1 Make sure the NAS is connected to the Internet See Section 10 4 on page 107 for details about testing network connections 2 Check if you have exceeded the Google Driv...

Страница 354: ...CM not supported as a file format MP3 WMA M4A M4B MP4 3GP WAV OGG FLAC AAC MP2 AC3 MPA MP1 AIF ASF FLV DSD Images JPEG PNG TIF TIFF BMP GIF Video WMV MPEG2 MP1 MPG SPTS MP4 AVI VOB DivX 3GP VDR MPE DV...

Страница 355: ...latest information Please have the following information ready when you contact an office Required Information Product model and serial number Warranty Information Date that you received your device B...

Страница 356: ...n Pvt Ltd http www zyxel com pk Philippines ZyXEL Philippines http www zyxel com ph Singapore ZyXEL Singapore Pte Ltd http www zyxel com sg Taiwan ZyXEL Communications Corporation http www zyxel com t...

Страница 357: ...lgaria ZyXEL http www zyxel com bg bg Czech Republic ZyXEL Communications Czech s r o http www zyxel cz Denmark ZyXEL Communications A S http www zyxel dk Estonia ZyXEL Estonia http www zyxel com ee e...

Страница 358: ...com lt lt homepage shtml Netherlands ZyXEL Benelux http www zyxel nl Norway ZyXEL Communications http www zyxel no Poland ZyXEL Communications Poland http www zyxel pl Romania ZyXEL Romania http www z...

Страница 359: ...www zyxel co uk Ukraine ZyXEL Ukraine http www ua zyxel com Latin America Argentina ZyXEL Communication Corporation http www zyxel com ec es Brazil ZyXEL Communications Brasil Ltda https www zyxel co...

Страница 360: ...360 http www zyxel com me en North America USA ZyXEL Communications Inc North America Headquarters http www zyxel com us en Oceania Australia ZyXEL Communications Corporation http www zyxel com au en...

Страница 361: ...rference and 2 this device must accept any interference received including interference that may cause undesired operation Changes or modifications not expressly approved by the party responsible for...

Страница 362: ...r adaptor or cord is damaged it might cause electrocution Remove it from the device and the power source repairing the power adapter or cord is prohibited Contact your local vendor to order a new one...

Страница 363: ...n Produkt und oder seiner Batterie dazu beitragen nat rliche Ressourcen zu sparen und die Umwelt und die menschliche Gesundheit zu sch tzen El s mbolo de abajo indica que seg n las regulaciones locale...

Страница 364: ...Appendix C Legal Information Cloud Storage User s Guide 364 Environmental Product Declaration...

Страница 365: ...cretion of ZyXEL This warranty shall not apply if the product has been modified misused tampered with damaged by an act of God or subjected to abnormal working conditions Note Repair or replacement as...

Страница 366: ...download 222 235 preferences 223 protection 236 237 status 221 URL 222 FTP 213 215 262 activation 216 anonymous access 216 passive mode transfer 216 media server 214 216 configuration 217 iTunes serve...

Страница 367: ...rt 355 D date 210 desktop 41 disclaimer 361 discovery 20 disk S M A R T attributes 79 displaying user information 285 DLNA 214 234 DNS 106 108 documentation related 2 Domain Name System see DNS domain...

Страница 368: ...LS 188 passive mode transfer 216 FTP Uploadr 270 activation 270 bandwidth limit 273 configuration 272 grace period 273 server entry 271 FTPES 214 FTPES FTP over explicit TLS SSL 188 FTPS 188 262 G glo...

Страница 369: ...roup 210 NAS Starter Utility 19 navigation panel 140 network 106 DNS 106 108 IP address 106 PPPoE 107 111 119 TCP IP 107 notifications download service activation 219 notifications download service 23...

Страница 370: ...level Flickr 267 schedule power management 304 scheduling download service 225 secure connections 182 server Syslog 243 TFTP 250 server entry FTP Uploadr 271 server name 209 setup COPY SYNC button 23...

Страница 371: ...fo hash 230 trackers 230 Transport Layer Security see TLS troubleshooting domain user 345 domain user share access 345 file access 345 folder access 345 forgot password 340 341 LED indicators 337 LAN...

Страница 372: ...n panel 140 status 139 web publishing 215 230 240 activation 230 example 238 port number 240 troubleshooting 350 web security 182 workgroup name 210 Y YouTube 262 access rights 269 activation 263 auth...

Отзывы: