background image


© 2016 ZOLL Data Systems, Inc. All rights reserved. 

68 

CONFIDENTIAL TRADE SECRETS – DO NOT DISCLOSE.


Z

O

L

L


D

o

c

u

m

e

n

t

a

t

i

o

n


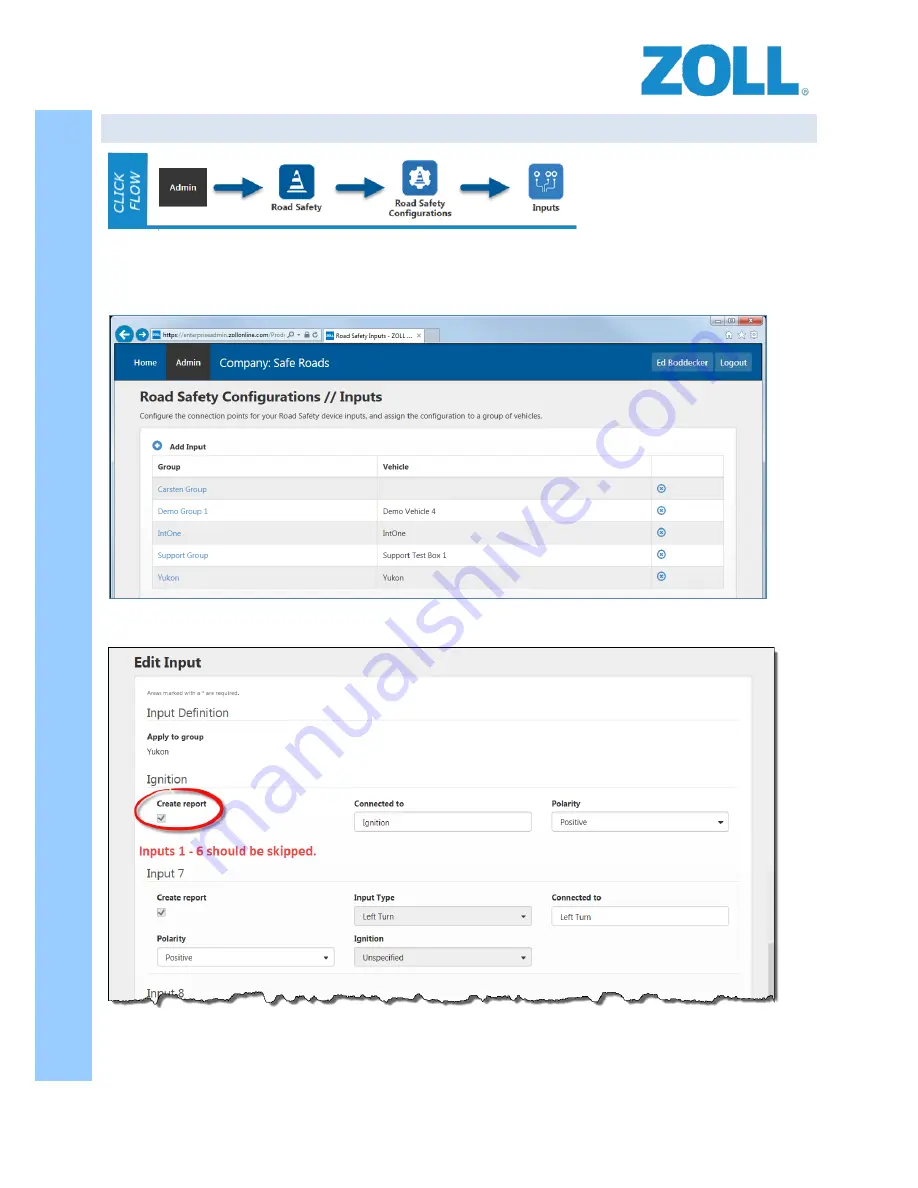
8. ROAD SAFETY CONFIGURATIONS SCREEN - INPUTS 


Here you will configure the connection points for your Road Safety device inputs, and assign them to a Group of 
vehicles (previously defined).  

Click the vehicle group your vehicle is assigned to (or add a new set of inputs). 


Put a check in the Create Report box. The inputs must be assigned as follows: 


Содержание Road Safety RS-4000

Страница 1: ...Road Safety RS 4000 System Overview and Installation Version 4 13 ZO 5 2 0 85 Updated 6 28 16...

Страница 2: ...2016 ZOLL Data Systems Inc All rights reserved i CONFIDENTIAL TRADE SECRETS DO NOT DISCLOSE Z O L L D o c u m e n t a t i o n...

Страница 3: ...configured using the web based ZOLL Online Road Safety application Failure to complete 1 2 for every unit will result in a non functional vehicle s ZOLL Online s Road Safety application is the back e...

Страница 4: ...include all of the necessary information needed to setup the devices and make them operable addition details and training on the full scope of the Road Safety product is available at no additional ch...

Страница 5: ...ontroller Area Network Buses CAN 3 VCAN 4 ZCAN ZOLL CAN 4 Vehicle Dynamics 4 GPS 4 Accelerometer 4 Inputs Outputs 4 Digital I 0 4 Single Ended Inputs 4 Differential Inputs 4 High Speed Inputs 4 Digita...

Страница 6: ...Emergency Lights Input 25 STEP 14 Connecting Siren Inputs 25 STEP 15 Connecting the Power and Ground Inputs 26 STEP 16 Connecting the chassis Grounds 26 STEP 17 Connecting Digital Outputs 26 STEP 18 C...

Страница 7: ...roup Settings 64 8 Road Safety Configurations screen Inputs 68 9 Road Safety Configurations screen Devices 71 10 Vehicle Installation Verification 72 Appendix F Digital Ally RS 4000 Trigger connection...

Страница 8: ...ystem components Personal injury hazards such as needle sticks and biological hazards may be present and the installers should be aware of the procedures to avoid injury Oxygen Cylinders Prior to star...

Страница 9: ...JB Kwik epoxy or equivalent product Lead free solder 16 18 gauge Butt splices Wire loom and RTV Silicone if installing roof mount antenna RECOMMENDED TOOLS Drill with screwdriver bits 1 2 1 step bits...

Страница 10: ...as 1 802 11 b g n Wi Fi capability The system identifies and databases activities by vehicle Optional driver identification allows the system to also record and store activities by driver The system a...

Страница 11: ...gital Inputs 1 analog input and 2 digital outputs SINGLE ENDED INPUTS 16 single ended inputs are available referencing 0 VDC common Input Voltage for Logic 1 8 18VDC Absolute Maximum 40 Volts Maximum...

Страница 12: ...Shock Not Operating 30g Peak Acceleration 11 1ms Pulse Width Vibration Tested 5g 1 500Hz per IEC 68 2 6 RS 4000 DIGITAL ALLY INTEGRATION The Digital Ally video recording system DVM 250 250 is an in v...

Страница 13: ...eness and condition Any shortage or damage should be documented and immediately reported to the ZOLL support team at 1 800 663 3911 or support zoll com RS 3211 R Driver ID Receptacle RS 3212 6 Driver...

Страница 14: ...eserved 7 CONFIDENTIAL TRADE SECRETS DO NOT DISCLOSE Z O L L D o c u m e n t a t i o n RS 0202 WiFi Antenna RS 4203 GPS Antenna RS 4301 Speaker RS 4902 Unsafe Reverse Spotter Switch Kit Additional opt...

Страница 15: ...THAT CAN BE PURCHASED FROM ZOLL BY THE AGENCY RS 2213 Driver ID Programmer Kit RS 3212 25 Driver ID Tags Package of 25 RS 3144 Sprinter Harness RS 4105 Standard I O Harness RS 4106 Mercedes Sprinter D...

Страница 16: ...sight line out the rear window and one switch mounted outside the vehicle near the left or right taillight assembly depending on agency policy NOTE Switches should be placed in similar positions on a...

Страница 17: ...e within the OEM imposed length limit for the OBDII CAN cable of 16 feet 4 87 meters Extensions to the cable are not recommended or supported by ZOLL DO NOT modify the cable RS 4202 WINDOW MOUNT GPS A...

Страница 18: ...OTE The panel should not be greater than 3 16 4 76mm thick and have sufficient room behind it to fit without interference A 13 16 hole is required Connects to RS 4000 On Board Computer via the Standar...

Страница 19: ...2016 ZOLL Data Systems Inc All rights reserved 12 CONFIDENTIAL TRADE SECRETS DO NOT DISCLOSE Z O L L D o c u m e n t a t i o n CONNECTIVITY OVERVIEW See Appendix C for wiring assignments...

Страница 20: ...ve a tenant account configured in ZOLL Online Customers using multiple ZOLL Online applications will use the tenant already in use for their other products It is not the responsibility of the vehicle...

Страница 21: ...wing the below work flow STEP 1 VEHICLE INSPECTION Complete a thorough interior and exterior inspection of the vehicle with the customer using the Vehicle Inspection Diagram Form 1 and the ZOLL Road S...

Страница 22: ...d verify adequate clearance Ensure that you disconnect all wiring from the seat per the manufacturer s recommendations before removing from it from the vehicle Ensure that you have clearance on the co...

Страница 23: ...nments and possible connection locations Make sure the wires do not interfere with moving parts contact sharp edges and are long enough to reach the wire connection point without stress RS 4101 Power...

Страница 24: ...and Form 3 Build Sheet for wiring assignments NOTE You may have received a newer version of these harnesses where all the input wiring is located on one harness In this case the expansion harness will...

Страница 25: ...rt to the matching receptacle on the ZOLL OBDII cable Secure all wiring to prevent interference with vehicle foot controls or any other moving components under the dash Typical Routing Connect inline...

Страница 26: ...unting holes and the speaker wire access hole 3 Using a 3 16 drill bit drill the hole for speaker wire access and for the 2 mounting screws 4 Pass the speaker wires through the access hole and using t...

Страница 27: ...e driver s seat Drill a hole through the panel at the chosen location using a 13 16 or 20mm drill bit See Appendix C and Form 3 Build Sheet for wiring assignments 1 Feed the wires into the hole and th...

Страница 28: ...r switch location in the patient compartment overhead to check for clearance prior to drilling the 5 8 diameter hole for the interior switch and to make the wiring connections 2 After making connectio...

Страница 29: ...2016 ZOLL Data Systems Inc All rights reserved 22 CONFIDENTIAL TRADE SECRETS DO NOT DISCLOSE Z O L L D o c u m e n t a t i o n Spotter Switch Connectivity...

Страница 30: ...assembly using two part epoxy JB Weld Quick This part remains stationary and is usually secured to the floor or seat 5 The actuator magnet is installed on the buckle itself using two part epoxy JB Wel...

Страница 31: ...ive composite A windshield mounted radio antenna is already in place CAUTION Do not place the antenna where it may interfere with the driver s vision Some states prohibit mounting anything on the wind...

Страница 32: ...on point and solder splice the connection Tape the splice and secure the wiring STEP 12 CONNECTING THE PARKING BRAKE INPUT Locate the Green Tan wire in the input harness used for monitoring the revers...

Страница 33: ...nections Tape the splices and secure the wiring Caution Do not connect any Road Safety ground connections to any existing vehicle connections The exception would be a connection to a ground lug or gro...

Страница 34: ...n completion of a download while the vehicle is connected to the access point ETHERNET CONNECTION To connect the RS 4000 to the vehicle s cellular modem route an Ethernet cable from the RS 4000 s Ethe...

Страница 35: ...re available just continue to scroll in one direction or the other until the appropriate letter number or symbol is displayed press ENTER to select 11 Save your changes a From MAIN MENU press DOWN ARR...

Страница 36: ...L Data Systems Inc All rights reserved 29 CONFIDENTIAL TRADE SECRETS DO NOT DISCLOSE Z O L L D o c u m e n t a t i o n 3 Click the START button in the lower right corner of the screen 4 Click on CONTR...

Страница 37: ...2016 ZOLL Data Systems Inc All rights reserved 30 CONFIDENTIAL TRADE SECRETS DO NOT DISCLOSE Z O L L D o c u m e n t a t i o n 5 Click on NETWORK AND SHARING CENTER 6 Click on CONNECT TO A NETWORK...

Страница 38: ...o n 7 Find the name of your access point and select it Note the SSID on your SAMPLE INSTALLATION FORM for future reference 8 Enter the network security key for the selected network and then click OK...

Страница 39: ...2016 ZOLL Data Systems Inc All rights reserved 32 CONFIDENTIAL TRADE SECRETS DO NOT DISCLOSE Z O L L D o c u m e n t a t i o n 10 Click on the WIRELESS PROPERTIES button...

Страница 40: ...CASTING ITS NAME SSID Then click OK 12 Test your connectivity by opening Internet Explorer and navigating to a web page such as http www zolldata com 13 If your settings are correct the ZOLL Data webp...

Страница 41: ...is connected to a cellular modem without an SSID and the modem has more than one Ethernet port connect your laptop to the open Ethernet port If the RS 4000 is connected to a cellular modem without an...

Страница 42: ...nnected check the status of the following top to bottom a Version matches version displayed on the RS 4000 screen b Settings Downloaded c Settings Applied d GPS Available e Send Cache Size f DAQ Port...

Страница 43: ...n t a t i o n Sample screen shot with all items in the GREEN Note the items with the are just versions keys or serial numbers and cannot be modified Screen shot the above and the event tab after cycl...

Страница 44: ...RS 4000 accelerometer and gyro must be calibrated to prevent erroneous force measurements from being created 1 Ensure the vehicle is on a flat and level surface 2 Calibrate the unit using option 11 o...

Страница 45: ...riate tones are present if used Login Reverse spotter switch Seatbelt Over force and Over speed if safe to do so If the vehicle was configured to communicate via the vehicle s cellular modem data will...

Страница 46: ...lers spending time attempting to troubleshoot and repair conditions that were pre existing and identify vehicle systems that may have been impacted during the install and will need to be corrected bef...

Страница 47: ...2016 ZOLL Data Systems Inc All rights reserved 40 CONFIDENTIAL TRADE SECRETS DO NOT DISCLOSE Z O L L D o c u m e n t a t i o n FORM 1 VEHICLE INSPECTION DIAGRAM...

Страница 48: ...2016 ZOLL Data Systems Inc All rights reserved 41 CONFIDENTIAL TRADE SECRETS DO NOT DISCLOSE Z O L L D o c u m e n t a t i o n FORM 2 VEHICLE INSPECTION FORM...

Страница 49: ...2016 ZOLL Data Systems Inc All rights reserved 42 CONFIDENTIAL TRADE SECRETS DO NOT DISCLOSE Z O L L D o c u m e n t a t i o n FORM 3 BUILD SHEET...

Страница 50: ...2016 ZOLL Data Systems Inc All rights reserved 43 CONFIDENTIAL TRADE SECRETS DO NOT DISCLOSE Z O L L D o c u m e n t a t i o n FORM 4 POST INSTALLATION VERIFICATION WORKSHEET...

Страница 51: ...2016 ZOLL Data Systems Inc All rights reserved 44 CONFIDENTIAL TRADE SECRETS DO NOT DISCLOSE Z O L L D o c u m e n t a t i o n FORM 5 SERIAL NUMBER ASSIGNMENT FORM...

Страница 52: ...nvironmental hazards NOTE Location should be within 16 feet of the driver s side dashboard There is an OEM limit of 16 feet for the OBDII CAN Harness RS 4902 Spotter Switches When pressed a tone alert...

Страница 53: ...ty to the ignition switch NOTE The panel should not be greater than 3 16 thick and have sufficient room behind it to fit without interference Connects to On Board Computer Plug 16 Pin 1 and 9 RS 4301...

Страница 54: ...rientation Index Number to use for your installation When mounting the unit ensure it is level perpendicular or vertical and either parallel or square to the centerline of the vehicle Orientation Inde...

Страница 55: ...tabs are on the bottom and parallel to the floor ZOLL logo and screen facing up The ambulance is shown as a reference to how the RS 4000 would be mounted inside the vehicle Orientation 1 default ZOLL...

Страница 56: ...5 8 The On Board Computer s mounting tabs are on top and parallel to the floor ZOLL logo and screen facing down mounted under a shelf Orientation 5 ZOLL logo DOWN connectors facing FRONT Orientation...

Страница 57: ...DEX 9 12 The On Board Computer is mounted vertically perpendicular to the floor ZOLL logo and screen facing forward wall mounted Orientation 9 ZOLL logo FRONT connectors facing UP Orientation 10 ZOLL...

Страница 58: ...On Board Computer is mounted vertically perpendicular to the floor ZOLL logo and screen facing rearward wall mounted Orientation 13 ZOLL logo facing REAR connectors facing UP Orientation 14 ZOLL logo...

Страница 59: ...n Board Computer is mounted vertically perpendicular to the floor ZOLL logo and screen facing left right wall mounted Orientation 17 ZOLL logo facing LEFT connectors facing UP Orientation 18 ZOLL logo...

Страница 60: ...Board Computer is mounted vertically perpendicular to the floor ZOLL logo and screen facing right left wall mounted Orientation 21 ZOLL logo facing RIGHT connectors facing UP Orientation 22 ZOLL logo...

Страница 61: ...2016 ZOLL Data Systems Inc All rights reserved 54 CONFIDENTIAL TRADE SECRETS DO NOT DISCLOSE Z O L L D o c u m e n t a t i o n This page left intentional blank...

Страница 62: ...e 11 Reverse Grn Blk Various Back Up Light circuit 12 Parking Brake Grn Tan Parking Brake Switch BCM 13 Emerg Lights Grn Gray Switched side of Pri Sec Circuit 14 Neutral if used Grn Vio Varies per veh...

Страница 63: ...r this value is 29 500 pulses per mile This value is used directly as the scale value for vehicle speed CALIBRATING SPEED AND RPM SCALE VALUES For a variety of reasons including inevitable differences...

Страница 64: ...guration Options You can set Configuration options for High Speed RPM Connection Type by using ZOLL Online In ZOLL Online go to Administration Road Safety Road Safety Configurations Devices and then c...

Страница 65: ...th a target RPM value in the range of 1500 2000RPM 4 Calibrating Speed Again open the High Speed Calibrator window by clicking on the wheel icon in the Diagnostics Viewer First choose Speed from the H...

Страница 66: ...e speed and RPM match between the vehicle and RS4000 by comparing values on the vehicle speedometer to values displayed in Diagnostic Viewer s SxS tab Note that Diagnostic Viewer always displays speed...

Страница 67: ...BE PERFORMED PRIOR TO THE COMPLETION OF THE IN VEHICLE INSTALLATION OF THE DEVICE 1 SUPPORTED BROWSERS ZOLL Online supports the most current versions of the following browsers Google Chrome Most recen...

Страница 68: ...lication are accessed via the Administration section As seen in the screen shot above the initial page to which you re taken once logged into ZOLL Online is the My Products page You can see the Admini...

Страница 69: ...clicking on Administration or Admin you re taken to the screen where you can select the product you wish to administer The selections here will vary based upon which ZOLL products the agency uses Obvi...

Страница 70: ...ther edit the vehicles that already exist by clicking on their Vehicle Name or click the Add a vehicle plus button to create a vehicle Items marked with an are required enter other information as need...

Страница 71: ...ad Safety and then Road Safety Configurations Here you can see all of the different sections that can be configured to customize the Road Safety application for the agency To configure the group setti...

Страница 72: ...ings page allow for the customization of alarm notifications for the driver set warning ranges and more Section Settings NOTE Based upon our experience with the system and consultations with our clien...

Страница 73: ...ta Systems Inc All rights reserved 66 CONFIDENTIAL TRADE SECRETS DO NOT DISCLOSE Z O L L D o c u m e n t a t i o n RPM values will obviously vary greatly based upon different factors and discussed wit...

Страница 74: ...f configured here in Road Safety the GPS information acquired from the RS 4000 will be sent to the destinations from ZOLL Online If this setup is requested by the agency they will be required to provi...

Страница 75: ...AD SAFETY CONFIGURATIONS SCREEN INPUTS Here you will configure the connection points for your Road Safety device inputs and assign them to a Group of vehicles previously defined Click the vehicle grou...

Страница 76: ...2016 ZOLL Data Systems Inc All rights reserved 69 CONFIDENTIAL TRADE SECRETS DO NOT DISCLOSE Z O L L D o c u m e n t a t i o n...

Страница 77: ...gurations Input Input Type Connected to 1 5 Skipped 7 Left Turn Left Turn 8 Right Turn Right Turn 9 Brake Brake 10 Spotter Spotter 11 Reverse Reverse 12 Parking Brake Parking Brake 13 EmergencyLights...

Страница 78: ...dow and select the serial number that is being installed in the vehicle This must match the serial number on the RS 4000 2 In the RPM Connector Type field 2 specify either Vehicle Computer or High Spe...

Страница 79: ...one final system test to ensure the functionality of the vehicle s Seeing report s populated with data from each vehicle is a good indication that the system is up and functioning properly Follow thes...

Страница 80: ...ria i Type The report type should be Second by second to see the exact data being sent to the system ii Description Something like RS Installation Test will work fine This report can be removed after...

Страница 81: ...ngitudinal G Force Lateral G Force and RPM are all toggles that can be clicked to enable or disable their display on the report In our example only Event Red Blocks and Speed Blue Line are being displ...

Страница 82: ...tion Test report the installer can simply edit this report for the next vehicle they wish to test From the My Reports list they would simply click the edit button and change the vehicle they wish to v...

Страница 83: ...devices DVM 250 250 INSTALLATION 1 If possible the installation of the DVM 250 250 should be done simultaneously with the RS 4000 s Running cables and making connections for both devices is obviously...

Страница 84: ...L L D o c u m e n t a t i o n DVM 250 250 Basic Wiring Diagram If the Digital Ally orange input wire Sensor 2 is already in use any of the other available input wires can be used Using a wire sensor o...

Страница 85: ...Configuration Manager from Digital Ally Visit http www digitalallyinc com and click on the customer portal button at the top right portion of the page 2 Sign up for an account if you have not already...

Страница 86: ...d by just pressing OK THE GENERAL TAB 1 Location Set the appropriate time zone and desired date format using the drop down 2 Display Generally the defaults for these settings work fine 3 Power a Ignit...

Страница 87: ...of time after an event that will be recorded Adjust this value as needed Remember that the actual event video will have a combined length of the Pre Event Buffer Time and the Triggered Record Time If...

Страница 88: ...Digital Ally devices can trigger a recording based upon vehicle movement In addition to trigging a recording based upon vehicle movement the Digital Ally system can also trigger a recording based upo...

Страница 89: ...below Until they ve been configured following the procedure below the sensor will be named Sensor 1 and Sensor 2 Sensor 1 This sensor is reserved by Digital Ally for a vehicle reverse or backup sensor...

Страница 90: ...ve button DO NOT change the name of the configuration file The filename must remain deviceconfig there is no file extension 2 Remove the External SD card from the DVM 250 250 camera 3 Load the SD card...

Страница 91: ...eos To access the internal continuously looped video you will need to connect the camera to a computer via the USB connection on the back of the camera The camera s storage will be accessible as a rem...

Страница 92: ...connection of a monitor mouse and keyboard to the RS 4000 Details on this method can be found on page 28 b Wirelessly This method can be used if both the RS 4000 and a desktop laptop computer are on...

Страница 93: ...Seatbelt 011 Overspeed Emergent 017 Extreme Overspeed Emergent 030 Overspeed Non Emergent 024 Extreme Overspeed Non Emergent 050 Coordinated Turn 043 Coordinated Turn 071 Turn Factor One 064 Turn Fac...

Страница 94: ...0 to boot up the green LED will be solid when it s complete 3 Manual Record Test a Press the RED RECORD button on the front of the mirror b SUCCESSFUL TEST The red status indicator will blink indicati...

Страница 95: ...m e n t a t i o n RS 4000 DIGITAL ALLY TROUBLE SHOOTING SUMMARY This following excerpt is taken directly from the troubleshooting section of the Digital Ally installation guide For additional assistan...

Страница 96: ...2016 ZOLL Data Systems Inc All rights reserved 89 CONFIDENTIAL TRADE SECRETS DO NOT DISCLOSE Z O L L D o c u m e n t a t i o n APPENDIX G INSTALLATION QUICK REFERENCE SHEET...

Отзывы: