INSTRUCTION MANUAL CENTRAL COMMAND STATION MX10, MX10EC Page41
10.
Interlocking Program “ESTWGJ” on the MX10
ESTWGJ
) provides a prototypical display of interlock-
ing (since 2018 also electronic interlocking) in a model interlocking. Main tasks are the prototypical
processes for controlling and solving for train and shunting lines.
ESTWGJ is compatible with Windows XP, 7, Vista, 8, 10 (and future versions); preferably use the
newest version, because its functionality is considered when developing.
The connection between computer and MX10 can be established via USB or LAN (also WIFI). The
simplest is the connection via LAN and also the most effective in usage (USB connection see descrip-
tion in the following chapter).
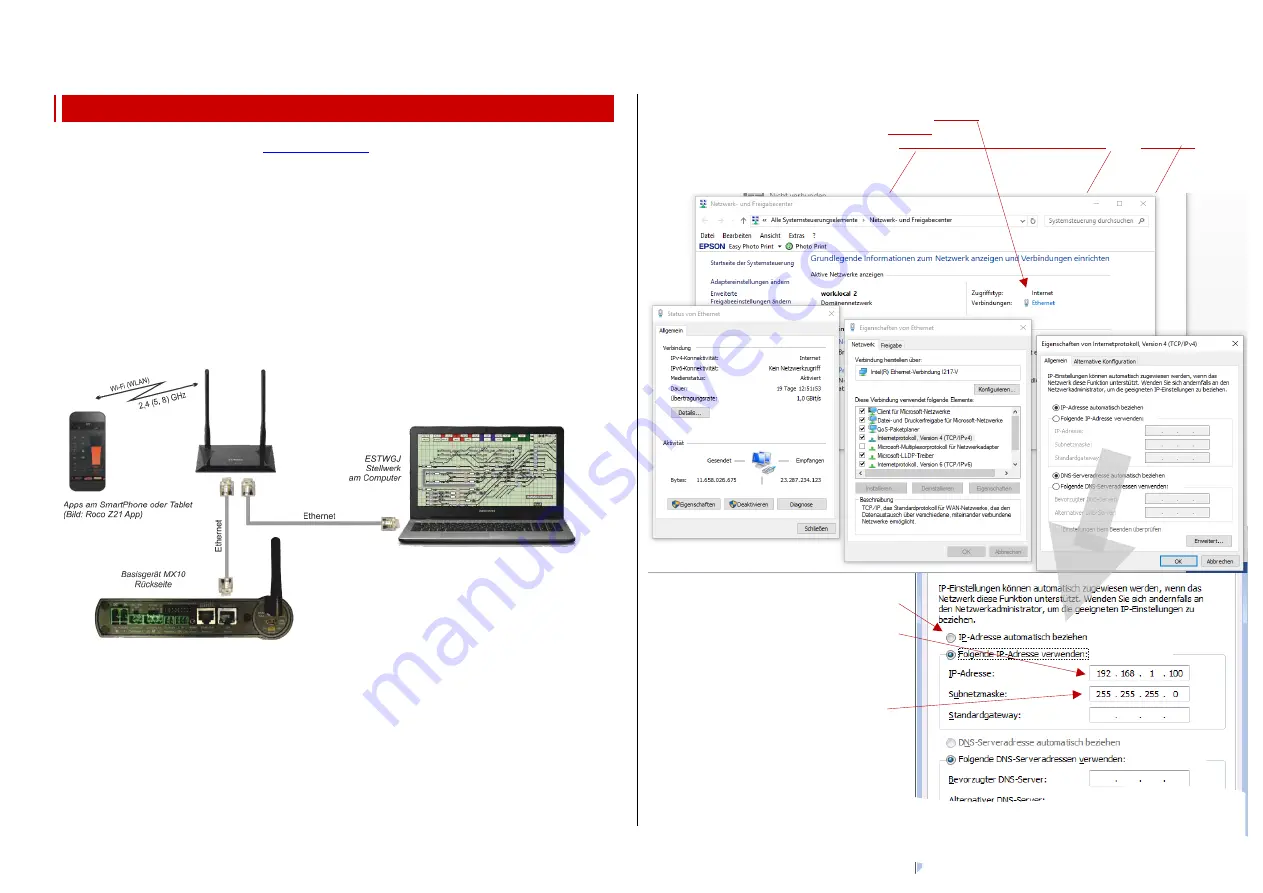
The ethernet or LAN cable leads from the LAN socket on the back of the MX10 either
- directly to the computer (it must have an individual IP address, see below), or
- if at the same time an external WIFI router is used, e.g. for the Roco App, it leads to the WIFI router.
The router can be connected via another ethernet cable or WIFI. The router assigns IP addresses to
the connected devices. The MX10 has to have an IP address that corresponds to the range of static
IP addresses of the router (see instruction manual of the router).
Necessary actions on the computer when connecting it directly via LAN cable:
Only use crosslink LAN cables.
The PC / Laptop has to have a
static
IP address
corresponding to the principles described below.
In case of a firewall, it has to be ensured that the MX10 sends data via the UDP ports 14520 (PC
sends) and 14521 (PC receives commands; these ports are configured by default in the MX10 and can
be changed in the MX10 menu under “PC Monitor” / “Z20 Rx”) to the PC.
There are different possibilities to get to the window for the “Internet protocol settings, Version 4
(TCP/IPv4)”, in which the actual settings can be done, among them the following (Windows 10):
Calling-up (e.g. Windows button, -> “Windows settings” -> “Networks and Internet”) to
- Window “Network and Sharing Center”: clicking on “
Ethernet
“ leads to
- Window “Status and Ethernet”: clicking on “
Settings
“ leads to
- Window “Properties of Ethernet”: clicking on “
Internet protocol, Version 4 (TCP/IPv4)
“ and “
Properties
“
leads to
- Window “Properties of Internet protocol, Version 4 (TCP/IPv4)”: here, the actual entries are made:
“192 168 1” has to correspond to the MX10 (default setting); subnet is set automatically
Last position “100” has to be different from the MX10 (it has “145”)
OK
ESTWGJ:
Basic configurations,
Digital system
Clicking on “
Use the following IP ad-
dress”
and enter
for example
192.168.1.100 *)
*) if “100” is already used by a device via
“LAN”, another value can be used
The box “Subnetmask” is filled
automatically (if not: enter 255.255.255.0).
OK, OK, OK, ...


