4 • Installation & Operation
Delivery Inspection
Zero Zone display cases are carefully factory-tested, inspected, and properly packed to ensure delivery in the best possible condition. The
equipment should be unwrapped and checked for damage immediately upon delivery. DAMAGE MUST BE NOTED AT TIME OF DELIVERY,
AND ALL CLAIMS FOR DAMAGES MUST BE FILED WITH THE TRANSPORTATION COMPANY, NOT WITH ZERO ZONE. The carrier will
supply necessary report and claim forms.
Do not leave, store, or hold case outdoors in direct sunlight or high ambient temperature. With the end panels on, the case is airtight;
the inside temperature of the case will increase, and the heat will be unable to escape. This could potentially cause any plastic inside
the case to deform or warp.
Packaging
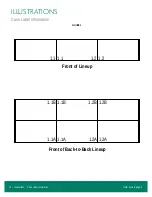
Each case in a lineup is labeled to identify the lineup and joint. The label uses a two digit number designation, separated by a decimal. The
first number indicates the case lineup. The second number indicates the case joint. Case joints begin with the number “1” at the left most joint in
the lineup when looking at the front of the lineup. The first case in the lineup will be labeled on the right end and the second case in the lineup
will be labeled on the left end. The numbers on each end to be joined will match, as indicated in the figure below. Back-to-Back cases have a
side “A” and a side “B”.
The
first
case in a lineup (with the right side labeled “x.1”) has a packet attached to the shelving that contains touch-up paint.
Every
case in
a lineup has a packet attached to the shelving that contains important information about the case and/or lineup and, if applicable, special
instructions for installing ordered options.
Bumpers and kickplates are shipped on top of the case. Shelves for the case are tie-wrapped and blocked into the individual cases. Other
accessories like drain traps, drain pans, condensate evaporation pans, and hat channel rails are shipped in the case that require the parts.
Materials for joining cases—including caulk, joining bolts, splices, and end filler posts—are shipped in each case to be joined.
The door is prevented from opening during shipment with the use of a door-holding shipping bracket. The bracket is screwed to the top of the
case at each door and should be removed when the case is unpacked.
Location
These cases must not be installed in the direct rays of the sun or near a source of radiant heat. Be certain that the floor under the installation is
of sufficient strength to prevent sagging. Uneven surfaces will result in reduced performance.
Cases should be set to allow a minimum 3" of space behind the back of the units. This will allow necessary air to circulate behind the
display cases and prevent condensation. Higher humidity stores with minimal air circulation require at least a 4" gap. A minimum 2" gap is
recommended between cases on end-to-end installations. All minimum spacing requirements may increase if seismic restraints are used.
Installation Leveling
A lineup solely made of freezers should be level front to back and right to left.
When joining a freezer and cooler in a short lineup, both cases should be tilted back with an additional 3/16" of shims under the front bases
after the case is leveled.
. On long lineups, the tilt back on the coolers should gradually increase while working
away from the cooler/freezer joint until the last case has an additional 3/8" of shims under the front base and the tilt back on the freezers should
gradually decrease to no additional shims while working away from the cooler/freezer joint.
Cases should be set level right to left to allow complete drainage of defrost water. Since a level floor area is seldom available, the following
steps are recommended to insure a level installation.
1.
Measure off and mark on floor the exact dimensions of the case lineup. (Check blueprints).
INSTALLATION & OPERATION
Содержание CRYSTAL MERCHANDISER
Страница 23: ...Illustrations RVLC30 Base Locations 21 Illustrations Figure 4 RVLC30 Base Locations Refer back to page 5...
Страница 24: ...22 Illustrations RVLC30BB Base Locations Illustrations Figure 5 RVLC30BB Base Locations Refer back to page 5...
Страница 25: ...Illustrations Case Squareness 23 Illustrations Figure 6 Case Squareness Refer back to page 5...
Страница 26: ...24 Illustrations Shim Placement Illustrations Figure 7 Shim Placement Refer back to page 5...
Страница 27: ...Illustrations Shim Orientation 25 Illustrations Figure 8 Shim Orientation Refer back to page 5...
Страница 29: ...Illustrations Spacer Block 27 Illustrations Figure 10 Spacer Block Refer back to page 6...
Страница 34: ...32 Illustrations Drain Line Illustrations Figure 15 Drain Line Refer back to page 7...
Страница 38: ...36 Illustrations Electrical Box Illustrations Figure 19 Electrical Box Refer back to page 11...


